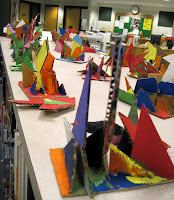
Making these cardboard sculptures with my 1st graders is one of my favorite projects. The kids learn the words sculpture, and abstract, and we discuss how they will use an interesting arrangement of shapes and color to create their sculptures. I cut up the cardboard shipping boxes that my supplies come in, so this is a great recycling project.


I posted more about this project last year here.
The materials and processes are simple:
I cut 4"x 6" rectangles for the bases, and then hack the rest into assorted shapes, using an old 'workhorse' paper cutter. Then, glue is squeezed onto the corner of the base, and a pop stick is used as a 'glue paintbrush'. Students scoop the glue with the pop stick and spread it on the piece they plan to glue. They hold the piece in place and count to 10 to let the glue begin to take hold. We spent two sessions building and another 2 painting.
The boy who built the tall sculpture on the left below still needs to finish painting.


One REALLY IMPORTANT note: the glue should be Elmer's Glue-All, NOT Elmer's School Glue. They are not the same thing, and the School Glue will not hold and the kids will get frustrated. The Glue-All is MUCH stronger!
This year, a bunch of kids built out horizontally rather than building taller. Here's some examples:


Here's the projects all on display on top of the stacks in the elementary side of our school library - the kids were SO proud to see their work on display for the whole school to see.

Some kids finished painting early, so I gave them some paper for 'free choice' using the paint. Here's some examples of what they did:


Phyl, how many students do you have per grade, and how much storage space do you have for 3D projects? I'm just impressed that you are able to figure out the logistics of so many 3D projects!
ReplyDeleteI'm working on making more storage space in my classroom. I bought some closet shelves designed for shoes with PTO money so I'll have room when we do clay projects later this year (or when the drying racks overflow) but the shelves aren't very tall. I'm going to keep trying because I think it's important to add more 3D but I just don't know where I can *safely* put things for now when I have over 100 students in each grade, closer to 125 in 1st!
Katie, I'm lucky. Our school is small, with between 35 and 50 kids per grade level, and only 23 kindergartners! The first grade has I think 47 kids.
ReplyDeleteI "choreograph" to plan how to fit the 3-D work. I moved the 1st grade sculptures to the library as the papier-mache cats are taking over the world. The cats are stacked EVERYWHERE - I believe there are 49 of them. I have two cabinets I call "cages" for sculpture drying, and I also put them on top of the cabinets. I have some other sculptural stuff planned too and so I need to really keep the kids moving on getting those cats complete.
The cardboard sculptures are not be the storage problem of the papier-mache, as I load them onto trays that can be put on top of pretty much anything, and they are basically small. Gotta watch out for fire inspections though that they are all 2' from the ceiling.
I, too, always marvel at the number of 3D works you can accomplish at one time. Most of my grade levels are 120 - 135, so 3D stuff takes some MAJOR juggling!!! Great sculptures, Phyl.
ReplyDeleteAs always love these. Storage is always an issue. . . but if I can get them out of the room quickly and don't let a pile up happen I think I could try something this scale. They are so much fun!
ReplyDeleteThe kids did a great job, Phyl. I am amazed that they were done by first graders. I do that kind of sculpture with the 5th grades. On a side note to all of those folks who were asking how you store all of those sculptures,I have a tip. When the sculptures are dry, the next day, I throw them into gigantic clear trash bags I get from the custodian. I have the kids store the bag in their homeroom (the homeroom teachers just love me for this.....)and then they bring the bag with them the next week. While they are in the painting process, I have the kids carry them back to their class after art and put them on the windowsill to dry until the next week. I always make them out of very sturdy cardboard in case you were wondering how I am able to throw them all into a bag together before painting. It just free's up a LOT of space in the artroom.
ReplyDelete:)Pat
Ha ha Pat, I bet they do love you!
ReplyDeleteWhile mine are made of sturdy cardboard, sometimes the gluing is a little precarious - crazy balances etc - so I don't think these would fare so well in a bag.
Honestly, this lesson is PERFECT for 1st grade - they are willing to count out loud. Sometimes when they are gluing something crazy they count to really high numbers, and it's so cute listening to them figure it out! We look at the edges of the cut cardboard and note that the edges with parallel lines don't stick as good as the edges with a zigzag, if that makes sense. The kids take this seriously, and look for the zigzag side to glue.
Phyl,
ReplyDeleteI forgot to say that they don't get thrown into the plastic bag until the next day when they are completely dry:)
:)Pat