Pages

Sunday, January 31, 2016

A Good Day

Cool mask-in-progress, no?  But it wasn't made by one of my students.  On Friday, I spent the day at Elizabethtown-Lewis Central School, a little Adirondack school district, attending a Professional Development Day for North Country art teachers.  The art room in these pictures belongs to K-12 art teacher Terry Crowningshield, and the work in these photos is the work of her students.  Each time I'm in her classrooms, I feel like I'm home. Terry is a kindred spirit as an art teacher!
 The papier-mache masks in the pictures above are made on an armature of a plastic bag stuffed with newspaper.  Regular readers of this blog have likely seen plastic bag armatures for papier-mache before!  Here's the back of the mask shown at the top of this post, with the plastic bag still inside.  Below it is a picture of the insides of a mask once the bag has been removed.
 Here's the mask viewed from another angle, so that you can better see the facial features.
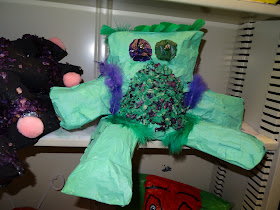
Another grade of Terry's students have been making goofy aliens from papier-mache, using the plastic air-filled "pillows" that you find in packages you've received in the mail.  Instead of popping them to remove the air, students taped them together to form their aliens and papier-mache'ed over them. Aren't they adorable?
 Here's some close-ups!
 This cutie-pie alien is even wearing earrings and carrying a purse!
On top of the cabinets, I noticed some plaster bandage people-in-motion sculptures, totally reminiscent of ones that my 6th graders made and that I've blogged about several times before  One of those posts can be found HERE.  Here's a couple of the sculptures that really interested me.
Part of our day was the opportunity to work hands-on using the media of our choice.  Terry, like me, likes to create large still life arrangements, with something different to offer from every side and angle.  I chose to do an 18"x 24" drawing with a large graphite stick, and then paint with some gouache paints that I own but haven't used in years.  The first photo below is of the still life view from where I was working.  The second photo is of my unfinished painting.  Looking at them both I notice a lot of mistakes in my artwork - though I guess my viewpoint while drawing was slightly lower than from where I took the photo.  Anyhow, it was great to have this opportunity!
 Hanging in the hallway were these adorable seahorses.  It's hard to tell from the photos, but they seahorses were glued on the paper with a little twist so that the bodies curved out three-dimensionally.  They were so adorable!
  There's so much more I could show you... but I'll close with this - a giant light bulb and a large candy package.  These again are projects I've done before!  Giant pop sculptures, including gridded enlarged candy bars!  Like I said before, I feel like I'm home in this art room! 
Thanks, Terry, for allowing all 29 of us into your classrooms for the day, and for taking the time to put together a great agenda, prepare the materials, and even make sure we were provided with morning muffins and beverages and a lunch so fabulous and large that I took half of it home and ate it for dinner tonight! 

Friday, January 22, 2016

Crafty Projects Around the House

lampshade completed!
This fall, after a visit to my brother in Cape Cod, we took a leisurely drive home through the back roads, stopping at antique and junk stores and scenic overlooks.  At one antique/junk stop, my husband found an old lamp, made from a cracked pitcher and wash basin, pictured below.  The lampshade, unfortunately, was stained and decaying. But he figured he could replace the shade, and that it would fit in beautifully with the many vintage pieces in our Adirondack camp.
He went online looking at lampshades, and it didn't take long to discover that to buy a new bell-shaped vintage-looking lampshade, it would easily cost triple what he had paid for the lamp.  Being that the pitcher has a crack, and that he would have to replace the wiring, it began to seem sort of ridiculous to have to invest big bucks in the shade.  So, silly me, I said "I'll make a new shade for you".  And I proceeded to strip the stained and brittle fabric off the lampshade frame.

Someone should have told me how challenging this would be.  I mean, I'd gladly  make another lampshade, but NOT one with a bell shape and scalloped bottom edge.  I went online, solicited advice, and found a tutorial I liked.  I dragged my husband to the fabric store (since it is HIS lamp, I wanted his approval).   He cleaned up the rust and spray-primed the bare lampshade frame.  And many, many, many hours later, after much measuring, pinning, wrapping, sewing by both machine and hand, and gluing  trim, the lampshade is complete, and I couldn't be prouder.
 For the trim, I really wanted to put a fringe on the bottom, but I couldn't find what I wanted locally, and was concerned that the color wouldn't match appropriately if I purchased it online.  So I dragged hubby back to the fabric store a second time, and he picked out this pretty beaded trim.  I'm not sure it was the best choice, putting a scalloped trim on a scalloped edge, but we are satisfied.
And here it is, all newly rewired, and assembled.  Isn't it cute? 
 Not all projects have to be so challenging!  This next project was a solution to a storage problem. We had gotten a new TV, and a Roku player, and found ourselves with a multitude of remotes.  I would leave them on the coffee table, and my neat-freak husband would shove them in a little drawer in the coffee table, where they inevitably got stuck.  So I found a little cardboard box, and raided my box of remnant fabrics and trims.  And with a little cutting and gluing, I made this:
 Isn't it cute?
 By the way, a little shout out for wonderful Sobo Fabric Glue that made both putting the trim on the lampshade and decorating the box so easy. 
 I even covered the bottom, to protect the coffee table!
 And look how perfectly all the remotes fit in the box!
 And one more project...  A while back (last year?), when I got my iPad Air, I got a new cover for it, too, and promptly began to decorate it with metallic and black Sharpies, and a white Sharpie paint marker.  And I stopped about halfway and never finished it.
Until a couple of days ago, when I was on hold on the telephone.  I got out the Sharpies, and finished it up!  Here's how it looks now, below. 
What little crafty projects have you been up to this winter?

Saturday, January 9, 2016

DragonWing Arts is back and we celebrated Silly Walks Day!

My business, DragonWing Arts, has been touch-and-go.  I don't like dealing with advertising and all the PR, so I guess I don't do it very well.  I had some great repeat students, but this year they were headed to 5th grade, which is in the  middle school, and their parents were worried that with the big change, they'd by too stressed (I know, that totally doesn't make sense; art class should is de-stressing!)  But luckily, I now have three new students and one repeater - all together, a second grader, two third graders, and one fourth grader.  All very sweet kids, it seems!  Look how cute they are!
Their first class was on Thursday, and I explained that it was International Silly Walks Day (courtesy of Monty Python, of course) and that we had to celebrate.  And they were willing participants!  Every time they had to walk somewhere - to wash up, to the bathroom, and so on, they silly-walked all the way!  When their parents picked them up after class, they must have been wondering what the heck was up when they saw their happy kids silly-walking to the cars!

These pictures, below, are for their licenses.  Licenses, you ask??  Well, they are obviously too young for a driver's license, so...  They will each have an Artistic License!  (Or a Creative License.  I'm still trying to decide which name I prefer.  Which do you  think is the better choice?) I've done a version of this before, but it was before I retired, and thus needs a DragonWing Arts update.
The licenses will be the size of a driver's license, laminated, and will have their photo on it.  It will give them permission to use their imaginations and powers of invention to represent things in original ways, and will encourage creative thinking.  I'll be putting them on key chains, if they want.
Meanwhile, we did a warm-up project and started another in our first class.  I run the classes in seasonal sessions of between 6 to 8 classes per session.  Each session's projects revolve around a specific theme.  My winter session is called "Matisse meets the Jungle - Bright Colors & Wild Beasts!"  Ironically, I've discovered that usually the parents haven't mentioned what the theme is at all.  The kids are happy to make absolutely anything!  But we are going to be doing a version of the "Fauve Fauve" project I posted about a few years ago, with some major variations, plus we are going to build papier-mache wild beasts, and much more, depending on time.  The 8 classes will go by really fast!

For our warm-up project, we used animal skin patterns or scales as a loose inspiration, and used a variation on a favorite unusual use of a common material.  You've read about us using pastel chalks on wet paper here.  This time, though, we used black acrylic paint to draw lines, and then used a paintbrush dipped in water to wet sections of the paper one at a time.  We used pastel chalk on the wet sections, to create a paint-like look.  (Thank you to Ginger, who blogs at Paintbrush Rocket, for the inspiration for brushing on the water rather than soaking the paper.)  Next time, we'll cover them with Mod Podge to seal the chalk and give the papers an overall gloss.  
 Remember, the animal skins or scales or fur were just a vague inspiration.  Then we used fauve inspiration for our color choices!  Above left, fish scales; right, snake skin.  Directly below, a combination of snake skin (diamonds), feathers, and spots!  And lastly, more snake skin!
Next week we'll start building our armatures for papier-mache wild beasts.  Who can imagine what they might be???  After all, we'll all have creative license!