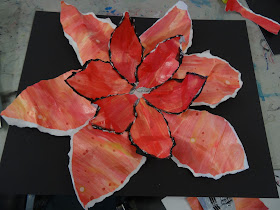
The workshop presenter was Phyllis Annett, a School Specialty Art Consultant. I first met Phyllis at our state convention several years ago, and because we share the same relatively uncommon name, we've chatted every year. Which is how we came to put together this busy workshop!
My favorite project from the workshop was the flower pictured at the top of the post, though her sample was much more complex and elegant than mine. We painted watercolor paper in bands of color, and when the paint was dry, we painted over it with a tempera varnish to seal. When that was dry, we tore flower petals and leaves to assemble into a flower, and glued them onto a piece of mat board. The painted and glossed watercolor paper was easily manipulated so that the leaves and petals could be bent and curled. Phyllis (the presenter) used Model Magic for the center of her flower, but I just used fringed scraps of my painted paper. Here's a closeup of the center.
Here's the table where we painted our paper.
The two incredible pieces directly below were the presenter's examples. I did my center differently because while I loved her flowers, her Model Magic centers made me think of golf balls!
And here's a couple of pieces made by some workshop attendees.
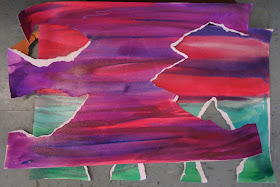
And I love this - it's someone's painted paper that petals have been torn from. I saw it on the floor, and I thought it looked like a mysterious landscape on another planet!We also did a project which uses layer of acetate, drawn on with Sharpie Paint Markers, inside a box. The layers are separated by 3 D-O's. Participants came up with great ideas for their layered artwork, but I had left this project for last and with limited time, just did layers of colors and swirls and such.
Here's a closeup. I think this project would be more effective if there were slots cut in the top of the box to allow light in between the layers. Maybe I'll take a mat knife to my box and try it out!
Look at this! Another workshop attendee was making a dragon lair! I absolutely love this, and would love to see how it turned out when completed.
The third project (yes, four hours, three lesson ideas to try out, and all materials provided for us by Sax/School Specialty!) was fun and easy. Small rectangles of black mat had been pre-cut in various dimensions, and we used the paint markers again to create a dimensional piece, by stacking small pieces of mat board under some of the pieces when it was glued together. OOPS this photo below is actually sideways!
Here's a couple of closeups showing the levels/layering.
I loved all the unique ideas and solutions to this project by the other workshop attendees, so I want to share some here. Look at this one, below. It's an absolute WOW!!
This one below looks like a fun whimsical solution!
And I'm especially intrigued by this solution below:
And this one, which takes the rectangles and makes them into circles by the way they are colored. I used to have a set of botanical tea mugs with covers, and these remind me of those mug covers!
And the dimensional approach to this one is very cool.
This one below was colored with Colorsticks around the images,and I really like the vivid turquoise color contrasting the black, and the images drawn with paint markers.
An interesting 4 seasons piece, made more interesting by the diagonal placement of some of the elements. I don't think it was done when I photographed it.
Another solution/approach:
And finally, this person took the clear acetate from the second project, and incorporated it into the third project. Very cool.


I like this flowers:)
ReplyDelete