Showing posts with label collage. Show all posts

Wednesday, November 20, 2019

Sunshine Collages

Tomorrow I'm headed to Binghamton NY for my state art teacher's convention where I'll be teaching a couple of workshops. I'll be be blogging about it in the coming week, but here's something else in the meantime. 
Last April I blogged here about how my DragonWing Arts students had made painted paper in warm and cool colors, to use in some sunshine collages we were making.  I never posted the finished products.  As it was, we ran out of time and had to take some short cuts in putting together the final pieces, but I still liked them a lot. I almost forgot to take pics, so I shot these in a hurry in very poor lighting. 
The kids had designed patterns on tracing paper for their suns, and were using them with their painted paper to cut and put together like puzzles.  But their ideas were WAY too complicated, so in the end, with no time left, we ditched the patterns, threw caution to the wind, and just started cutting and assembling!
 It was a challenge, but the kids were enthusiastic nevertheless!
 Here are the (somewhat) completed pieces.
 
The aftermath!
We've got some really fabulous new projects my students are working on now.  I'll be telling you more about them in the coming month, when the artwork is completed.  Now, I'd better go finish packing!!!  Hope to see some of you in Binghamton!


Saturday, March 2, 2019

Our Collages are Out of This World!!

.
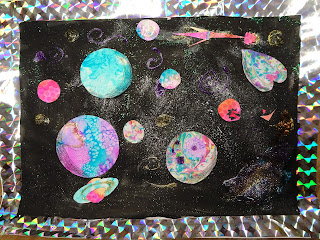
My DragonWing Art students have been experimenting with various paint techniques, with the results being made into planets for colorful "out of this world" collages. 
We began by painting large (18x24") pieces of paper with black ink, leaving unpainted borders about the thickness of a ruler. We also used some glittery purple paint on the ink, to add some sparkle.  When dry, white paint was spattered on with a toothbrush, to make more stars in space.
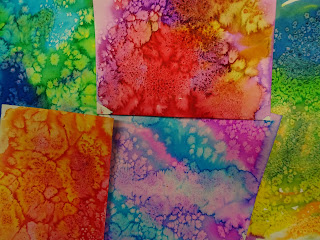
On small sheets of white paper, we used liquid watercolors in several ways to achieve interesting surface texture.
We used the watercolors with salt, 
With saran wrap,
And with bubble wrap.
 plus liquid watercolor and shaving cream for marbling.
We also used bleeding tissue paper applied with water, removing the tissue paper when dry, to create colorful blends.
 And finally, we printed some papers with slices of pool noodles and tempera paint.

 Often, our hands ended up getting printed, too!
 All the papers that were created were used to make into planets and more for our collages. 
We used various bottles, caps, bowls, cd's, rolls of tape, and more as circle tracers for planets.
We used black crayons to add shadows to our planets to make them look round.  This was easy for some of the students, and more challenging for others.
 I showed the students how to cut rings for planets if they desired. 
 And the students began merrily cutting planets for their collages, to glue onto their painted and spattered background papers.
I gave the students strips of holographic contact paper, that they used to create fancy borders for their papers.
I also had strips of glow-in-the-dark contact paper, which was used on the sides of the collage pictured below.
 Finally, I also offered the students some glitter glue.  The bottles hadn't been used in a while, and the glue often squirted out in wonky and unexpected ways, but still, the sparkle really jazzes up the skies!
There are currently 5 students in my DragonWing Arts class; I unfortunately neglected to photograph one of the final collages.  I'll photograph it in a few days, and then add the pic to this post.  In the meantime, here's one last pic.  

Saturday, November 11, 2017

Surrealism in Space!

I came across a really cool post on the Italian blog Arteascuola, and decided to adapt the project to use with my after school DragonWing Arts students.  Thank you to blogger Miriam Paternoster for her great idea!  You can find her post, HERE.

There were three parts to creating the final project.  But before we even started, we discussed surrealism and and looked at images by various artists.  We noticed that many of the paintings created a sense of space and depth by using perspective.  So of course we had to discuss what linear perspective is!  Then we were able to start.

Step 1 was creating the background, and outer space sky.  We painted with black ink, and let it dry.  Then we painted on some glittery purple paint (it was a free sample I was given at a convention, and the consistency is rather thin and jelly-ish and doesn't cover well at all, but it create a nice effect great over black).  We also splatter painted some white tempera paint.  When it was dry, metallic and glittery markers and colored pencils were used to add some planets and stars and such.

Step 2 was to create a simple room interior on a separate paper, using one-point perspective.  We used the vanishing point and our rulers to create a checkered pattern on the floor, and also to place some doors and windows.  The rooms were painted with liquid watercolors, and salt was added as desired o make a funk textural look to the walls and floor.  When the paint was dry, some details were added with Sharpie, and the windows and doors were cut open.  Some were cut out completely, and others were cut so that they could open and close.  The ceilings were completely cut away. 
Here we are, ready to cut out our ceilings and doors.  
The Sharpie embellishments haven't been added yet.
Step 3 was assembly and magazine collage.  The parts were glued together, and students picked images to put in their rooms and skies.  I was originally planning to cut a window flap in the skies, and take and print photos of the kids so they could be entering through the window.  Thank goodness I didn't tell the kids about this plan, since we ran out of time and never got to it!  The pic below shows the work created in steps 1 and 2, ready to be assembled.

The pics below are the finished pieces, after the magazine collage was added and everything was glued together.  (We used Elmer's Glue-All applied with a paintbrush.)   The pic at the top of the post is another of the complete pieces.

I have just 4 kids in the class this fall, which sometimes makes an odd dynamic.  I had great expectations for the kids putting things like giant hamburgers or ice cream cones or insects or tubes of toothpaste in the room or in the windows, or a fish flying through the sky, and so on. I made an example with a giant foot coming through a door, and a large hand reaching in a window, as well as a huge eyeball and a lizard, and a chocolate chip cookie.  I had loads of magazines - nature, home, and more, and so I was very surprised at the odd choices the kids ultimately made.  I've been teaching a long time, and usually kids would have been intrigued by my example but these kids had other ideas, decidedly different from my expectations.  But I think they are pretty cool, nevertheless!!!

Friday, November 4, 2016

Fall Favorite Art Projects

So here's the thing.  It seems a lot of art teachers right now have been immersed in seasonal projects involving pumpkins or owls.  But while I love the autumn, and I like seasonal artwork, my favorite seasonal lessons involve neither owls or pumpkins.  So today I'm going to share a couple of my fall faves with you.  I am retired, but these are projects I did while I was still teaching full time.  I never photographed the student work, but I still have my own samples, so I'll share them with you here.  I usually prefer to share student work, but today, this will have to do!
The two scarecrows above, and the one below, are all collages, and were made by me as samples for 3rd grade classes.  For the backgrounds (negative space) on the two above, students tore tissue paper into chunks. (The kids selected three colors to use, so if they wanted blue, turquoise and green, for example, that would have been fine; I chose autumn leaf colors for my samples.) Mod Podge or watered down Elmer's Glue-All was used to adhere it to heavyweight white paper.  Both work just fine. Students first painted the Mod Podge or glue mix onto the white paper, and then put colored tissue on the wet paper.  They then painted over the tissue to seal it. 
The collage directly above has a painted background; big brushes were used and tempera paint was applied loosely and expressively.  We may have been learning about Van Gogh, but since the sample is a few years old, I can't guarantee it! You'll notice on both the tissue paper backgrounds and the painted background, there is a small white frame on the paper.  This is one of my favorite "tricks".   Students draw a frame (or or you can draw it for younger kids) of about 1/2" inside the edge of the paper.  All painting/gluing is done inside the frame.  This way, you will have clean paper edges for carrying, you can lay them on the floor for drying if you don't have a drying rack, the tables will stay cleaner since no painting is done at the edges, and the paper won't curl as much as when it is painted to the edge!  Plus, when you hang them up to display, the artwork has built in picture frames!

Anyhow - when the negative space is dry, it's time for collage.  I put out, all around the room, boxes and bins and trays of all kinds of goodies: fabric scraps, wood scraps, toothpicks, wooden sticks, drinking straws, coffee stir sticks, cotton swabs, buttons, rickrack, ribbon, yarn, hunks of burlap, bags of straw, raffia, feathers, pompoms, and so on.  (I'm not afraid of a mess.)  We discussed the meaning of the word POROUS.  I would explain that Elmer's Glue-All holds best for porous items, but non-porous items might fall off, so for non-porous items like plastic buttons, we'd use a stronger tacky glue.  Kids were free to get what they need, taking just two or three items at a time, so that they could be sure to get them glued down before class ended.  Everyone started with some sort of stick or straw to hold up their scarecrow!  I love the independent decision-making necessary, and letting the kids figure out how to put together the clothes and such.  Nothing could stick up off the paper (they had to fit in the drying rack); otherwise it was really up to them.  Everyone pitched in at cleanup time to get the materials back in their boxes and bins, and shoved them into the storage closet or on the counter for next time, and sponged off any glue that dripped on the tables.   

 I loved to have my 4th graders draw "naked" trees this time of year, and have done a wide variety of approaches.  One approach, charcoal trees, has been featured a few times on the blog, with student samples.  You can find a good post about this project HERE, with student samples.  But today, I'm sharing trees painted with tempera.

I am NOT a fan of the "Y" shaped trees that many art teachers favor.  Why not?  Because none of the trees outside my classroom window were shaped that way!  So instead, I taught students how to make trees branch off a central trunk that may or may not split.  But it didn't have to!  But anyhow, I want to talk about the tempera trees. 
In both of the two painted trees above (the one with the orange sky, and the one with the green and purple sky), students started with a land line. It could be straight or curving or angled.  Then a trunk was added that extended to the top of the paper; all branches added on extended to the edges as well, filling the space.

Students were give a choice of using warm colors for their tree or sky; cool colors for whichever wasn't painted warm.  Then students selected whatever color(s) they wanted for the ground.  The photo isn't great, but in the orange sky painting, the tree is blue.  White and black were used to shade as desired. 
One year, I gave students a different color challenge.  Instead of warms and cools; we made neutral paintings, but without using any black.  So the challenge was for students to mix browns and grays by using various combos of yellow and violet, green and red, orange and blue.  They also were given turquoise and magenta.  They were encouraged to also explore combinations of three or even four colors together in varying proportions.  I wish I had their work to show you! It's wonderful to watch kids discover that you don't need black to make gray, and that you don't need a bottle of brown paint at all!  Below is a closeup of the color of the tree above, painted in this manner. 

I have blogged about one other autumn tree project, that uses sand and glue for swirly texture a la Van Gogh.  I think the student work was pretty awesome, so I hope you'll hop over to the old post and see their creations!  You can find the post HERE

That's it for today.  Do you have favorite fall projects that do NOT involve pumpkins or owls?  That involve a lot of student choice in the process?  If you do, I'd love to hear about them!