Friday, July 19, 2013

Finally, Precious Metal Clay

It's been more than a week since I took a class in precious metal clay at the Adirondack Folk School, but I'm finally going to share what I did with you.

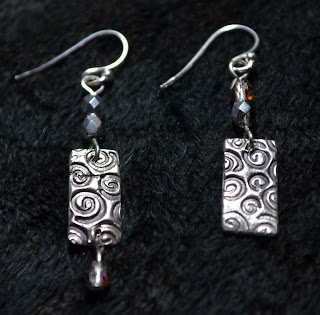
This asymmetrical pair of earrings (above) wasn't originally intended that way.  I meant to drill one hole in each earring, for the wire, but I put two holes in one and none in the other.  When I discovered my mistake, a made a hole in the second piece, but forgot that I had made TWO holes in the first one!  So I dangled an extra crystal from the one with the extra hole, and I actually really like the asymmetry. These earring were made at the last minute from the last tidbits of PMC (precious metal clay) I had left in my pack.  I had to hurry to complete them so they could be in time for firing.  Hence, my drilling mistake.


 I tried photographing this pair on so many different pieces of fabric, so you could see the lovely amethyst color of the crystals and seed beads.  But the purple hues just keep looking blue in these photos.  Sigh.  These teardrop shapes were actually the very first pieces I made in the class.  Hence their imperfections!
 We made a ring pretty early in the class, because they needed more firing time.  So I didn't have a clear plan.  I changed my textures about 6 times, and then rushed to put something on the ring.  The little holes were a quickie thing, and if I had time I would have wiped them out and redone the spirals.  But I did not have time.  Next time I will have a plan of how I want it to look so it isn't so lumpy and inconsistent looking.  Anyhow, I'm still proud of my very first handmade silver ring, and I especially love the floral texture on the back of the band.
 What fun!  We went outside and grabbed leaves to use as textures.  I'm pretty happy with the way these turned out, though I plan to make some alterations to the strand of green seed beads.  I don't like the way they hang and I think I can make them better. 
 I think this pair with the paisley textures might be my favorite, though I may change the way they hang from the ear wire to make them a tiny bit longer.  They look like something from India to me, and I love the way the little triangles swing on the big ones. 
I need to tell you, I had absolutely NO idea what this stuff was before the class, and doubted that it was 'real' silver.  Well, I was wrong.  It is most definitely real, 99% pure. No wonder the materials fee for the class was so expensive!!  But worth every dime.  I seriously love precious metal clay!  Now that I understand the properties of the material, I have some great quirky ideas of what I'd like to do with it, but I have to wait until the fall when the teacher has more classes open.  I don't have a kiln and even if I could get someone to fire my work for me, the material is expensive and I'd rather work under the supervision of the teacher for advice when I'm not sure the best approach to one of my ideas. 

Have you ever used precious metal clay? 

Saturday, July 13, 2013

Just had to share

I was going to post about my experience taking a class in precious metal clay, and show you the jewelry I made that day, but I have to take some decent photos of them and in the meantime I couldn't resist sharing this glorious sunset with you.
 These photos, by the way, are NOT Photoshopped or color edited in any way.  The only editing I did outside of the camera was a simple crop around the edges.
How did I get these spectacular colors, you ask? 
 
 First of all, obviously, you need a beautiful sunset reflected in a lovely lake.  But just as important is the camera settings you choose.  I did NOT use manual camera settings for this, even though I am trying to use them as much as possible.  My camera (and probably yours, too) has 'scene' settings that include one for sunset and another for dusk.  These settings are selected to optimize the sunset with both exposure and color balance. The dusk setting is a gently warmer color balance, and the sunset setting has a more dramatic warmth.  They do not change what I saw, but they enhance it.  If you have these settings, use them!!!  Don't just hang out on the 'automatic' setting, but don't be so stuck on doing things yourself that you don't use what Nikon or Canon has put there to give you success.  

Saturday, July 6, 2013

Happy Birthday USA!

Wonderful 4th of July, time at the lake with family!  
Son & guitar on the dock, waiting for the sun to set
It was especially nice to pull up a folding chair next to my son on the dock as the sun set, waiting for the fireworks. He played his guitar for a while, and then we both took out our Nikon DSLRs in anticipation of fireworks.
Imperfect focus.  Sorry!
Waiting for fireworks
The 'camp'  - view from the dock
  There was no 'advertised' show on our little lake.  We could have traveled a few miles to see 'big' firework displays in several nearby locations, and then could have spent hours in traffic trying to get out when the fireworks were over.

 
Not a fan of traffic, I preferred this, and there were actually two locations on our lake where there were large lovely fireworks displays, and some smaller displays, all viewed from the comfort of our very own dock.  And a boat on the lake started the evening by sending up lanterns floating in the sky.  


 On the 5th, we played all day in the lake.  Ahhh...
My son doing his swimmer's dive

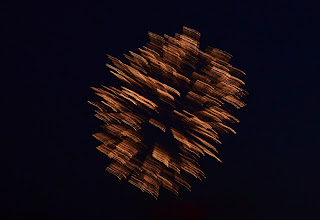
By the way, I am really clueless about the best way to photograph fireworks, and it shows.  My firework photos don't seem to look like usual firework photos.  If you know optimum camera settings for this, please tell me!
 
I started with the camera on a little tripod on a little table, using the live view screen instead of the viewfinder.  I was very unsuccessful this way, because I was struggling to figure out settings.  Eventually, I propped the leg of the mini tripod into my belly, and used the viewfinder instead.  I shot exposures at every aperture imaginable, and used shutter speeds from fractions of a second to several seconds.  I had to mostly use manual focus, because auto-focus couldn't find something to focus on.  (Of course, it was dark, so neither could I.  So, while I'm usually a stickler about focus, these are imperfect.  Sorry.)  The results were unexpected every time,and I could not find any rhyme or reason to why they were so different photo-to-photo.  I have done some cropping here and there, but not much other editing.  In many photos, if you look closely, you can see the tree to my right, the skyline, and even some people on the neighboring dock.  Some of the images look like nebula or palm trees or water droplets to me, and others - well - I just have lost all perspective at this point.  I'd love your opinions  Don't be afraid to say what you think please!  And again, any night photo advice...