Showing posts with label lesson ideas. Show all posts

Saturday, May 18, 2013

I've got my head in the clouds!

 I don't know when I've been more excited about what I saw on a blog post than by this one right here: http://manualescanigo.blogspot.com/2013/05/sol-y-lluvia.html.  I have so many ideas as a result of this blog post that my mind is whirring.  I've chosen not to copy Cristina's photos to this post as I would not do so without permission.  But there are clouds of white fluff hanging from the ceiling, with all sorts of raindrops - made from stuffed felt, bottlecaps, and more.  There's smaller clouds that look like perhaps painted sponges, with raindrops (foil?) hanging from them.  There's a large table area covered with a painted pond, with ceramic ducks swimming, lily pads with frogs, and again, more. 

One of my ideas is based on an image from the blog of little wire people with their heads surrounded by white cotton fluff.  It's got me thinking of all kinds of 'head in the clouds' artwork, both 2 and 3 dimensional.  I see so many possibilities!

I know many of you already are regular readers of Cristina's awesome blog, but if you aren't, you are missing out on a blog by an incredibly inspiring art teacher.  You will be amazed by the fabulous student artwork.   And by the way, for those of you, like me, who aren't good at foreign language, there is a translator button on the blog.  The translation isn't great, but it does help (though it doesn't address the process or materials at all; instead it is more philosophical in nature).

By the way, I don't like to write a post without photos, so I need to give photo credit/explanation.  The photos in this post are both by my son, shot during his stay at Stellenbosch University in South Africa (Stellenbosch is near Capetown) when he was there for a college internship 3 years ago.  The top photo is him, shot via self-timer. He always takes a photo of himself jumping on tops of mountains.  I wish he had tied his shoelaces better, but he made it home safely so I guess I shouldn't complain!

Tuesday, February 5, 2013

Where did that idea come from?

So often, I see lessons posted that I've seen before 'somewhere'. Earlier this week I was going through a binder of lesson ideas clipped from magazines for many years, and so today's post features a little sampling of what I found, that I've all seen recently on the blogs.

How many times have you seen this 'falling backwards' lesson?  Sometimes it's called falling into space, or falling into water, or foreshortening, or... you get the idea.  I first came across this lesson idea in a May 1985 Arts & Activities page where it was mentioned pictured to the left), but if you read the text, you'll see that the lesson was first featured in the September 1984 issue.  While I began teaching art in 1976, I was in a high school position until June 1985, so this lesson idea was probably one of the first things I clipped and saved.  And I've done various versions of this project over the years, with various media, but I've never posted any. I figured everyone has seen it before in one version or another.

So go ahead, post your versions, but please don't say you invented the idea! (You didn't.) After all, this magazine first published the lesson 28 years ago!!!!  And maybe it was somewhere else even before that!

And how about this much used Louise Nevelson lesson idea, in the left-hand photo below, from Spark magazine in 1994? (I posted my own version in this post from 2010.)

 Or this Laurel Burch lesson, in the right-hand photo above, from a School Arts article published in March 1999?  If you read the article, you will see it also references Matisse (Henri Matisse & Laurel Burch are both personal favorites), and the technique used is a drawing with white glue on black paper, which after drying is colored with pastel chalks.   You've all tried that technique, haven't you?! 

Then there's these 3 articles below,all from School Arts magazine, April 2000, April 2001, and April 2005
I actually collected shoes after I saw one of these articles, and my 6th graders did a fabulous sculptural painted project, re-imagining the shoes they brought in.  Stupidly, I have no photos, and since it was probably in the early 2000's, any remnant of these shoes in the art room are long since gone.

So many times I've seen lessons in magazines, or on the internet, that I've seen... and seen... and seen again.  If you've read School Arts and/or Arts & Activities for as many years as I have, you've undoubtedly seen lessons repeated many times with minor variations (or have posted a variation yourself), from coil pots, to mirror image names, to kaleidoscopic drawings, to taking lines for a walk, to Matisse goldfish bowls (I posted mine here and here), to Klimt trees, to Kandinsky circles, to Van Gogh starry nights, to Monet Japanese bridges, to collaborative circle paintings, to Mondrian animals, to dancing giraffes, to Wayne Thiebaud cakes (I posted mine here), to woven pouches (I posted mine here and here)...  you get the idea. I think I'd better stop.

And that's OK.  We don't always need to reinvent the wheel, and it's always miraculous to see kindergartners paint sunflowers, no matter how many times it's been done before, isn't it?  So keep on posting that wonderful student artwork, and your versions of the tried and true, but keep showing us your original ideas too!. 

Sometimes, I find wonderful original ideas, or interesting twists on old standards, when perusing the blogs.  Maybe it's Artful Artsy Amy's wonderful negative space value study paintings of bicycles painted on old maps, or Art Project Girl's creative version of Andy Goldsworthy, or these wonderful Matisse-style paintings on wallpaper at Fun Art 4 Kids, or Mr. MintArt's gorgeous notans, or Cassie Stephens' clever cuckoo clocks, or Art With Mr. Hall's value landscapes done on the computer.  And I'm only scratching the surface of what's out there. 

Where did your ideas source from originally?  Do you save decades-old magazine articles like I do?  Do you see the articles repeat themselves after a while?  What sparks an original idea?

Tuesday, January 22, 2013

An oldie but goodie - 'Words that Describe Themselves'

I've shared this in a lesson plan exchange (of lessons for substitutes) that Art Project Girl arranged a year or two ago, but I've never posted it on the blog before.  The flag image above had me thinking about our presidential inauguration, so I thought I'd share this lesson today. (By the way, did you LOVE Michelle Obama's red dress as much as I did?  Spectacular color!)  

Back to the lesson; the idea is simple.  How can you illustrate a word so that the word itself illustrates what it says (but is still easy to read)?  We brainstormed word ideas on the whiteboard, and then selected words.  No two people in the same class were allowed to select the same word.  Great words include nice descriptive adjectives (curly, frozen, boiling, tangled, etc) and almost any sort of noun, including objects or broader themes (sports, art, ice cream, mountains, rope, autumn, feathers, wild animals, cupcakes, magic, waterfall, ocean, snowstorm, rocket, hair, etc). Try to discourage the real easy words: hot, cold, short, tall.  
 Plan ideas on scrap paper, and then select the materials that work best for the chosen word.  Make sure it is spelled correctly!  We usually talked a bit about lettering (use of upper vs lower case, etc) and spacing (there is nothing worse than running out of room and having to squash together the last few letters).  On the final paper, the word is drawn out very lightly to make sure the space is being used effectively, and then color is added as appropriate.  Some of the examples in these pictures were colored with markers, others with colored pencils or crayons.  They were then cut out and mounted on construction paper, so from start to finish, the lesson took two art class periods.  Time permitting, the lesson can be expanded.  Wouldn't it be great for that FLAG to be waving against a sky?  And what if the EGGS (below) were placed in a frying pan or on a plate? 

Sorry the rest of these are sideways.  They are the only pics I have of this project so they'll have to do :(


The pieces pictured in this post were all done, I believe, by 5th graders, but this lesson can be easily adapted for both younger and older students. 

Saturday, March 10, 2012

Inspired by Klee and Sinbad the Sailor


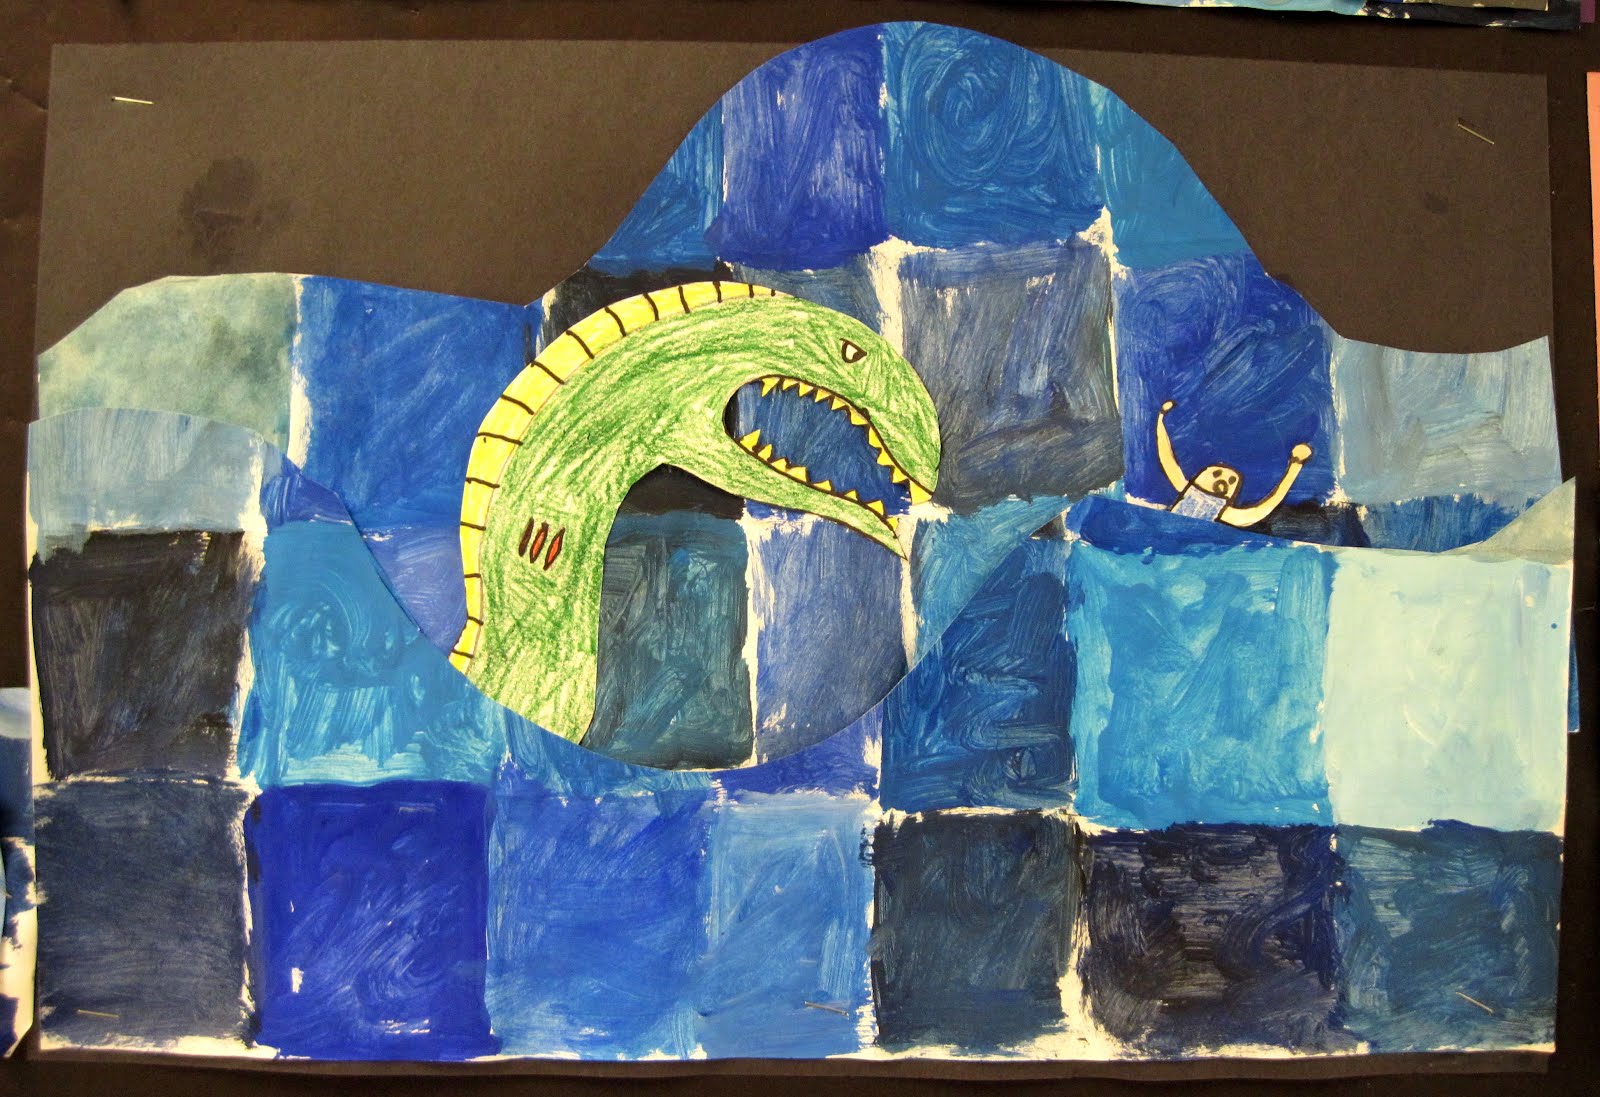
What can be better for 3rd graders than stories of giant birds, sea monsters, and whales that look like islands? Why, the chance to paint, to mix colors, and to interpret the stories their own way, of course! (Note the sheep in the mouth of the giant bird above!)

We began by looking at Paul Klee's painting Sinbad the Sailor, pictured here:

We noted the values of blue in the water. Students folded up papers to make many rectangles, and were given various blue paints, along with white and black. They merrily mixed away, creating as many different blues as they could. NO BRUSH WASHING NECESSARY! If their brush had too much paint, they wiped the excess on a paper towel.

This photo below showed what happened when one brand of white was dipped into a thinner brand of blue. The kids were very excited by this and even more so when I took a photo of the magic in the paint dish.

My original plan for this lesson had a step of creating a second paper using orange, black, white, and blue to create a variety of browns to mimic the sky of Klee's painting. I changed the plan when I realized that it would take too much time that we didn't have.

We looked at a book with the stories of the 7 voyages of Sinbad. I didn't share them all. (For example, I left out the island filled with cannibals, and another island where an old man forced Sinbad to carry him around on his back for days. Just too weird.) We focused on these tales:
  • the story of a beautiful island that seemed to be having an earthquake but turned out to be a whale with beautiful foliage growing on its back;
  • the tale of seeing a a glowing orb in the distance that turned out to be the egg of a huge bird called a rookh, which was overlooking a valley filled with diamonds and snakes - Sinbad tied a rope to the rookh's leg and was hoisted into the valley when the rookh went down to feed, and came back with a heap of diamonds in his pockets;
  • the story of the island of the apes, which included an ogre;
  • and of course the tale of a sea monster, which we decided was depicted in Klee's painting.
Students drew and colored parts of their story on 9"x12" paper - some kids used more than one piece of paper if they had lots to depict - and then cut them out. The blue paper was cut across to create a wave or many waves, and the students used both pieces to create water. A construction paper sky was chosen, and then the parts were all glued together.

The whale was a popular story to draw:

But so were sea monsters and ogres,

and of course the rookh and the giant egg.

I think they are each imaginative and terrific; don't you?

Here's one of the two bulletin boards where these paintings are currently on display.

Looking down from above


Yes, that is a flying pizza zooming in above the city on the left. Those are superheros flying above the other two cities. Wait till you see what other things are in the skies above my 4th graders' cities!!

I always give my 4th graders a basic introduction to one-point perspective. I've done "flying boxes" for years, and the 4th graders are always so excited to try out this new skill. But we all know it's a struggle; not all kids will 'get' it right away, and some (particularly those who struggle at math, it seems), may NEVER truly grasp the nuances of the process. Anyhow, I saw a lesson version of perspective cities viewed from above at a post on Sarah's Art Room. I used her idea of keeping the cities in black and white, but changed my approach to the rest of the lesson.

We all worked together to begin, with me using an old-fashioned overhead projector to demonstrate! Our Vanishing Point was at the bottom center of the 12"x15" paper, and everyone used rulers to draw a minimum of 6 rectangles, all parallel to the sides of the paper. Starting from the bottoms of the bottom rectangle, we began connecting all corners to the VP, with the following rules: NEVER draw through one of your rectangles, and if you BUMP into another rectangle on the way to the VP, you STOP and don't pick up the line again on the other side of the rectangle. Easy peasy!!

We traced with Sharpies, and made light pencil guidelines aiming toward the VP down the walls of the buildings to use for windows and more. This is where it gets pretty challenging for 1st timers, so I didn't stress out when some were less successful in this part of the lesson. The buildings would look like buildings no matter what! They loved writing words on the roofs so that airplanes could see them: everything from the sign that said "Reptile House - P.S. Don't Buy the Cobra!" to the "Pot Belly Deli"to the "Haunted County Jail" which included "Ghost Place". And of course there's schools, art museums, police stations, amusement places, stores, restaurants, and more. The cities were cut out to place on a background that was created separately.

The backgrounds were a lot of fun, and done in about 10 minutes. On an 12"x18" sheet of white paper, the curvature of a planet was drawn with oil pastel. Still using the oil pastels, some kids added lots of design and texture to the planet at this point, others added stars and other celestial details, and others were pretty minimal with the oil pastel.

Then, we painted with liquid watercolor, but all I had was blue, turquoise, red, and sparkly 'black'. The other colors - greens, violets, oranges and yellows - all were paint that I had previously created by soaking the tips of those dead markers. We've all seen that done, right? I have a box in the art room labeled "DEAD MARKER GRAVEYARD" and the dried out markers all get tossed there for me to periodically soak. (By the way - the paints I made this way are getting a gelatinous skin on them. Do you know how to prevent this from happening?)


The last step was the silliest. After gluing down the city, the students used a separate (smaller; I think it was 6"x9") sheet of paper and some markers to create something that could be flying above the city. In the 3 photos above, there's a UFO, a dragon, and a flying fish. Below is someone seated on a magic carpet, a mutant bumble bee, and someone with jet packs.

And then, below, is a flying submarine, another superhero of some sort, and an airplane.
Some other ones that I didn't post in these photos (it was hard to choose but I just had too many to post them all) included a flying pig, a butterfly, a dragonfly, a helicopter, a flying pickup truck, an alien, another UFO, a flying heart, and a hot air balloon.

I think this may be the most fun my 4th graders EVER had doing perspective, and I think they are very proud of their success.

Wednesday, February 8, 2012

Kindergarten Kitties on Flying Carpets!


It all started when my kindergartners were making paper bag puppets. They were having a hard time cutting and I realized they needed practice. I thought of this post by Art Project Girl.

I prepared some papers with zigzag and wavy lines, and the kids cut them in 2 colors and glued them on a piece of 9x12" construction paper. We decided they looked like magic carpets so we cut fringe on the ends.

But what should ride on the flying carpets? Somehow we decided on cats!

There's still a few to be completed, so when they are done I can move a few clouds around on the bulletin board to make room for them. Aren't they cute?