Showing posts with label construction paper. Show all posts

Friday, June 6, 2014

Projects for Pacon!

completed project idea ~ 'Designing Negative Space'
When I was at the NAEA convention in San Diego, in the vendor area, a gal from Pacon was looking for art bloggers willing to write up lessons incorporating a new material that they would send for you to sample.  I thought this sounded like a fun challenge, so I accepted the offer.  In return, I received their new Pacon Basic Black Drawing Paper in three forms: a package of 9"x12" sheets, a spiral sketchbook of the same size, and a large project roll.  The paper is especially designed for use with gel pens and metallic markers.
completed project idea ~  'Getting Buggy: Still Life Collage'
I used the spiral pad as a place to experiment, and I discovered that the gel pens I was using did not show up well.  Since the paper is intended for use with gel pens, I contacted the rep and she immediately popped a set of Sakura GellyRoll Moonlight Gel Pens in the mail to me, and yay, they worked fabulously on the black paper!  I definitely recommend them.  I also had success with a variety of metallic markers (also recommended for use with this paper), with Faber Castell Metallic Gel Sticks, and white acrylic ink (using a bamboo pen).  I'm not going to show you all my fun doodles, but I must say, I do love the idea of a black sketchpad!  Next I'm going to be using the sketchpad to test white charcoal pencil and some white and sepia-tone conte, and I expect they might both work well. 
completed project idea ~ 'Wacky Woven Flying Carpet'
About the black paper - it is lighter weight than construction paper, with a very smooth surface on one side and a slight tooth on the other.  Due to its light weight, I don't think I'd recommend it for wet media.  While I haven't yet tried it (but I will), I think the paper would suit well for some folding and curling techniques.  The only criticism I have of the paper is that the black is not a deep rich black, but actually more on the gray side of black.  But of course, that means that a black Sharpie shows up on it for adding subtle detail, so that's kind of cool, isn't it?

Anyhow, in typical fashion, I went overboard and I developed three lesson ideas, all using the 9"x12" paper, and I'd like to share them with you.  I haven't come up with any fabulous ideas for the larger size paper yet, since the fine points of gel pens and metallic markers lend themselves more to small sizes.  But like I said, maybe a folding/rolling/curling type of project?
My first lesson idea (pictured above, below, and at the top of the post) is the simplest: an easy project I called 'Designing Negative Space'.  With a white gel pen, I traced an ordinary object (I used a scissors) many times on a sheet of the Pacon black paper, turning it in various directions, overlapping, and even going right over the edge of the paper.  The idea would be to talk with students about balance, repetition, and movement to create good a composition.  Then I filled in all the sections of negative space, using repeating patterns and designs.  Again, I used the GellyRoll  pens for this.
 

The second project 'Getting Buggy: Still Life Collage' is my favorite, but has more steps.  I referred to the artwork of Dutch artist Rachel Ruysch (1664-1750), whose lush still life paintings always include 'creepy-crawlies' (insects, spiders, small lizards, butterflies, snails, inchworms, etc) tucked in among the flowers and on the tables. Here are a few images of her paintings:
I decided to make a colorful flower still life collage with bugs in it, to bring this to an elementary level.  The backgrounds of her paintings are usually dark, so I selected a deep blue Tru-Ray construction paper for the background (12"x18"), a piece of brown Tru-Ray for the table (6"x12"), and a piece of the 9"x12" Pacon Basic Black Drawing Paper for the vase.  (Definitely not as dark as hers!)  I folded the black paper in 1/2 like a book, and with the fold on the side drew a gentle 'S' curve from the top to the bottom.  I cut on that line and unfolded the paper to discover my vase, which I then glued on the table in my artwork and decorated with the metallic gel sticks.
I drew a bunch of insects with the gel pens (and addeed some black Sharpie detail) on the Pacon black paper, and cut around them loosely.  On assorted scraps of Tru-Ray construction paper, I drew some simple flower and leaf shapes, stacked some pieces together and cut them all out.  I then arranged them, including the bugs I had created, and glued it all together.  Finally, I used the gel markers to add details - veins on the leaves, lines on the flower petals, dots in the centers of flowers, and so on.  I enjoyed making my sample, and I think this could be a really fun lesson to do with kids!

The final project is called 'Wacky Woven Flying Carpets', and is similar to a 2nd grade paper weaving project I have posted about before on this blog.  (Hint: it is much less complicated than it looks!)  I won't give you all the process details here,  but I will mention that all the black paper in the weaving is the Basic Black Drawing Paper and was decorated with the gel pens.  My idea is that after the paper weaving and patterning techniques are all complete, the weavings would be displayed on a sky mural, and that the students could have fun creating whatever should ride on their flying carpets:  cats on carpets? (I've done that before); rattlesnakes on rugs?; flying french fries?... you get the idea!  Silly is good!!! Or, the weavings can just be backed with construction paper as I did in the 2nd image below, for use in a display about repeating pattern and design. 
If you want more information about the paper I was provided to use for these lessons, you can find links to it here: Basic Black Sketch Diary, Basic Black Drawing Paper 9"x12", and Basic Black Art Roll 24"x10'.  And if you've never visited the Pacon website before, here is where you will find assorted projects and lesson plans.  And here's a link to their Facebook page.  I'm hopeful that in the near future you will find the full details of  my three lesson ideas included on their website!  Yippee!!!!

And finally - I enjoyed coming up with ideas how to use this paper, and I want to say  THANK YOU to Jessica at Pacon for giving me the materials and the opportunity.  It was fun! 

Friday, March 30, 2012

Cleaning frenzy, and a request for inspiration

Yesterday I couldn't stand the mess any more. A few days back, I went in my storage closet for something, tripped on a big box, and went flying, landing with a crash face-down on the floor and bruising my knees. Thank goodness I wasn't hurt more. The 6th graders were entering the room and saw me go flying. I told one boy to go the nurse and get me an icepack, PRONTO!! Some of the kids were asking "are you OK?" and others were simply saying "where's my project?" or "where are the poofing tools?", barely noticing I was flat on the floor. The nurse, knowing that I'm an absolute klutz from prior incidents, stopped up in the room to make sure I wasn't really hurt (I guess the boy had charged into her office yelling "Mrs. B needs ice NOW!!!!")

Anyhow, I've had so many projects ongoing that the materials needed for them all had piled up and gotten out of control. By yesterday afternoon, the mess had me so freaked out that I didn't know what to do first. I knew I didn't want to risk any more injuries, so I had to do SOMETHING. So after the kids were gone, I finally tackled the closet, hoping I wouldn't come across this:

I didn't leave my classroom until 7pm. My garbage pails were full, and my storage closet was hugely improved, with nothing on the floor to trip over.

So I told my husband I would be home early today.

But then, after the kids were all gone, and I had stacked up the dry paintings, I noticed the ever-growing pile of leftover paper on the counter.

There was construction paper of every dimension, some in good condition, some faded or with staple holes around the edges, in every color imaginable. I began trimming them down to manageable sizes, cutting away torn and faded edges, and stacking them by color family into a big flat box. A lot of the colored paper will be used for a flower-making activity I have planned.

But I was still left with a HUGE pile of white, especially strips and rectangular chunks, from when I've cut 18"x24" paper into 18" squares, or 12"x18" into 12"x15", and so on... And it was 6pm on a Friday evening and certainly time to go home.

You must have those strips and chunks of white paper too, right? WHAT DO YOU DO WITH THEM?? I had already used some of them yesterday for a really fun painted paper activity with first graders (we used printmaking rollers - very cool results), but there's still just SO MUCH of it left.

Do you have any brilliant ideas for the use of a volume of white paper strips, in a variety of sizes? INSPIRATION, PLEASE!

Wednesday, November 2, 2011

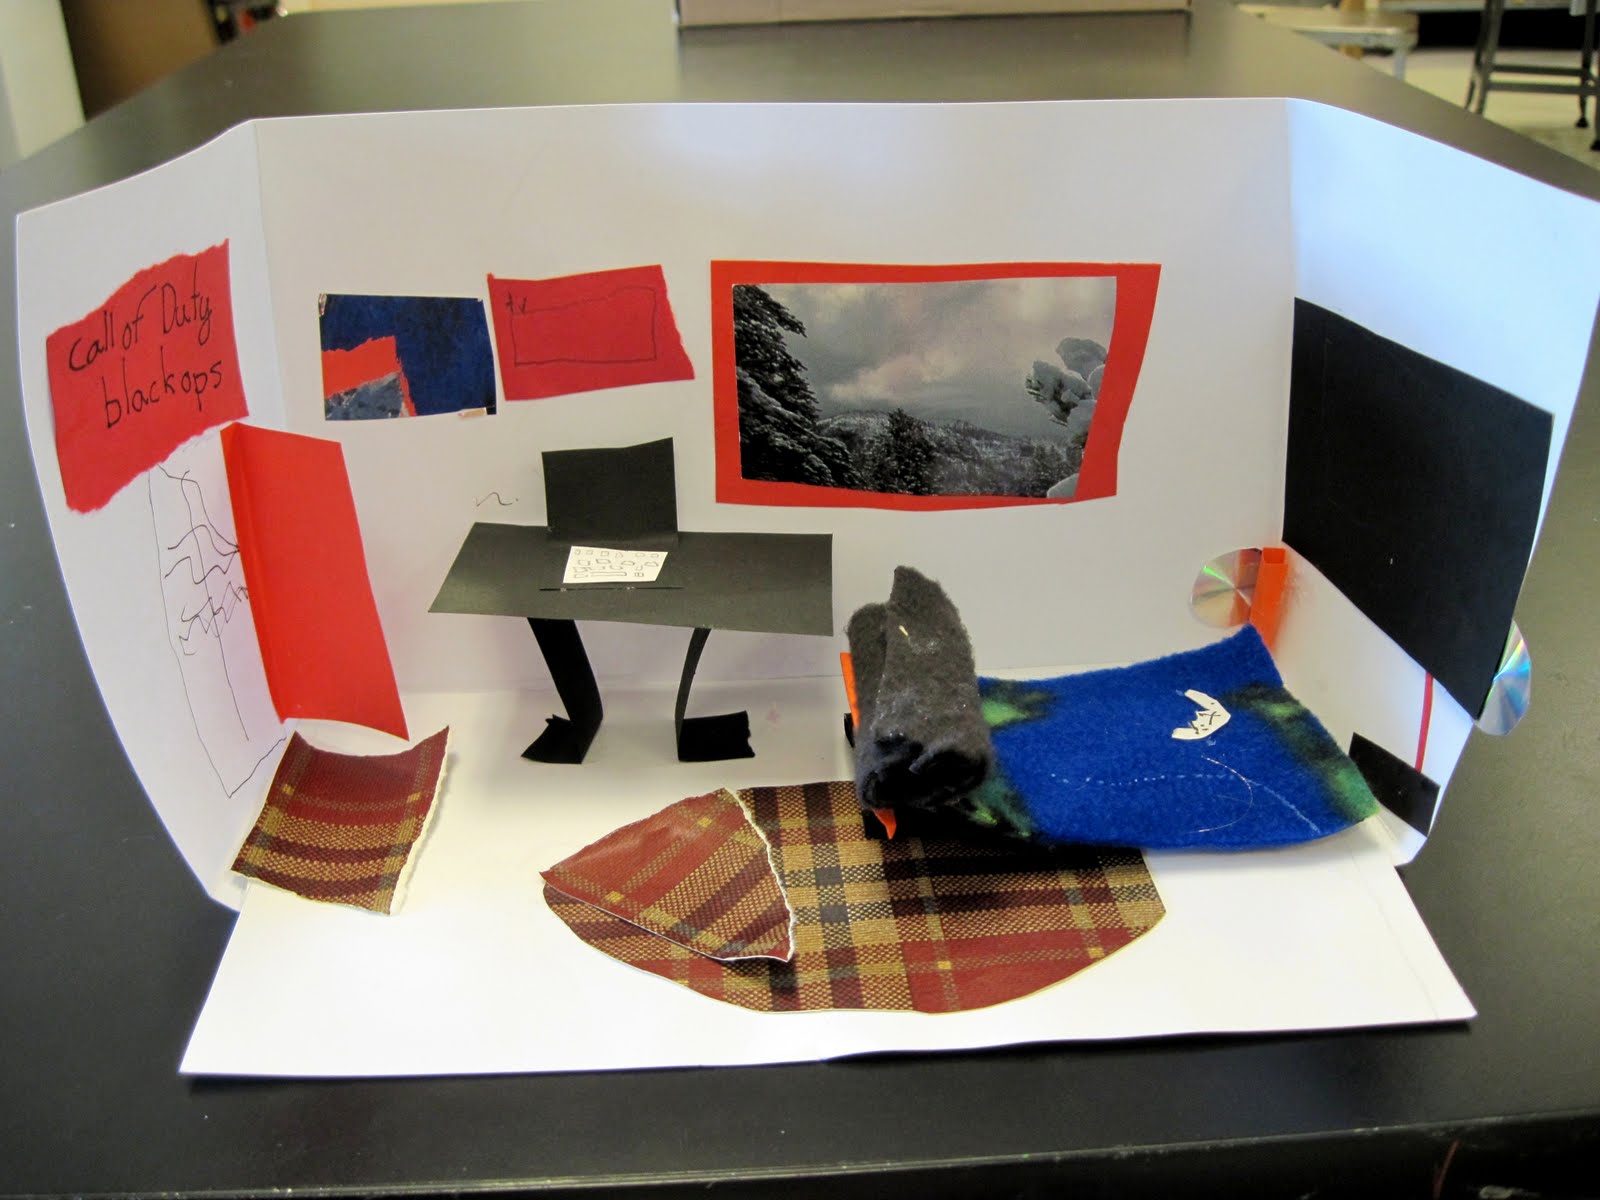
My Dream Room! by 4th grade


This is one of those lessons that make me proud to be an art teacher. No other teachers could deal with the problem-solving and open-ended solutions that happen on a daily basis in a good art program. A BIG thank you to Natalie and her post at her blog smART class that convinced me that I could successfully "borrow" this lesson from her.

Above is a portion of Garek's not-yet-complete room (there will be a blanket etc on the bed), and Karli's sweet artsy bedroom. I adore that she made herself in the lounge chair, and that her outfit matches her curtains. And then there's that cool desk/chair thing she designed on the right.

We had discussed van Gogh at length, and looked at a couple of versions of his Bedroom at Arles. The kids were given the opportunity to create their own rooms. Together we measured, cut, and folded to make the basic room structure.

I then showed them just a few basic guidelines for creating the contents of their dream rooms. I put out a huge selection of wallpaper samples, crazy papers, solid-color construction paper pieces, magazines and magazine photos, clear acetate scraps, silvery contact paper (used especially for mirrors and DVD's), fabric, and glue. These are just a few of the rooms - each one is totally different. I love the way the boys all seem to have included video game systems (note the controller on the bed in Ryan's room on the left). I thought Maddy's canopy over her raised platform bed was cool, and I love the way she decorated her room with her name and signs!

Some of the rooms, like Jazz's room on the left above, used color and pattern combinations I NEVER would have put together! Connor's room, on the right, is under the ocean, as you can see by the SCUBA diver out the window.
Daniel's room is a a jungle gym.
The kids used mostly glue sticks and Elmer's Glue-All, but I also kept a low-temp hot glue gun plugged in and ready, and Dan popped over to me at the glue gun frequently to have another layer of stuff zapped on for permanence. Totally cool room.


Wyatt's room is very hip, isn't it? Love the "loading..." on the flat screen TV. Too funny! And the open laptop on the table.

What I really liked about this project was the different solutions kids came up with - for example, ladders: some had cut-out rungs, some had glued-on rungs, and others were accordion-folded. And the stuff in their rooms - wow! There are fish tanks, and terrariums with reptiles in them, bunk beds, couches, "glass" top coffee tables, curtains with tie-backs, rugs, wallpaper trim, and more. There are Adirondack themed rooms, camouflage rooms, hunting lodges, tropical rooms, and so much more.

A lot of the furniture is crooked and mismatched, but the truth is, the kids really had to THINK to figure out how to put these together, so the learning was in the doing.

As a final step, I read (to the students) van Gogh's letter to Theo describing his room, the colors he used, and his desire for it to look restful and calm. The kids then wrote their OWN descriptions of their rooms, and these are displayed on top of the stacks in our school library, alongside the rooms. It meant I had a messy art room, but a successful lesson! I hope I remembered to unplug the glue gun.........

Wednesday, February 9, 2011

100 pounds of Tru-Ray!!


The blog http://minimatisse.blogspot.com/ recently had a post inviting readers to enter to win 100 pounds of Tru-Ray construction paper simply by becoming a "fan" of Pacon Creative Products' facebook page.
I don't usually respond to offers like this on facebook; as a matter of fact I don't usually do much at all on facebook beyond look at my son's photos. But I figured "what the heck", became a Pacon fan, and promptly forgot about it until I read a comment on my blog from blogger-buddy http://artprojectgirl.blogspot.com/, asking if I had won the paper. So off to facebook I went, and indeedy Pacon had announced that I am the winner! As we say in my art room, Holy Guacomole!!
So today I called Pacon to claim my prize. I was told I could pick out 2 cartons of paper, and that I could choose the color and size paper for each carton, but the whole carton had to be the same thing. I'm getting one carton of 18"x24" paper (15 packages of 50 sheets = 750 sheets!). The second carton is 12"x18" (25 packages of 50 sheets = 1250 sheets!)!!! With that much paper, I couldn't imagine it being all one color, so I was told I could receive the assorted packages, as long the whole carton was the assorted packs. I'm getting a standard assortment for the large size paper, and the bright assortment for the smaller paper. How cool is that?!
-
I (obviously) will share with the secondary art teacher in my district, as well as any elementary teachers who want. It will help a lot with our budgets and requisitions for the coming school year.
-
Thank You Pacon!!!!! And thank you blogger-friends that have congratulated me. What a cheeful lift to a gloomy winter!