Friday, January 30, 2015

Art Educator Befuddlement - Help me please!

I just spent a few days in fabulous NYC, during the blizzard-that-wasn't.  We had tickets to see the Matisse Cutouts show at MoMA, and it was, of course, fabulous, and deserves (and will get) a post of it's own.  But this isn't that post.  And the magical Matisse pictured above is not one of the cutouts.
Once we finished touring the special exhibit, we visited the rest of the museum.  I've been to MoMA many times, but it's still fun to walk through the 20th century pages of an art history textbook.  Above and below are a few of the many iconic paintings in MoMA:
 These paintings are so iconic that I don't have to name the artists, because anyone who has taken a basic art history survey course knows every one of these, and others in MoMA, such as Picasso's Three Musicians and Monet's huge Waterlilies.
  First time visitors to MoMA are usually amazed at how small these two paintings below are.  I mean, Starry Night is somewhat small, but The Persistence of Memory is downright itsy-bitsy!!  What a surprise!
But none of the paintings above are the reason for this blog post.  It's other stuff that has me befuddled.  I mean, I'm all for originality.  I never had any trouble teaching kids about Pollock, for example.  I could show them his earlier stuff, so they knew he could draw really well, and then, when they ask "why is he so famous for just flinging paint all over the place?" or "why aren't our paintings that we did that way in a museum too?" I could answer by putting it in historical context.  He was doing something new, that hadn't been done before, and it was special.  
 
But there's some stuff I am scratching my head over, and I need your help.
Look at these pieces below:
There's this one pictured above, Twin by Robert Ryman.  It is all white.  Or how about the piece below? If you are able, read the description by clicking on the image to enlarge it. 
 And then there's this one below, by Bruce Nauman.  Wha???
 I missed getting the name of the 'artist' for these pieces below.
Or maybe I just didn't care.
Cosmic Slop "The Berlin Conference" by Rashid Johnson, pictured below, is a large black textural piece in soap and black wax.  I can't quite fathom the connection between the canvas and the title.
 Below, the piece titled North Chester Ave, by Mary Weatherford, really annoyed me.  It doesn't  evoke anything to me whatsoever, and then there's the obtrusive cords.  It's supposed to depict the color, light, and atmosphere of a landscape.  Um, really?  Doesn't do it for me.
 How about the Barnett Newman painting 'The Wild', below, as viewed by my befuddled husband?  He's thinking "please can I go sit down now?  Or take a walk outside in the miserable icy cold wind and slippery sidewalks?"
What's with these hideous lumps of molten looking poo by Lynda Benglis?
 Or this, below, by Eva Hesse, made out of paint and string over papier-mache with elastic cord?
 And the ultimate hideousness, at least to me, was this noisy and violent video installation, below, situated in the room next to Matisse's glorious Dance of Life.  The wailing screeching repeating sound track was persistent and beyond annnoying, especially since you could hear it while viewing the artwork in the adjacent room.  I just don't understand.  
 I feel like the joke is on me.  I need someone to explain to me WHY this stuff rates being in a top-notch art museum along with paintings by Klimt, and Picasso, and Cezanne, and Gauguin, why I should want to pay good money to see this garbage.  I'm not an old fuddy-duddy.  I enjoy some contemporary art, which is why a visit to Mass MoCA is one of my favorite museum excursions.  But I need to draw a line.  I don't  understand the value of these pieces I have posted.  I want someone to tell me how you explain this stuff to kids.

In elementary art programs, we are teaching the Elements of Art and Principles of Design.  We are teaching composition and color theory and creative problem solving and personal expression.  We are teaching global, cultural, and historical awareness.  We are, honestly, also trying to make attractive art, stuff we can hang in student art shows and that make the parents, administration,and community proud.  But how do I make the leap from these basics, to a video of someone chopping off a bloated finger?  Or a 1/2" wide canvas hanging on the wall?  Or a pile of hastily painted canvases laying in a pile like discarded leftovers, for me to pick up off the museum floor and examine?  Or any of the other pieces that I have included below 'OOF'?  What is YOUR opinion on these pieces, and how do YOU approach discussing them with students?  Please weigh in!!
Thank goodness there was the whimsical Lunar Asparagus by Max Ernst to cheer me up, in the midst of these other pieces, or others like this colorful beauty by Andre Derain, which I will use to complete this post.  I'm looking forward to your opinions.

Friday, January 23, 2015

Are you a 'helicopter' art teacher? - Thoughts on fostering independence in the art room

Another long wordy but hopefully useful or at least somewhat thought-provoking post ~
It's normal to want to do things for others to help them succeed.  But I think that we, as art teachers, need to remember how important it is to empower our students.  We all know those 'helicopter parents' who want to know every step their child makes, who correct all the mistakes on their homework, and who, hovering, do everything for them, never letting them figure things out or make decisions on their own because they may just make a mistake or get hurt.  The end result is, of course, kids who don't know how to make their own decisions, and who've never had a failure, never been hurt, and thus don't know how to handle it when the inevitable happens.

But here's the thing - some of us are 'helicopter art teachers' and might not even realize it. (I'm sure you know someone like this)  So - in case YOU are a helicopter art teacher, I want to give you some things to think about.

First, a little disclaimer:  This is  not a TAB post.  If that's what you came here expecting to find, you may want to look somewhere else.  But I'd love it if you'd stay!

I'll start with the story of a student, a sweet but immature 5th grade boy whose baby-like behavior kept him from forming many friendships; he was 
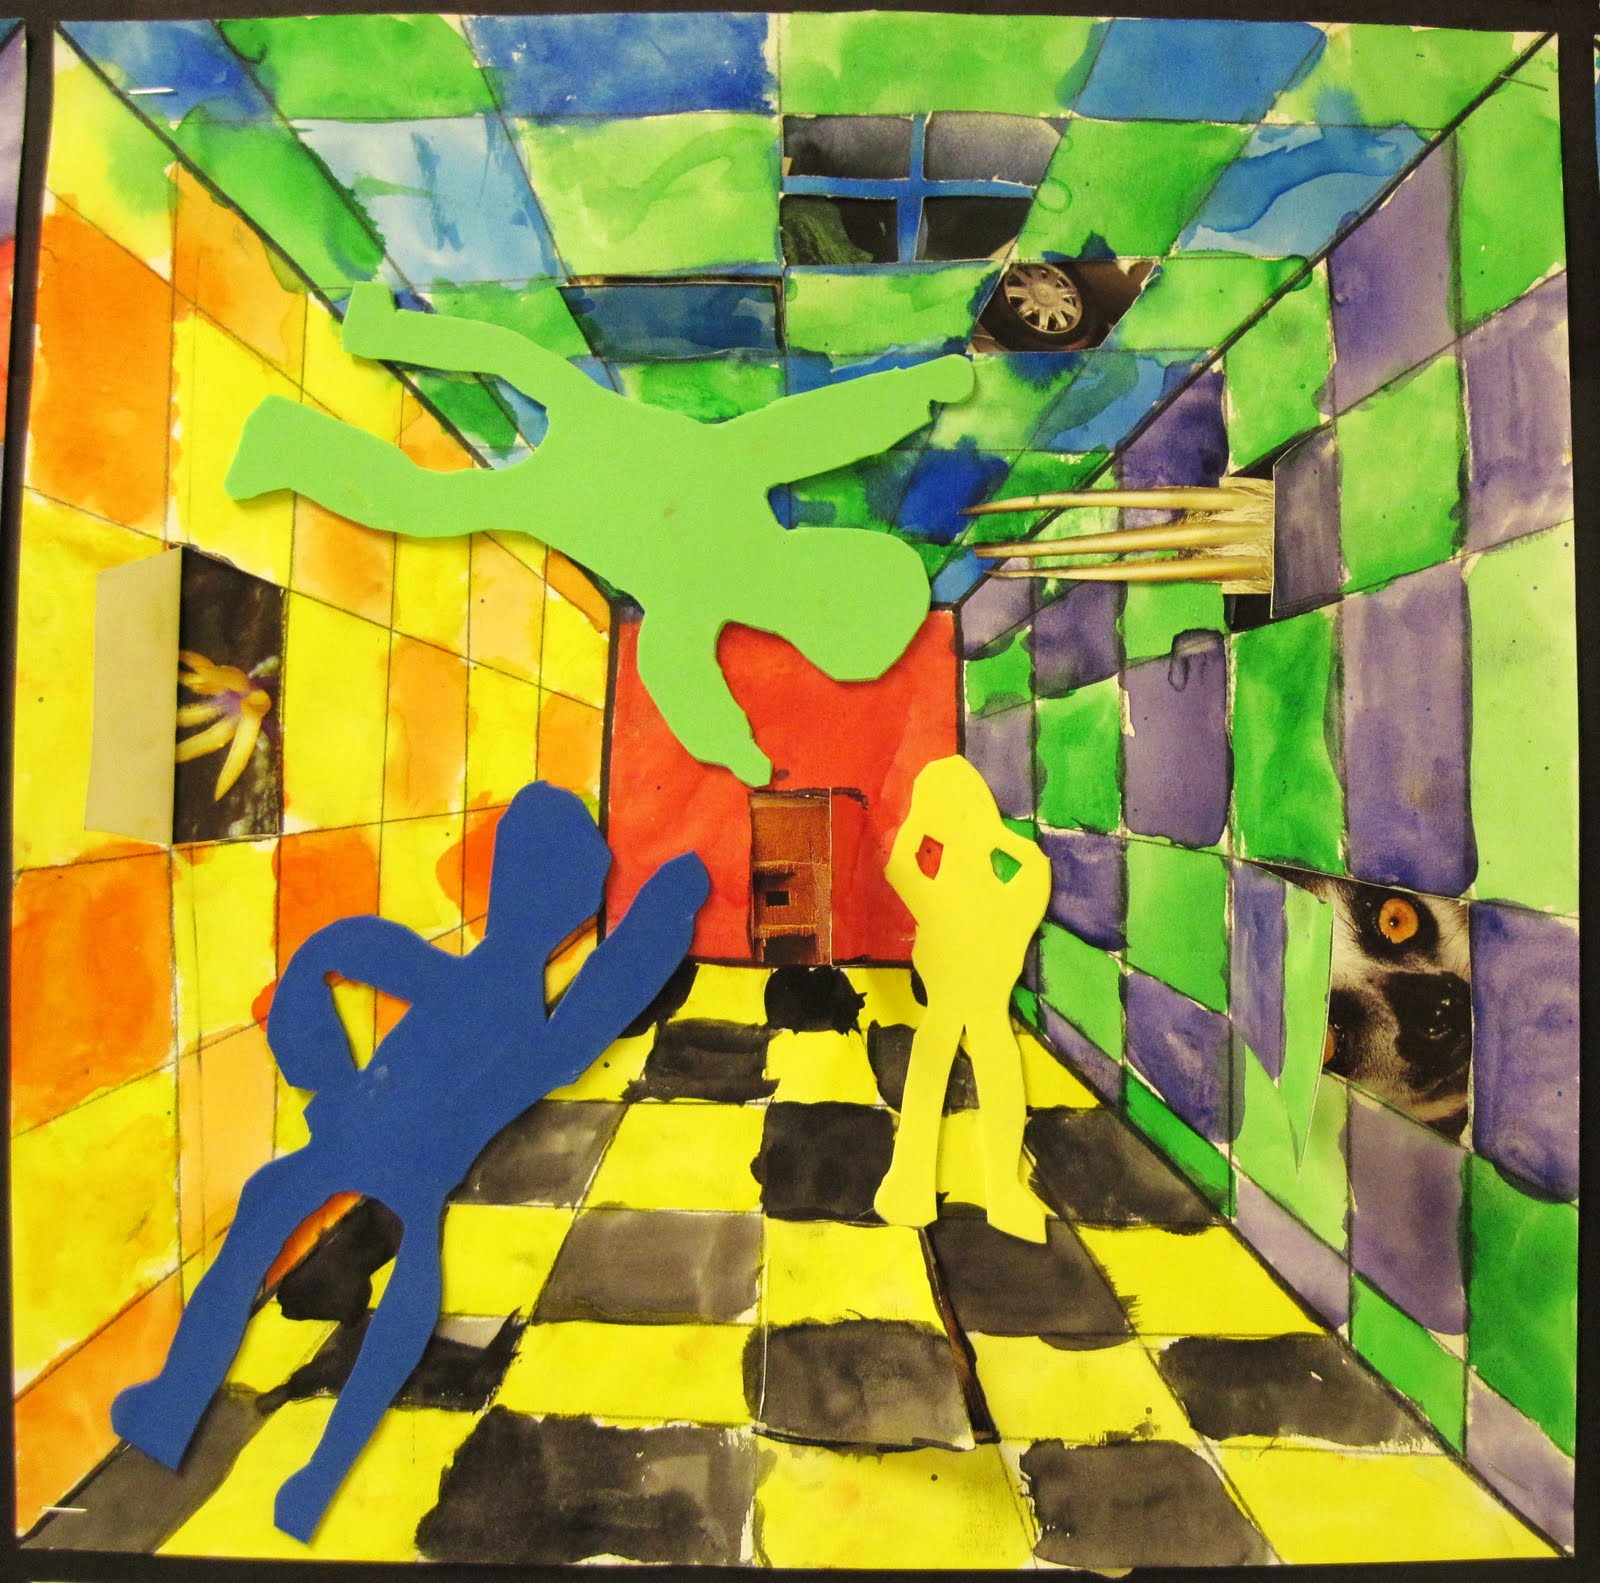
an easy target.  In 5th grade, students were working on a surreal perspective hallway.  Windows and/or doors were to be cut open with X-acto knives (after a demo on usage and safety), and then magazine images were added to create surreal elements.  The boy told me that he wasn't allowed to use a knife.  He told me his mother still cut all his food.  I knew he was a Boy Scout, but when I asked, he told me he wasn't even allowed to use a jackknife in scouting.  I knew he had an obsessively hovering overprotective mom, and an IEP, so I decided, after a discussion with the special ed chair, that since it was only a few quick cuts, I would just do them for him so he could move on to complete the project.
 But the following year, in 6th grade, my students were each creating a cartouche of their names in Sheetrock.  We were using woodcarving and linoleum carving tools, as well as sharp blades, of course again with safety and usage demonstrations.  I could see he was worried, but I told him it was safe if he followed instructions, and I wanted him to try and knew he could do it.  He otherwise loved art, and I knew this would be a good step for him.  Otherwise he couldn't succeed at the project.  And I knew they'd soon be learning to use woodshop tools in technology class, anyhow.  And of course, he was successful, and very proud of of his achievement.  We don't learn how to do something if someone always does it for us!!  More on this topic later...
Some thoughts on distribution of materials. Most of you often pre-set our tables with materials needed for the class period, and I would sometimes do that too.  (If you wonder why I am writing in the past tense here, remember, I'm retired.)   And I know many of you keep containers on each table with basic supplies: pencils, scissors, glue sticks, etc.  Not me.  I used a lot of big paper, and a lot of messy materials, and I did not want my tables cluttered with anything we weren't going to be using. My opinion - if my students weren't going to be using pencils that day, or scissors, or glue sticks, why would I have wanted them on the table? They'd just get in the way.
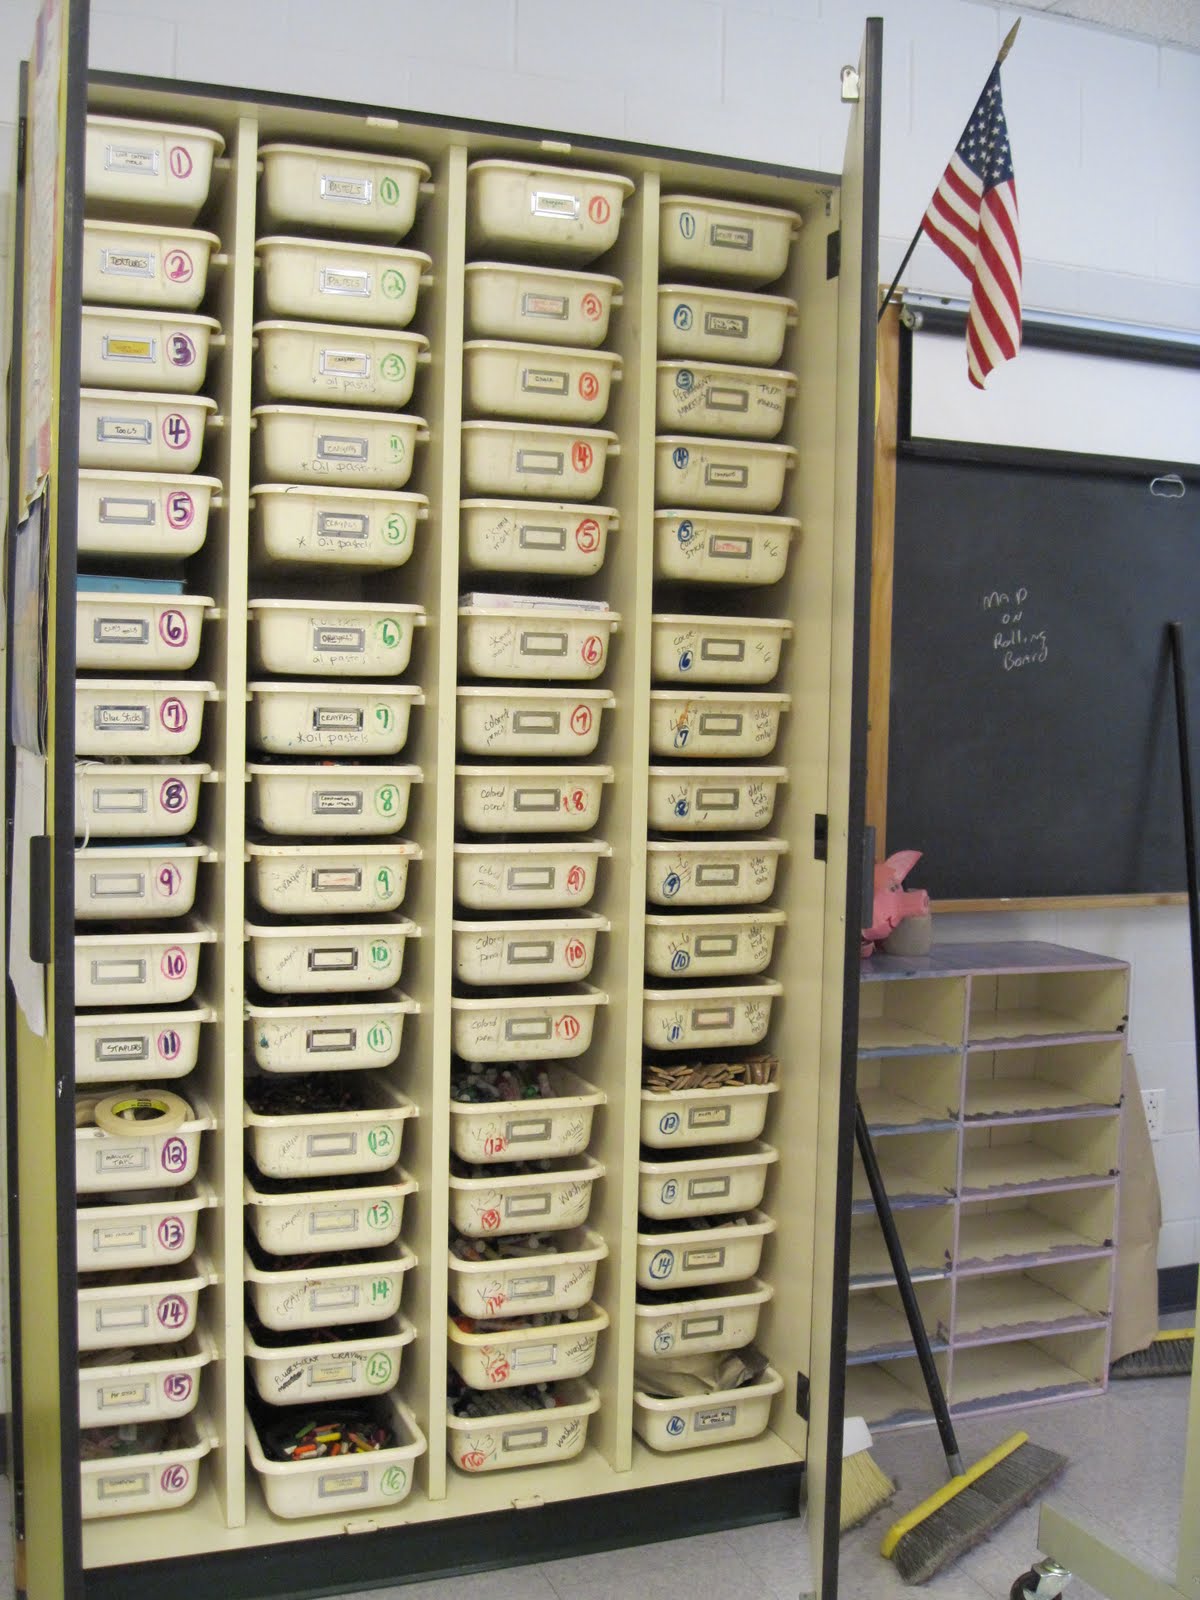
In my classroom, I had a large unit with labeled bins at the front of the room (above), a counter on the side of the room, and a low round table in the center (below).  I generally kept containers of both pencils and  black Sharpies on the round table, and would often also use it as a place to put specific supplies that students would need for the day's class.  If all students needed a scissors (or glue, or ruler, or some other material) at the same time, I would have a student helper pass them out and collect them.  But, often, in a project with multiple steps done independently, I would simply leave assorted materials on the round table.  The students were told "If you are ready for a scissors (or whatever), get up and get one." And when they were done with the scissors, they'd get up and put it back, keeping their table clutter-free.  This means (*warning!*) that the students were frequently getting out of their seats to get what they need.  *An aside here - since this means the kids were often walking with scissors, my rule was this: 'points down, hands around'. And obviously no running in the art room, ever. We chanted the 'scissor rap' together, with hand motions.  The kids knew that the was the only way they were allowed to walk with a scissors was with their hand wrapped around the point.
Are you afraid of letting students get out of their seats to get things?  Think about how empowering it would be to let THEM get the materials out, if they know where they are kept!  Then, during any free choice time (I often had students in during lunch, for example), they could also go to the bins and find whatever they might want to use, instead of asking you for a specific material.  *Note:  the very top bins had materials I wanted to keep safe from young hands, such as the X-Acto knives.  And I had plenty of storage elsewhere, so materials I did not want used regularly were kept elsewhere. 

Certainly you can (and should) set parameters.  For example, while doing collage projects, I might have put all the materials on the counter.  Or while weaving, all the yarn might have been in bins on the round table.  Or while doing a painting using many pre-mixed colors (such as in this recent post), I might put a large tray with all the pre-mixed colors of paint on the round table. Students could get up, get ONE color (or ball of yarn), or THREE collage items, and bring them to their table.  When they needed a new color or yarn, they'd have to return one color, and exchange it for another.  Or when they needed more collage materials, they'd simply get up and get three more. All scraps were immediately placed in the recycle box.
Having a classroom where kids are able to get up, move about, and get what they need will make your life easier, and makes them more independent.  Can't find what you need?  Get up and look for it!  Your paint water is dirty?  Go change it!  You need a different size paint brush?  Go find the right size!  You spilled something on the floor?  Wet a sponge, squeeze it out tight, and wipe up the mess!  Want to add another fun layer to this?  Put on some calypso music (or something else fun) and make the rule that if you need to get up and get something, you have to dance your way there!  Then watch it happen!
 And, how about this: for students who can't figure out how to do the next step of the project, or you simply don't remember what it was, this rule was posted on my board: Ask Three Before you Ask Me!  This rule will empower students to be helpers.  Oftentimes, this will be a win/win situation, as the student in need of  help learns from a peer, and in the process, it frees you up to help someone who really needs your guidance.

Now, on to the topic (which I have talked about before, particularly in this post written August 2010).  The topic is the use of tracers/templates/stencils.  Now I'm NOT going to say there is never a time and place to use a tracer; I'd be wrong.  In particular, I have used tracers for geometric shapes (I often use everything from bottle caps to rolls of tape as circle tracers), and occasionally to serve as specific means, when the shape might have been incidental to the product.  And I know some of you, particularly those with 30 minute classes, are working with serious time constraints, and need to find ways to get things done very quickly.  What I however DO object to is the use of tracers in lieu of a child's drawing because 'it will look better'.  What if the 3rd grade child below had used a tracer for her magnificent elephant, and if everyone in the class had also used elephant tracers?  They would have lost the absolute magic of each piece of artwork being an original child's interpretation. 
Instead, since we were going to be painting 'fauve' African animals, the students practiced drawing African animals using a series of projected and printed images.  We looked at the animals, discussed what shapes made up their bodies, which way their legs bent, whether they had a neck, and so on.  We practiced putting together the appropriate shapes to make the animal, and in the end, the kids learned a LOT about how to draw animals.  I contend that learning this way will empower your students to make decisions, and they will have much more pride in their work, because it is truly theirs. 
grade 2 texture monster
I recently saw a Facebook or blog post about monsters, where every child was given the same monster tracer, to fill with Zentangles.  (If you are reading this, and it was your post, please know that I am NOT picking on you.  I'm just presenting an alternative, my personal opinion.  Please do not be offended.)  Anyhow, the nice thing about monsters, or dragons, or creatures, or aliens, or even mermaids, is that we can use our imaginations to help us decide how they might look, since we do not have photos. So why have a tracer?  Aren't we then just telling the kids that our perception of what a monster looks like is 'better' than theirs?

For the two dragons below, made by 3rd graders with tin foil, clear contact paper, and Sharpie markers, we began by brainstorming and writing on the white board what kind of features a dragon might have, and why.  Is it going to fly?  Then it might need wings.  And so on.  In the end, each dragon was created based on the unique vision of the artist who designed it, rather than a bunch of matching dragon shapes designed by me and simply filled in like coloring books.  (To see more of the dragons created during this lesson, with a description of the process used, look here.) 
Again, for the 2nd grade 'texture creature' on the left below, or the 3rd grade alien portrait on the right, we brainstormed the many possibilities.  And in the end, each student had a unique product.  To see more work from either of these projects, or the kindergarten one below, follow these links:  texture fauves, alien portraits, blob monsters.  
below, kindergarten 'blob monster'
Certainly it is our role as art teachers to guide.  But we need to be careful about doing it for the student, rather than helping them to succeed on their own.  Imagine, for example, when building plaster bandage 'people in motion' in three 6th grade classes, that one girl in each class chose to build a ballerina.  Students were shown how to form the basic armature, and then took these projects in varied directions.  Each of the ballerina-makers asked how to make a tutu.  To each of them, I offered the same options, materials, and guidance, and I was thrilled that they individually each found a completely different solution within the offered parameters. 
Their unique solutions are so much more interesting than they would have been if I simply had said: "do it this way".  I'd give you a link to see more of these sculptures, but they have been posted more than once.  But if you are interested, use the search bar on the right or the labels on the bottom of the blog, and search 6th grade, or plaster bandage, or sculpture, or people in motion, or people in action.  You'll find them through various searches!!

My point is this: we should offer students the opportunity to become independent thinkers.  We need to let them gain a level of independence to make them confident about their work, and less dependent on copying or tracing that of someone else.  We need to prevent ourselves from being helicopter art teachers, hovering over our students and making all their decisions for them.  Sometimes, yes, they will fail.  And that, broadly, is the topic of my next post.  Until then, I hope everything goes swimmingly well! 
grade 2 texture shark

Friday, January 16, 2015

How to create a rockin' still life!

 My previous post, on the topic of observational drawing, received a lot views, and many compliments for my 'Matisse goldfish still life'.  So I thought maybe I would explain how to set up a really killer still life, that your students will want to draw.  I've set up many fun and unusual still lifes over the years, and while I unfortunately don't have photos of them to show, I have lots of great hints to share.  So today I set up this still life (above) to show you how to proceed.

 1) Choosing the objects:
Choose objects with interesting shapes, but not so complex that the kids will be frightening to draw.   You may want to choose a theme for the still life when you are picking objects.  (More on this in a bit.)  Think about the colors of the objects.  Will they work together?  What media are you using?
Where do I find these objects?  Go to yard sales, garage sales, or flea markets.  You can find silly toys and oddball knick-knacks, often for 10 or 25 cents.  Or check out the dollar store.  That's a good place to buy fake flowers and plants.  Or just look around your home! 
 
Above on the left, the cookie jar (or is it an ice bucket?) was a yard sale find.  The students are fascinated by it.  Mr. Coconut was picked up many years ago in the Bahamas.  The basket on the left below was a freebie, and the puppet in it was made by me.  On the right, a flea market find.
 Choose objects with a wide variety of shapes and sizes, organic and geometric, some with a vertical orientation, and some horizontal, natural and man-made.  
 
 An object like the old violin case below (which belonged to my grandfather) is wonderful in a still life, because it can create some negative space, and set up some environmental boundaries.  You can drape fabric through it, and tuck small objects inside it. 
2) Setting it up:
You may want to select items based on a theme.  For example, the objects in the photo below were all used, along with other objects (such as the dive helmet), in a still life that was widely based on the theme of the ocean and the beach.  The dive fins, mask, and snorkel all came from the dollar store.
Pick some fabric remnants or papers to use for creating negative space (background) of the still life.  With the beachy objects above, I used fabrics that were shades of blue, turquoise, peach and tan.  To create some vertical lines, I draped strings of 'pearls', and let them rest into and over seashells.  A pail turned on its side had sand-colored fabric spilling out, with some shells and toy fish on it.  There were toy boats, various toy sunglasses, a pair of flip-flops, and more. 

Pick a good place to put the still life, where it can be left set up for a while.  This can be on a counter-top if necessary, as above; but even better, put it in a central place, where it will be easily seen by everyone.  A great option is to put the still life on a rolling cart, so it can easily be moved out of the way when not in use.  I 'rescued' a little cart from an old (and obsolete) overhead projector.  It had a fold down shelf, and I put the shelf up to create more surface area to use.  I also had a larger cart in my classroom that was big enough for a large complex still life.
Create a background for the still life.  If your still life is on a counter, this could be as simple as tacking a piece of construction paper or some fabric to the wall behind the still life, as above.  Remember if you are using live plants in your still life, to plan your time accordingly. 

If your still life is going to be in a central location and you want it to be 'in the round', cut the edges of one side of a large cardboard box, and place in in the middle of the cart or table. 
 
A still life where all the objects are lined up on one level is usually boring.  Create levels with various sizes of boxes, or containers, that can be draped with fabric or paper.  After the still life is draped, objects can be put on top of the box, or in the crook of the angles where created where the box meets the surface of the table. 
Tape the fabric in place, and drape it with fabric or cover it with paper (construction paper or subtly patterned wallpaper) so it creates a 2-sided backdrop.  Think carefully about the lines you are creating with your drapes, and make sure any patterned fabric doesn't overwhelm the objects you've selected.   I suggest that you stay away from white or black fabric.  Make sure, if it will be viewed 'in the round', that all sides of the box get covered.  
 Above and below are the same boxes in the same position as shown above.  I also added both an upside down Cool Whip container and a cylindrical bottle laying on its side under  the drapes.
 Attach the fabric so it doesn't come down!  For this still life, I used paper clips and masking tape.  Staples also will work well for anchoring your fabric. 

In the 'Matisse' still life above, I used an ice cream chair that I dragged in from home, to create a level on the still life.  I was able to place objects on the seat of the chair, and under the chair, plus use it for draping the many patterned fabrics that were integral in this Matisse still life.  The nice thing about a large multi-layered in-the-round still life like this one below is that every child who draws it will find a completely different composition, so you won't end up with a bunch of matching drawings or paintings.  (Boring!!!)  To see artwork created based on this still life, check out this post.  And to see more photos of the still life close-up, go to this post


The steps in front of a renovation supply store, below, served as nice levels for the 'still life' that I spotted as I was entering the store.  See?  This wouldn't have been as interesting to me to photograph if the objects had been placed on the same level.
3) Adding the objects:
Once you've gotten your backgrounds anchored, start adding your objects.  Pay attention to the angles and lines you create.  In the photos below, I noticed the fabric pretty much all fell in vertical lines on this side of the still life, so I started by adding the large, slightly diagonal horizontal, to break up the space. Then I began filling in with the other objects I had gathered.  Where possible, put loops of tape on the bottoms of the objects to keep them in place.  Add draped fibers or jewelry to create some directional lines.  And if you are using a rolling cart, I suggest  marking the floor with tape so that each time you bring out the cart, it goes into the same location.
4) Drawing with the aid of a viewfinder:
 Do I expect every student to draw every object?  No way!  This would throw them into a panic, and make art that is too busy.  I give them each a viewfinder, cut to correspond to the proportions of the paper we will be using.  So for example, for 9"x12" paper their viewfinder could be cut to 3"x4".  These I cut out of scraps of tagboard.  I usually let them choose whether to use it horizontally or vertically.  Using the viewfinder, they 'squint like a pirate' and hold it away from their face.  What they find in the viewfinder should fill the space of their paper.  I usually set a minimum, such as " you need to have at least 3 objects in your composition".  As the viewfinder is moved closer and farther away from the face, you'll create totally different compositions, as seen in the versions below: 
 
 Here's another side of the same still life setup, also pictured vertically at the top of the post.
 Or perhaps a close-up.  Make sure, if you are using objects with eyes, you consider which way they are looking.  You don't want the objects to all be looking off the paper, though you have to remember they might be viewed from a variety of angles, so you might need to vary. 
 And on this same small still life, there's yet another side, viewed from different perspectives.
 Note the directional lines on the fabric.  I contrasted it with horizontal object placement. 
 And still another side:
The nice thing about all this, of course, is that no two kids will end up with the same artwork.  Yay!
5) A few other final tips:
  • Do I expect the kids to copy the pattern on the fabrics?  Absolutely not.  I explain the fabric is there to set a color mood for the still life.  They can eliminate or simplify fabric patterns in their drawings, and even change the color if it suits the artwork.  
  • What about glassware and metallic objects?   Both can be scary for students.  Keep it simple!  For a fun idea, put patterned scarves under and behind glassware, and then put water inside the glassware.  Zoom WAY in to find and some lovely abstraction!
  • Or what about trying a white-on white still life?  Look for white objects like eggs, a roll of toilet paper, and so on.  Put them all on a white draped background, and illuminate for shadows.  Have students explore the values with charcoal, or white conte or chalk on black paper.  
  •  Try a still life using just geometric shapes on solid draped fabric.  How about using Legos or other geometric building toys?  Or use all white geometric shapes and let the kids turn them into buildings in a landscape.
  • Which brings me to setting up a still life to represent a fake landscape.  Use layers of fabric to represent mountains, water, etc.  Use toy trees, boats, cars.   Hang some cotton stuffing on the sky for clouds.  This is fun when you live somewhere (like me) where the weather keeps you indoors for much of the school year.  Maybe you even want to throw in a toy Godzilla or alien!
  • When selecting objects, pick things that the kids will have fun drawing.  Toys are terrific.  If it looks boring to you, you can bet it will be boring for them. 
  • Can't set up a still life as I've described?  Set up mini-still lifes using cutaway shoe boxes; one per table.  In them, drape some fabric, and add Matchbox cars, or Happy Meal toys, or the little plastic animals you buy in bags in the dollar store.
  •  Use artists for reference, depending on what you are doing.  Using glassware?  Look up Janet Fish.  For some gorgeous still paintings, look up the work of Rachel Ruysch, and consider adding some little bugs or lizards in your still life, as did she.  Or of course Cezanne, or Matisse, or van Gogh, or anyone else as suits your need.  
 That's it!!