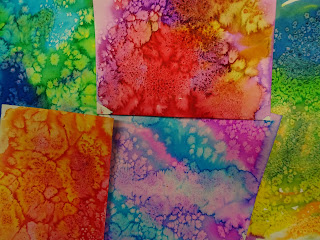
My DragonWing Arts students have been making painted paper, to use in sunshine collages we will be creating during late April or early May. Everybody painted 4 sections of an 18x24" sheet of paper, so there will be lots of choices to use for the sun and its rays.
We painted with brushes, scratched lines with the back of the brushes, stamped with foam circle stampers and also with slices of pool noodles cut in half, among other things.
We also painted smaller pieces of paper (12"x18") with cool colors, to use for our skies. We used the same methods and tools.
I found a rubbery waffle place-mat at the dollar store, and cut it in pieces. The kids enjoyed using them for stamping texture onto their papers. It was especially fun because their hands got so messy in the process.
Stay tuned; next month I'll post the process of putting together the collages and the final product. I've got some fun ideas for them - hopefully they'll be great!
Showing posts with label 3rd grade. Show all posts
Showing posts with label 3rd grade. Show all posts
Thursday, April 11, 2019
Saturday, March 9, 2019
Colorful Leafless Trees!
My DragonWing Arts students recently completed these paintings of trees. We began with this simple method:
First, draw a land line, dividing ground and sky.
Second, draw a trunk that extends from land line to top of paper.
Third, add branches coming from the trunk, extending to the edges of the paper. More smaller branches could be added coming from these branches.
Details could be added as desired. Some of the girls decided they should have branches that were shaped like hearts. And of course they wanted to add swings, too! I left these decisions up to them.
When the drawings were done, painting began. The kids each selected two colors to use to paint their skies, mixing as desired.
In the pic on the right below, you can see the the student making use of an 'ugly sponge' when mixing colors. We use these for keeping paintbrushes clean with minimal water. The excess paint is wiped off the brush onto the sponge, and the brush can then be dipped into the other color the student is using. When changing to a completely different pair of colors, the brush is first wiped on the ugly sponge, then washed in the water, and then wiped again on the sponge to remove excess moisture. The paints stay exceptionally clean with this method!
Then
another two colors were selected to paint the ground, and finally,
another two colors were used for the tree itself. White could be used
as desired, and other colors were used for various details.
When the paint was dry, some of the kids chose to use black Sharpies to outline and make their colors 'pop'. Originally, the plan was to add a few leaves as desired, cutting them from sheets of colored foam, adding vein lines with Sharpies, and gluing onto the trees or ground. We ran out of time, so the trees stayed leafless! I think they look great!
Saturday, March 2, 2019
Our Collages are Out of This World!!
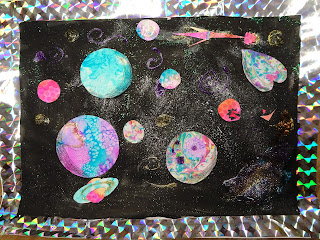
We began by painting large (18x24") pieces of paper with black ink, leaving unpainted borders about the thickness of a ruler. We also used some glittery purple paint on the ink, to add some sparkle. When dry, white paint was spattered on with a toothbrush, to make more stars in space.
On small sheets of white paper, we used liquid watercolors in several ways to achieve interesting surface texture.
We used the watercolors with salt,
With saran wrap,
And with bubble wrap.
plus liquid watercolor and shaving cream for marbling.
We also used bleeding tissue paper applied with water, removing the tissue paper when dry, to create colorful blends.
And finally, we printed some papers with slices of pool noodles and tempera paint.
Often, our hands ended up getting printed, too!
All the papers that were created were used to make into planets and more for our collages.
We used various bottles, caps, bowls, cd's, rolls of tape, and more as circle tracers for planets.
We used black crayons to add shadows to our planets to make them look round. This was easy for some of the students, and more challenging for others.
I showed the students how to cut rings for planets if they desired.
And the students began merrily cutting planets for their collages, to glue onto their painted and spattered background papers.
I gave the students strips of holographic contact paper, that they used to create fancy borders for their papers.I also had strips of glow-in-the-dark contact paper, which was used on the sides of the collage pictured below.
Finally, I also offered the students some glitter glue. The bottles hadn't been used in a while, and the glue often squirted out in wonky and unexpected ways, but still, the sparkle really jazzes up the skies!
There are currently 5 students in my DragonWing Arts class; I unfortunately neglected to photograph one of the final collages. I'll photograph it in a few days, and then add the pic to this post. In the meantime, here's one last pic.
Friday, January 11, 2019
Creating crazy colorful papers for collage
Here's the beginnings of new project with some fun preparatory steps! Last week, my DragonWing Arts students painted large sheets of paper with black ink, and then painted over it as desired with a glittery paint. These are going to become the backgrounds for colorful outer space collages. We will also be splattering them with some white and silver paint, to create galaxies of stars.
So this week's task was to create some colorfully textured papers that can be cut into planets, or any other celestial object desired! We did these several ways, using liquid watercolors and watercolor paper. The technique used for the papers pictured in the photo at the top of this post was bubble-wrap printing. The students wet their papers with a big brush, and then painted them with saturated colors. Then, a piece of bubble wrap was placed on the wet paint, and some cardboard was placed on top to keep it in place as it dried. Above are the results when dry. Yes, somehow I have purple bubble wrap! The color has absolutely no function. It's just pretty!
A similar process was used for the papers below, but instead of bubble wrap, students used crunched up pieces of wax paper and plastic wrap. I love the color choices they made - there's paper created for an ice planet, and another for a fiery planet, and so on.
Students then saturated another piece of paper with wet watercolors and sprinkled them with salt. We used a mix of table salt and kosher salt. The results, pictured below, are really lovely.
Then a piece of paper was pressed into the shaving cream, and the paper was squeegeed off afterward to remove excess shaving cream. We used pop sticks today, but a rectangle of cardboard is also a great squeegee for this method.
It's going to be fun to use all these papers to make our planets. If we have time, we will try some other techniques for even more planet paper! Stay tuned... we are working on a couple of other projects as well, so you won't be seeing the results for a few more weeks.
So this week's task was to create some colorfully textured papers that can be cut into planets, or any other celestial object desired! We did these several ways, using liquid watercolors and watercolor paper. The technique used for the papers pictured in the photo at the top of this post was bubble-wrap printing. The students wet their papers with a big brush, and then painted them with saturated colors. Then, a piece of bubble wrap was placed on the wet paint, and some cardboard was placed on top to keep it in place as it dried. Above are the results when dry. Yes, somehow I have purple bubble wrap! The color has absolutely no function. It's just pretty!
A similar process was used for the papers below, but instead of bubble wrap, students used crunched up pieces of wax paper and plastic wrap. I love the color choices they made - there's paper created for an ice planet, and another for a fiery planet, and so on.
Students then saturated another piece of paper with wet watercolors and sprinkled them with salt. We used a mix of table salt and kosher salt. The results, pictured below, are really lovely.
This one looks like it could be the earth!
Here's a couple more gorgeous closeups!
Finally, the students tried out shaving cream printing. If you've never done this before, it is easy and messy, but its the kind of mess that cleans up easily. Each student spread out some shaving cream on a tray. They dripped liquid watercolors into the shaving cream, and swirled the colors with a fork or a pointy wooden stick. Then a piece of paper was pressed into the shaving cream, and the paper was squeegeed off afterward to remove excess shaving cream. We used pop sticks today, but a rectangle of cardboard is also a great squeegee for this method.
It's going to be fun to use all these papers to make our planets. If we have time, we will try some other techniques for even more planet paper! Stay tuned... we are working on a couple of other projects as well, so you won't be seeing the results for a few more weeks.
Subscribe to:
Posts (Atom)


