Showing posts with label flying pigs. Show all posts

Monday, January 27, 2014

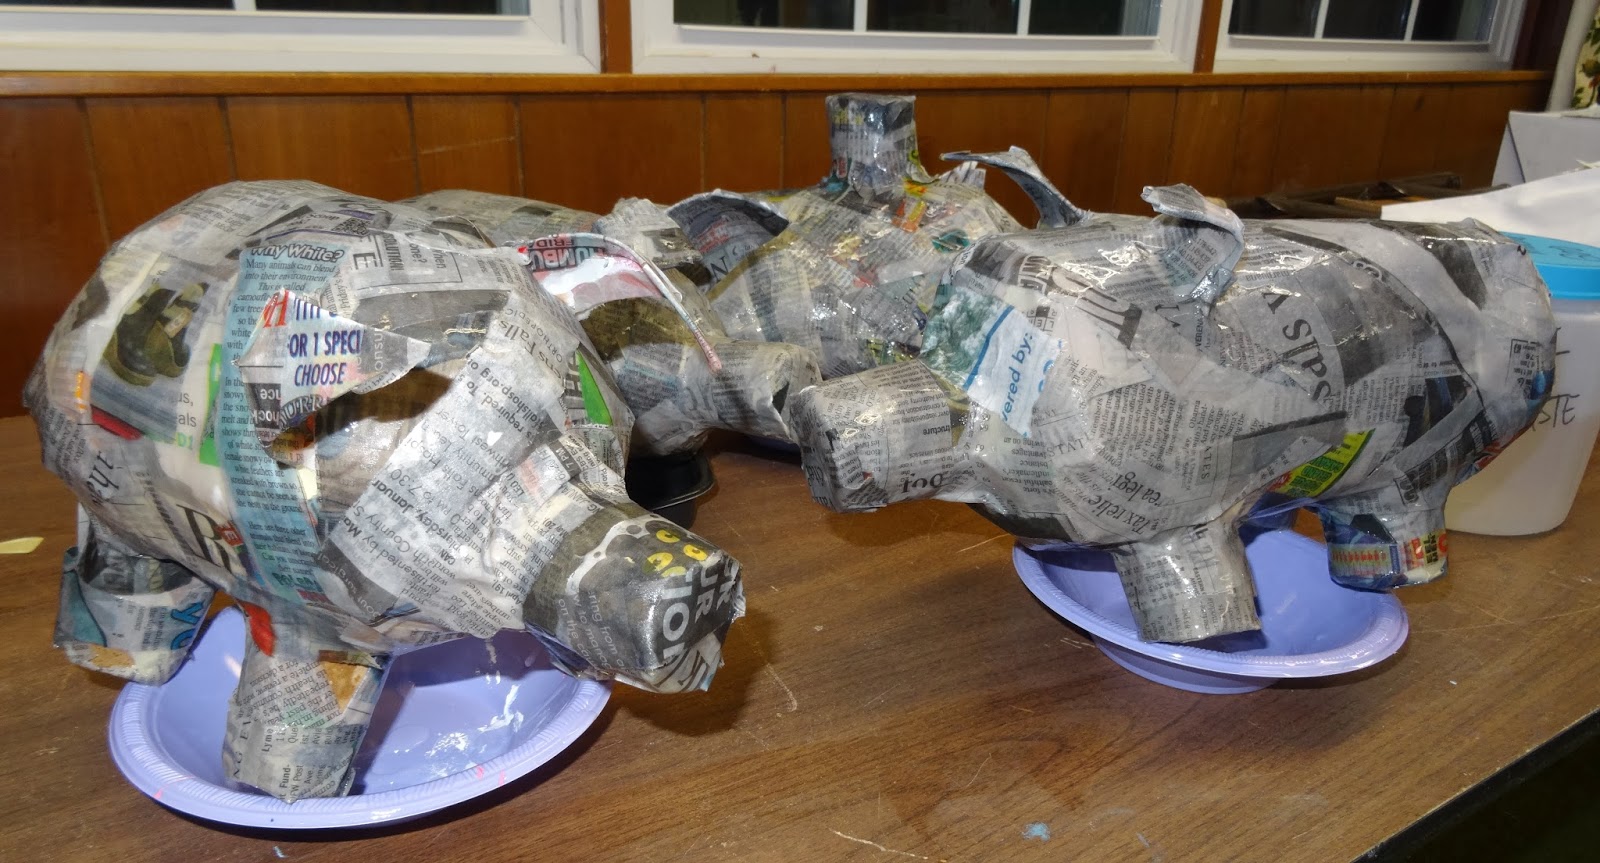
Papier-mache has begun!


Just thought I'd take a moment to share with you how my DragonWing Arts students are doing on their flying pigs!

I've mentioned this many many times before on the blog, but if you are a newer reader, you might not realize that I am positively smitten with papier-mache.  It's just got SO many possibilities.  But since these students are relatively new to me, and since our time is limited, rather than tackle something extreme, I decided to select a project for them that is foolproof easy, tried and true.
 

Many of you worry about papier-mache dripping all over the place and the mess.  I contend that, if done MY way, you'll have better results, it will be ridiculously easy to clean up, and they will dry much faster because you won't be using too much goo.

To make a long story short - do NOT dip the newspaper strips into the goo!  I know that's what most of you do - you dip them, and then 'scissor' off the excess with your fingers.  Instead, try this:  dip your FINGERTIPS into the goo.  Then rub it on the palm of your hand.  Touch a finger to a newspaper strip to pick it up, and rub it between your palms to saturate with goo.  It should look translucent, but not be drippy.  (Note the great vocabulary words you can teach: translucent and saturate!)  Then put the strip on the project, and give it a massage.  Repeat for the next strip; and the next; and the next....    When done for the day, make sure the whole thing is massaged nicely to smooth in rough edges or paper sticking up. 

Meanwhile, my students are also beginning a crazy favorite project of mine, 'toothpaste batik'!!  Some of you use a similar process using a resist of washable white or blue gel glue.  I've tried that and found that it is very challenging to wash out.  So we use a mix of white toothpaste and aloe vera lotion that I purchased at the dollar store.   I mix it 50/50 for the resist.  I'll be posting more about this process (and I've posted about it several times before; you can find six of these the posts via my labels at the bottom of the blog.  Just click on the label 'toothpaste batik'.).  In the meantime, I've gotten a sample started for the kids, and one of the girls has an abstract design that she has begin. Here's a sneak peak:
My sample frog, with the resist newly painted on
 Below is a student piece.  The design was drawn on paper, traced with Sharpie, and taped to a board.  The fabric was taped OVER the paper, so the Sharpie design shows through.  This way there are no pencil lines on the fabric to annoy you later! We'll be working on them again on Thursday, so I'll show you more details of the process then, I promise!  
Meanwhile, stay warm, everyone!

Sunday, January 19, 2014

Flying pig construction for papier-mache

My pig "Daisy"
Flying pigs are coming to life!  Students in my after school program DragonWing Arts  have began construction of piggies in preparation for papier-mache.  (They have not yet sprouted wings.)
For those of you who struggle with papier-mache, plastic bag construction offers enormous flexibility, and it is ridiculously easy.  The pig is a great project for a first-timer, since a bread bag is not too big, and a great shape to work with.

First you stuff the bag with crunched up newspaper, one page at a time.   Even a smallish bag from a loaf of bread, such as we are using here, will take quite a few pieces of newspaper to fill, since you want it fairly firm.   When full, the end of the bag gets tied, rubber-banded, twist-tied, or taped (whatever works!)  You won't see that end on the piggies in these photos, since their snouts have been built over the taped bag ends. 
The piggie above looks like he's on the run, or perhaps his arms and legs are stretched out Superman-style.  After all, he will be flying!

Masking tape is used to shape the bag as desired.  For the pigs, that simply means taping in any corners, but if you were making, for example, a bug, you might want to tightly tape a 'waist' to separate body parts.  This process of taping bags was used  for other papier-mache student work I've shown you over the years.  Look at these posts to find a Laurel Burch style cat, and a frog (among other things) made by former students, and an assortment of critters made by me as samples, including a lizard found in  this post.
 The legs were each made from 1/2 toilet paper roll, and the snout was another portion of a toilet paper roll.  The ends were cut with a number of slashes to 'flower out' the end for handles for taping.  The kids were instructed to tape around them in a tick-tac-toe shape.   This holds it on the best.  Then additional tape was added as needed.  They were stuffed with newspaper and the ends were taped over.
The ears were cut from cereal box cardboard, though the piggie above does not yet have his ears attached.  We cut the ears bigger than needed, slashed them once and overlapped the parts to form a curve, and hot glued the overlap.  The bottoms were slashed once again to form tabs to attach them to the piggie.  All the slashing, folding, and taping is the reason you need to start with such a large ear shape!

We will be using cereal box cardboard to add the wings, after the piggie has been papier-mache'd.  This will make the papier-mache process go more quickly.   You can see some finished papier-mache flying pigs, made by my former 5th graders, here.   

Next week, my students will be embarking on gooey papier-mache, my personal favorite thing ever!  In the meantime, the pigs already have names such as Piggly Wigglebottom (which will probably change several times before completion).

By the way, I'm often asked why I don't like using balloons for papier-mache.  I've told the story here on the blog before, but here it is again:  My town has a HUGE annual hot air balloon festival every year, so one year we decided to start in the fall with papier-mache hot air balloons.  At the end of the day there were more than 40 wet projects on my windowsills, in my drying cabinet, and on the counter.  I was in school quite late that afternoon, all alone except for a custodian, when I heard gunshots.  Or at least that's what I thought.  One after another, the balloons starting popping.  I'm assuming it was due to an end of the day temperature change in the building, perhaps?  I nearly jumped out of my skin!  More than 1/2 the projects popped, and I spent about another hour, blowing up new balloons into each one of the collapsing art projects.  I absolutely NEVER want to do that again!!!!  Boy were my lungs tired!
 Has anyone else ever had a balloon experience like mine?

Wednesday, March 30, 2011

Anything is possible in the art room - pigs are flying!


Above, Dylan's happy little pig (left) and Kylie's splatter-pig fly over my desk, along with Cristina's lovely angel pig (unfortunately not photo-ed). I also don't have a photo of the Boston Celtics pig, complete with sweatband on head, or the rodeo pig with its lasso.

So the flying pigs are mostly done; 25 of them are currently 'flying' in my room with 8 more to complete. The unfinished pigs include a clown pig, and a sweet girl piggie with lace and ruffles and bows. Next week, several pigs are going to the public library to fly through the children's room for a few weeks. Here's a view of my art room:

The little kids are so excited walking into the room and seeing all the pigs flying!


Above is Cordell's devil pig, and Summer's angel pig.


Chloe's chef pig (complete with fried egg) and Delilah's pig.


Trey's "ninja superhero pig" is situated over the radiator vents, so that his cape constantly blows in the breeze.


Kylee and Olivia's two happy piggies


Quinn's red, white & blue pig with star wings


Xavier's pig (wish you could see it's cute smile)


Mason and Jay's army pigs (note the "bomb" - a pipe cleaner and button - hanging from the pig on the right)

I think the pigs came out pretty cute, but I had trouble convincing the kids of how I wanted them finished. I told them that eyes close together look goofy and cute, but most simply didn't want them that way. They could have added eyelashes, bows, belts, and more, but only a few went that far. Two of the most unique are a firefighter pig and a sheriff pig (both the dads' professions) and they have name badges and uniforms, but ironically both have earrings and glitter eye shadow. So I had to remind myself: I chose pigs as our papier-mache project this year, rather than some others that I might have done, because I KNOW THE KIDS. This year's 5th graders are sweet, nice kids, quite lovely actually, but they have trouble with multi-step directions. The pigs are easy to construct and the only real decision-making was the design of the wings and how they are painted/decorated in the end. Ironically, my 3rd graders are beginning some papier-mache masks right now, and they are decidedly more complex. Again, I know the kids. Do you adjust your lessons & projects based on the mix of kids in the class?

**I said this a couple of days ago and I'll bring it up again - is anyone else having weird spacing things going on with blogger? After all these months w/no problems, suddenly I have extra spaces jumping in, or spaces deleting, no matter how many times I try to adjust it. I don't like the way it looks but I can't seem to fix it. It's a mess! Picky, picky, huh? Are you having these problems with your blog?

Friday, February 11, 2011

Pigs in progress - ready to fly!


My 5th graders are making flying pigs w/papier-mache. For those of you nervous about papier-mache, I'll admit I may do things a little differently, which makes it VERY EASY.
-
As I've told you before, the bodies are plastic bread bags stuffed with crumpled newspaper. This way, the papier-mache dries a LOT faster than when using an armature of wadded up newspaper, so it makes storage easier.
-
The kids learned how to cut the end of toilet paper rolls to make tabs to attach, and how to slit the cardboard ears (made from pieces of cereal boxes) to make them curve. The legs and snout were stuffed and taped over, and the whole project got a coat of papier-mache.
-

When dry, I hot glued a twist of wire for a hook on the top of each pig. (They need to fly, so I wanted it to be easy to hang them!) I passed out pictures of all sorts of wings: angel wings, butterfly wings, bat wings, etc. The kids cut their own wing patterns out of paper and then made the wings from cereal boxes, whatever size they desired. They had the option to reinforce the wings with wire for a curved shape.
-
Currently the kids are doing another coat or two of papier-mache. Next we will add a coat of gesso for strength, paint with acrylics, and glue add-ons such as foam or felt shapes, feathers, wiggle-eyes, sunglasses, halos, tutus, etc, depending on the personality of the pig.

A few words about my papier-mache process:
We use "Art Paste" which is a powder that comes in a box and mixes to make 4 quarts of goo. The kids call it "dog drool". Is it the strongest papier-mache out there? No. But it has wonderful advantages over wallpaper paste, wheat paste, flour and water, or even watered white glue. First of all, it can be mixed and stored FOREVER without spoiling, unlike wallpaper paste, wheat paste, or flour paste. Second of all, it is totally washable, and finally, instead of drying itchy on your skin, it makes your hands feel SOFT. And you don't need to worry about wheat allergies.
-
Here's the biggest difference in my process from what many of you do, and the biggest mess-saver. We do NOT dip our strips of newspaper into the goo, and do the typical "scissor off" of excess goo with our fingers. Kids tend to leave too much goo on when dipping the strips, and you end up with oozy, gooey mess that takes a long time to dry, and drips all over the place. What we do is scoop some goo on our fingers and rub it on our palms. Then we touch a finger to a strip to pick it up, and rub it between our palms to saturate the strip. Once some strips are placed on the armature, the kids are encouraged to put a little extra goo on their palms and give their projects a "massage" to smooth down any loose corners.
-
I know many of you papier-mache over balloons. I haven't done this in years, since the time we made hot air balloons (there's a big balloon festival here every September). Did you know that temperature changes may make balloons pop? I was in my classroom late one afternoon, and suddenly it sounded like gunfire as balloons started popping one after another! I had to run around blowing up fresh balloons into about 20 drooping globs of wet newspaper. What a mess!! Never again.

-
It looks like the kids are being guarded by an ill-tempered dragon! Poor wingless Lucy....

By the way - I must be a little crazy, as this is my 3rd post of the night. I've got a cold, and sitting on the couch with my laptop is my therapy tonight. Anyhow, don't forget to scroll down and see what else I posted earlier this evening.