Wednesday, March 30, 2011

Anything is possible in the art room - pigs are flying!


Above, Dylan's happy little pig (left) and Kylie's splatter-pig fly over my desk, along with Cristina's lovely angel pig (unfortunately not photo-ed). I also don't have a photo of the Boston Celtics pig, complete with sweatband on head, or the rodeo pig with its lasso.

So the flying pigs are mostly done; 25 of them are currently 'flying' in my room with 8 more to complete. The unfinished pigs include a clown pig, and a sweet girl piggie with lace and ruffles and bows. Next week, several pigs are going to the public library to fly through the children's room for a few weeks. Here's a view of my art room:

The little kids are so excited walking into the room and seeing all the pigs flying!


Above is Cordell's devil pig, and Summer's angel pig.


Chloe's chef pig (complete with fried egg) and Delilah's pig.


Trey's "ninja superhero pig" is situated over the radiator vents, so that his cape constantly blows in the breeze.


Kylee and Olivia's two happy piggies


Quinn's red, white & blue pig with star wings


Xavier's pig (wish you could see it's cute smile)


Mason and Jay's army pigs (note the "bomb" - a pipe cleaner and button - hanging from the pig on the right)

I think the pigs came out pretty cute, but I had trouble convincing the kids of how I wanted them finished. I told them that eyes close together look goofy and cute, but most simply didn't want them that way. They could have added eyelashes, bows, belts, and more, but only a few went that far. Two of the most unique are a firefighter pig and a sheriff pig (both the dads' professions) and they have name badges and uniforms, but ironically both have earrings and glitter eye shadow. So I had to remind myself: I chose pigs as our papier-mache project this year, rather than some others that I might have done, because I KNOW THE KIDS. This year's 5th graders are sweet, nice kids, quite lovely actually, but they have trouble with multi-step directions. The pigs are easy to construct and the only real decision-making was the design of the wings and how they are painted/decorated in the end. Ironically, my 3rd graders are beginning some papier-mache masks right now, and they are decidedly more complex. Again, I know the kids. Do you adjust your lessons & projects based on the mix of kids in the class?

**I said this a couple of days ago and I'll bring it up again - is anyone else having weird spacing things going on with blogger? After all these months w/no problems, suddenly I have extra spaces jumping in, or spaces deleting, no matter how many times I try to adjust it. I don't like the way it looks but I can't seem to fix it. It's a mess! Picky, picky, huh? Are you having these problems with your blog?

Tuesday, March 29, 2011

A long meeting and other random stuff

Here's a little doodlemania, as I doodled my way through a LONG (decidedly non-Zen) meeting this evening. The meeting ended just as my page filled up and my purple pen (I don't know why it doesn't look purple in the photo) started to run dry. And here's a necklace I made a while ago, which now belongs to a teaching assistant at my school. Sometimes I wish I kept it; it's definitely my taste. I'm making earrings to match for her, which is why I'm holding it.

And today my 2nd graders began making their teddy bear chairs. This is just step 1. Stay tuned in the next couple of weeks!!!

Op Art - 3rd grade

These paintings are by 2nd graders. I tailored the lesson after one I found here: http://artwithmrssmith.blogspot.com/2010/09/op-art-floating-spheres.html but I simplified it for my little guys.

Students each started with an 8" square of white paper, and a 10" square of graph paper with a 1" graph. The kids traced a circle twice, once anywhere on their graph paper, and once on the white paper. On the white paper circle, they made two downward arches (rainbows or frowny-faces), and 2 upward ones (smile lines), then rotated their paper one turn and did it again. Then it was on to painting! I had a choice of 2 colors of fluorescent paint on each table; each child chose one to paint every other square. For kids that got confused, I reminded them the opposite blocks would be black and would therefore cover any mistakes. I helped "dot" the squares for those students who had trouble figuring out the checkerboard, particularly in the circle. (Note they did not paint the inside of the circle on the graph paper.) Then the students painted the opposite squares black,and when dry the painted circle was cut out and glued on the graph paper. Finally some black and white oil pastels were used for a shadow. Here's the whole bulletin board:

A couple of thoughts about this lesson after-the-fact:

  • The bulletin board looks really cool, and the kids are really proud, but they lack soul. I have to justify to myself that the kids learned a lot, in particular paintbrush control and the need to follow directions carefully. But this type of project, where everyone's work is essentially the same, is not really my cup of tea - I like the unique vision of children and how they interpret instructions and ideas, and a lesson like this does not leave any room for interpretation.

  • One other thought - if I did this lesson again, I would have them trade colors for the circle. One student (the painting at the top of the blog) got the wrong green after being absent one day, and I think that the circle stands out that much more because the color is slightly different. I think using the complement would be even more dramatic.

Sunday, March 27, 2011

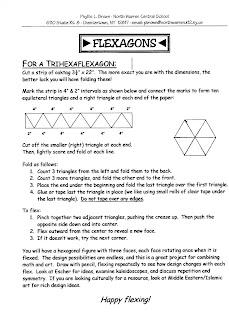
The Amazing Trihexaflexagon!!


A combination of math and art, this annual 6th grade project intrigues everybody. We began making them when my 22 year old son was in 5th grade, and for an enrichment class he researched math puzzles and games. His interest in them waned many years ago, but I've been intrigued ever since, and so have the kids. First we break down the word: tri = 3, so it has 3 sides, or 'faces'. Then hex = 6, and it has 6 edges. Then of course flex = bend, so we have a 3-faced, 6-sided, flexible polygon! Then, an added bonus, each face has an additional 'rotation'. What you see above is the first side, and its rotation.
Above is side 2 and its rotation, and below you see it being flexed, or rotated. The final step would be to reach into the center and 'bloom' it like a flower.
And below is side 3 and its rotation, still being colored (by one of the Sarahs).
It all starts with a sheet of bristol or tagboard, 3-1/2" x 22", measured into triangles. Accurate measurement is critical, so it is a good exercise for these kids. Then they learn to score the paper for it to fold cleanly. It's easy to do with good instruction, but hard for me to explain here on the blog. Here's a video of one: http://video.google.com/videoplay?docid=5757289930789567532#
***************
The story of the origin of the flexagon is really interesting and fun. If you type "flexagon" into google, or even "trihexaflexagon", you'll find endless information on how to make them, and much more. (The trihexaflexagon is only one of many flexagons, but easy enough for kids to put together. We also make a tetratetraflexagon,which is even easier to make, but a little less dynamic a result.)
*************
I've taught workshops on making flexagons at my NY state art teachers' conference, and may teach one again next year, so if you are in NY and are interested, I'll see you in Westchester in November! It's much easier to learn hands-on than from printed instructions, believe me!!
----------------------
If you've read this far, you're in luck, because..Ta Da!! Here's a scan of my instructions that I used for my workshop! Feel free to copy and use them:

Saturday, March 26, 2011

1st graders are "real" artists

It was a busy, messy week, with Kindergartners thumbprinting rainbows and painting skies, papier-mache flying pigs reaching completion, and more more more. But my 1st graders were not messy for once (though they came prepared wearing "art shirts") as we had one of my annual 1st grade favorite art classes.
I tell my 1st graders they are "real" artists, doing portraits, making sculptures, etc, all things real artists do. I explain that real artists practice drawing people by looking at live models, and they will each become a model for a minute or two for the rest of their classmates to draw.
*
I have them all stand up and we practice bending our bodies into positions I draw on the white board, using just ovals (you'll see a couple behind the models above). The kids folded up a big piece of 50lb white paper into enough rectangles to fit everyone in their class, and they love to get their turn to be a model! Unfortunately the artwork went home and I forgot to take pics of their finished drawing practice, but here's someone hard at work:
I'm using this lesson this year to intro "Giraffes Can't Dance" (a popular blogger art lesson) in their next art class, since we now have experience in how we bend and articulate our bodies. Hopefully that will help with our giraffes!!
*
NOTE: You may have noticed on the white board behind the first child the word "NO!" but recall my opinions on the "No-No board", posted a while back and generating much discussion that I really don't want to start again. So you may think I'm being hypocritical here, but I don't think so. FOR THIS LESSON, we did agree to say NO to stick people and NO to M&M people and the kids laughed a lot especially at the drawing of the M&M person (forgetting that a year or two they ALL drew people this way). Other than those 2 "NO's", I was open minded. Some kids drew with ovals like I had on the white board, but honestly that is tough for some 1st graders and often a drawing ended up with an extra oval or two in each leg or arm, making a multi-jointed person.
-
By the way - I had a comment about my color wheel table, so if you are interested, I posted about it here: http://plbrown.blogspot.com/2010/07/color-wheel-table.html
*
Later this weekend I promise to post trihexaflexagons and flying pigs!! (I told you it has been a busy week.)

Friday, March 25, 2011

Dunks, dancers, and more plaster bandage sculpture


Basketball - going for the dunk


Soccer player diving for the ball (left), and Michael Jackson (right)

and more dancers

Thursday, March 24, 2011

They don't tell you this in your college art ed program


There's a lot of practical stuff they don't tell you about in college, when they are busy teaching you all sorts of educational jargon and acronyms. Like how to take clean 40 paintbrushes and refill 10 paint trays in 2 minutes between classes, and how to get blue and black paint out from under your fingernails, and what to do when a bucket of papier-mache goo gets spilled on the floor, and how to get red acrylic paint out of fine blond hair, and how to keep the metal strips from coming out of the good wooden rulers, and what to do when the sink clogs, and especially (and most frustratingly), how to keep Elmer's Glue bottles from clogging.
*
Most of these things I have figured out during my 34 years in the art room, but I'm still befuddled by the glue caps. No matter how many times I tell the kids to close the tops and wipe off the excess glue when done, and to make sure the bottles are standing up, and to NOT stick a scissors in the top to unclog them, I still spend a ridiculous amount of time taking care of them. This morning I put 2 Elmer's bottles on each of 4 tables, all of them working. By the time the 2nd class had left each bottle was clogged and replaced with another, and by the end of the morning I don't think a single bottle still worked. How does this happen?!!
*
So I spent more than 2 hours after school today, removing and cleaning out all the tops, stabbing myself several times with the punching awl while I chipped away dried glue, and finally refilling. Do you go through this glue bottle ritual? If not, do you have any tips how to avoid it?

Wednesday, March 23, 2011

I couldn't wait any longer to show you this


Along with the basketball players, the dancers, the ninjas, and the female boxers, there has also been Luigi, Michael Jackson, a diver entering a swimming pool, characters from video games, soccer players, a jogger, an explorer, a golfer, and a zombie; but, in my opinion, there's been none that compare to Sarah's SCUBA diver. (This is Sarah #4. Another Sarah made a spectular girl boxer, one made a lovely dancer caught mid-leap with spectacularly braided hair, and one made a seriously goofy golfer.)


This piece actually isn't quite done - Sarah plans to add little "weights" on the weight belt, and a classmate is bringing her a little rubber octopus to hide in the coral, along with hopefully some fish. I love her attention to detail - the green highlighted hair in two pony tails, the gauge hanging from her air tank, and today's addition, the camera, complete with viewfinder, lens, and flash.