Showing posts with label sewing. Show all posts

Monday, August 15, 2016

This week's artistic creations

I've been slow about blogging, distracted by the summer.  But it has been a few creative days, and I thought I'd share my creations!
While watching the Olympics on TV, I made these two bracelets using beads from my personal stash.

I decided to replace the faded curtains in our Adirondack lakeside camp, for the first time in almost 20 years!  Last week I sewed and hung new kitchen curtains, and today we put up new bathroom curtains that I finished sewing yesterday.  The next big job is the living/dining room, but there's a LOT of windows so that might just be a project for the winter. 

 And my 10-year old step-grandson came over for the afternoon, and we made thin crust personal-size pan pizzas to order for everyone (including his mom, dad, and brother, plus my husband and me), using herbs, kale, tomatoes and green peppers from my husband's backyard garden, as well as other toppings. 
Here they are, straight out of the oven.  They were as delicious as they look!
 
Being creative isn't always doing a drawing or painting.  A pizza can be creative too!!

Saturday, March 26, 2016

Highlights of my visit to the Art Institute of Chicago

Lorette with Cup of Coffee; Henri Matisse
It's always great to see works of art that you've never seen before, that really grab you, especially by favorite artists, like the one above.  I totally am blown away by the close-cropped composition, and can't think of another Matisse painting like it, including the very neutral color scheme.

While I didn't get to see everything I wanted during my recent visit to the Art Institute of Chicago, and the van Gogh exhibit was so crowded that I got claustrophobic and escaped without seeing most of it, I have some pieces from elsewhere in the museum that I want to share.  But first, let me share my mola dress, that I made! My camera was missing for a day, so I had to rely on what pics I could get others to take of me.
In the left-hand image, I just completed presenting a workshop on blogging with Laura Lohmann of the blog Painted Paper, and Cassie Stephens, who has a self-named blog.  On the right is my annual colorful hair pic with a gal from Massachusetts.  I think her lovely mermaid hair really outshined my blue tips and steak this year!  I got the mola through Crizmac, and bought assorted colors of double-knit fabrics (to match the mola) from Mood, the fabric store in NYC where they shop for fabric on Project Runway.  I'm pretty pleased with the way the dress turned out!

Now, back to my visit to the art museum...  I was sure this pic below was going to say it was by Andre Derain.  But I was wrong.  Nevertheless, I love, love the colors!
House at Chatou; Maurice de Vlaminck
 And I was fooled again by these two paintings. I was guessing maybe Kandinsky.  I don't think I realized that Braque ever painted with such lively colors!
Landscape at L'Estaque; Georges Braque
Antwerp; Georges Braque
 These below, however, WERE painted by Kandinsky, who has forever been another of my personal favorites. 
Landscape with Two Poplars; Vasily Kandinsky
Painting with Troika; Vasily Kandinsky
I was tickled to discover that this lovely painting with a complementary color scheme had been painted by a woman, and she was American! 
Landscape; Marguerite Thompson Zorach
And another Matisse I've never seen before.  This painting is so expressive; I am smitten. 
Woman before an Aquarium; Henri Matisse
And this has a Matisse-ness to it, but it is NOT a Matisse.
Summer; William Zorach
Here, I might have guessed Manet, and of course I was wrong again...  Instead, it's painted by another American woman!
Shoe Shop; Elizabeth Sparhawk-Jones
Another that reminds me of Manet...
At Mouquins; William Glackens
But maybe my favorite pieces that I came across in the museum were both surprises by George Wesley Bellows.  These paintings are very different, color-wise, than the Bellows paintings I am familiar with.  They are both so rich, so vibrant! 
Love of Winter; George Wesley Bellows
When I got to the Bellows painting below, a young couple was raptly staring at it.  They turned to me and asked "Do you know where this is?"  And I was able to answer!  The Palisades are a mountain cliff area on the New Jersey side (the western shore) of the Hudson River, just north of New York City.  When we visit NYC, we usually travel there by Amtrak train, on a line which runs along the eastern (NY) shore of the river from Manhattan northward.  The Palisades are visible from the train, so this is a view I have seen many times.  The painting is lush.  
The Palisades; George Wesley Bellows
I had also never seen this painting below before.  Isn't it just spectacular?  Usually I expect to see Magritte paintings with a color scheme centered around blues, so this red-orange seems very unusual to me.  I wish my crummy museum photos did justice to the incredible richness of color in these paintings I am sharing with you.  I
The Banquet; Rene Magritte
This painting below was also alive with rich warm colors and movement.  I can hear the music playing!!
Nightlife; Archibald J. Motley, Jr.
And look at this fun Lichtenstein painting! 
Woman III; Roy Lichtenstein
I love this painting below because it just "feels" like the Maine coastline, which is probably what Marin was interpreting in this artwork. 
Movement: Boats and Objects, Blue Gray Sea; John Marin
I can't share van Gogh's Rooms with you, because, like I said, the exhibit was beyond crowded, actually shoulder-to-shoulder when I was there.  Being short, dealing with the crowd, and having a woman with a shrieking infant behind me were all too much, so instead I escaped and spent a lot of my museum time viewing Chagall's vibrant stained glass American Windows.  Here's a few pics.  The window panels represent 5 different topics: music, painting/art, theater, the American Bicentennial, and reading/literature.  I enjoyed reading about the process of their creation, as well as seeing the complete piece.   Here's a few views.
I hope you've enjoyed this little museum tour, without having to leave home! 

Friday, January 22, 2016

Crafty Projects Around the House

lampshade completed!
This fall, after a visit to my brother in Cape Cod, we took a leisurely drive home through the back roads, stopping at antique and junk stores and scenic overlooks.  At one antique/junk stop, my husband found an old lamp, made from a cracked pitcher and wash basin, pictured below.  The lampshade, unfortunately, was stained and decaying. But he figured he could replace the shade, and that it would fit in beautifully with the many vintage pieces in our Adirondack camp.
He went online looking at lampshades, and it didn't take long to discover that to buy a new bell-shaped vintage-looking lampshade, it would easily cost triple what he had paid for the lamp.  Being that the pitcher has a crack, and that he would have to replace the wiring, it began to seem sort of ridiculous to have to invest big bucks in the shade.  So, silly me, I said "I'll make a new shade for you".  And I proceeded to strip the stained and brittle fabric off the lampshade frame.

Someone should have told me how challenging this would be.  I mean, I'd gladly  make another lampshade, but NOT one with a bell shape and scalloped bottom edge.  I went online, solicited advice, and found a tutorial I liked.  I dragged my husband to the fabric store (since it is HIS lamp, I wanted his approval).   He cleaned up the rust and spray-primed the bare lampshade frame.  And many, many, many hours later, after much measuring, pinning, wrapping, sewing by both machine and hand, and gluing  trim, the lampshade is complete, and I couldn't be prouder.
 For the trim, I really wanted to put a fringe on the bottom, but I couldn't find what I wanted locally, and was concerned that the color wouldn't match appropriately if I purchased it online.  So I dragged hubby back to the fabric store a second time, and he picked out this pretty beaded trim.  I'm not sure it was the best choice, putting a scalloped trim on a scalloped edge, but we are satisfied.
And here it is, all newly rewired, and assembled.  Isn't it cute? 
 Not all projects have to be so challenging!  This next project was a solution to a storage problem. We had gotten a new TV, and a Roku player, and found ourselves with a multitude of remotes.  I would leave them on the coffee table, and my neat-freak husband would shove them in a little drawer in the coffee table, where they inevitably got stuck.  So I found a little cardboard box, and raided my box of remnant fabrics and trims.  And with a little cutting and gluing, I made this:
 Isn't it cute?
 By the way, a little shout out for wonderful Sobo Fabric Glue that made both putting the trim on the lampshade and decorating the box so easy. 
 I even covered the bottom, to protect the coffee table!
 And look how perfectly all the remotes fit in the box!
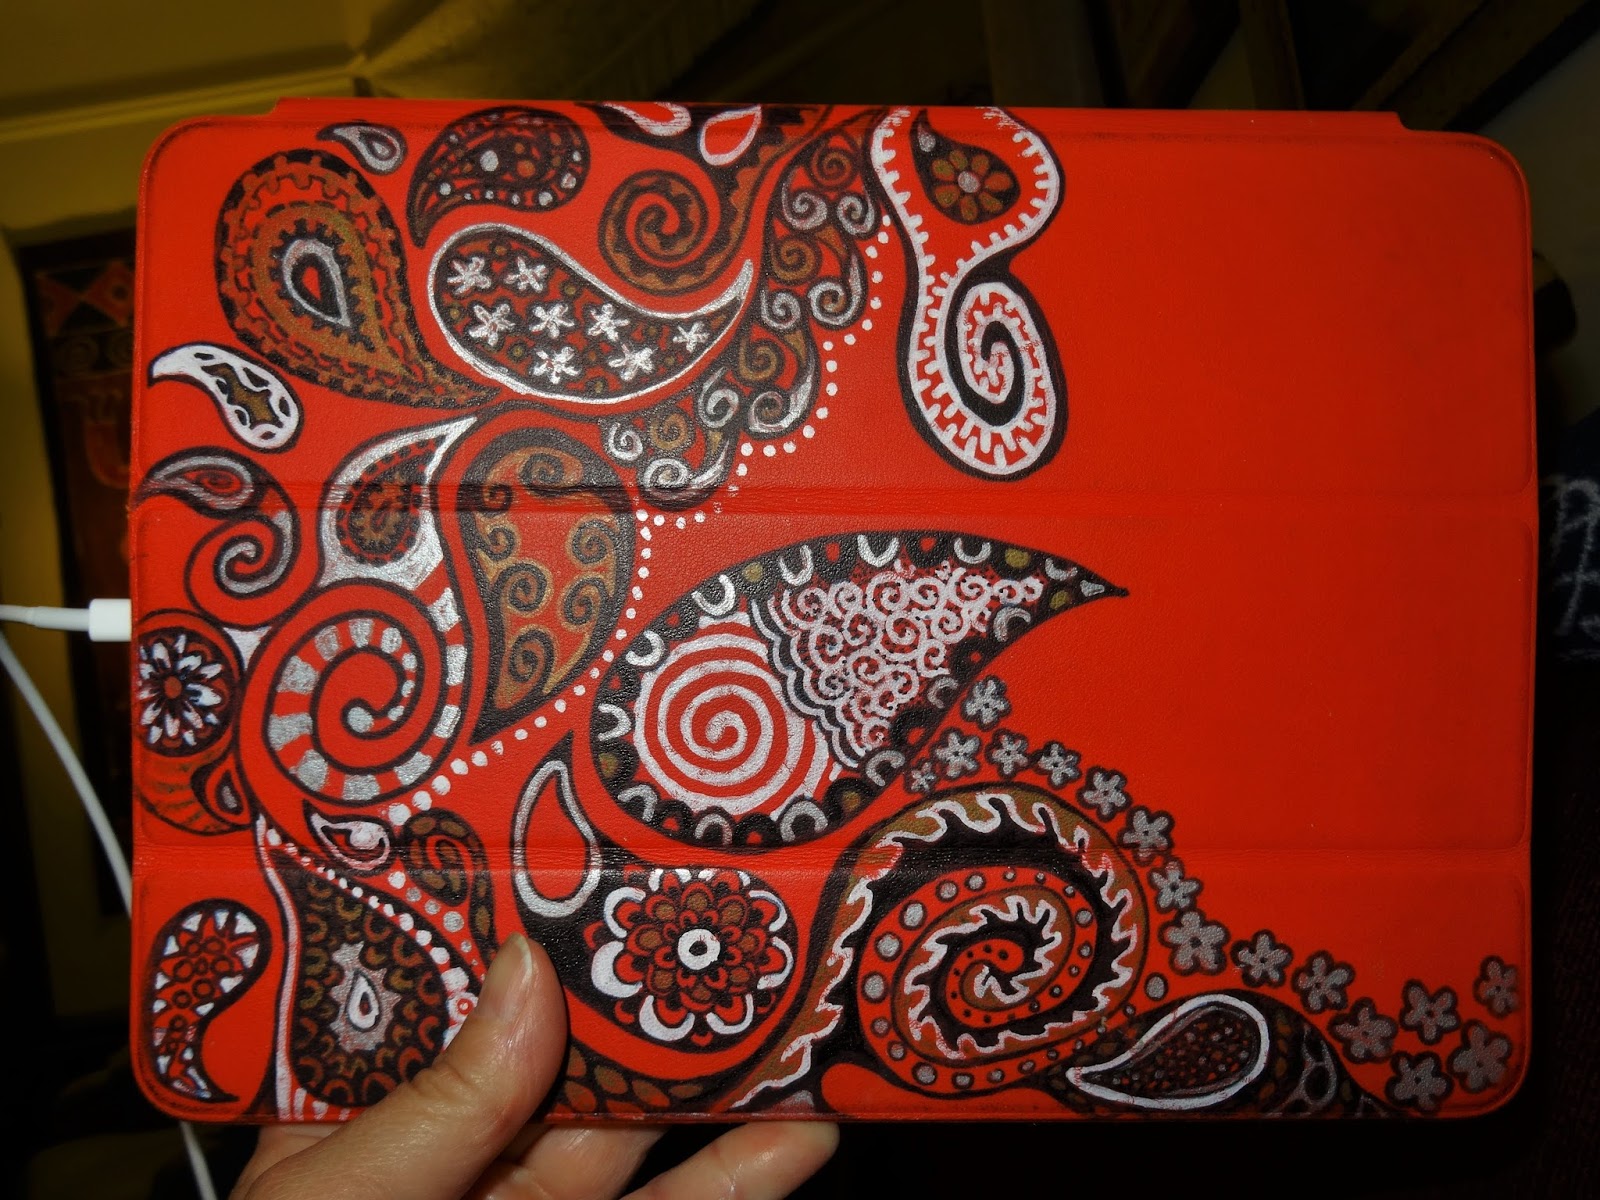
 And one more project...  A while back (last year?), when I got my iPad Air, I got a new cover for it, too, and promptly began to decorate it with metallic and black Sharpies, and a white Sharpie paint marker.  And I stopped about halfway and never finished it.
Until a couple of days ago, when I was on hold on the telephone.  I got out the Sharpies, and finished it up!  Here's how it looks now, below. 
What little crafty projects have you been up to this winter?

Thursday, September 4, 2014

My apron contribution to the Apron Sew-a-Long

my latest apron creation!
I've had many art room aprons, smocks, and lab jackets over the years, several of which were made by yours truly.  I was inspired by the amazing Cassie Stevens to make this one.  Cassie has a knack for getting us all sewing cute aprons and reading artsy books (and doing the associated homework) when we really should be cooking dinner, doing the laundry, feeding the cat, going to the gym, and cleaning the bathroom (well, those last two are really easy to ignore).  Anyhow, if you don't already know, Cassie started an Apron Sew-a-Long and even though I'm actually retired, I still can use this apron, which, by the way, is reversible.   Here's side #2. 
 Like I said, there have been many other aprons in past years. I seriously USE them!  My aprons wear their paint and glue like a badge of glory, until they get so nasty that they look like the refuse in a butcher shop.   I've posted about making a couple of them here and also here.  Then, there was the one with the adorable little aliens all over it - I mean, aliens with shopping carts and aliens with baby aliens in strollers, and so much more.  I don't have a pic of it, and it is long since gone, caked irreparably with layers of paint and what-not.  But I have a strong memory of a certain student - a large difficult autistic girl, who barely even acknowledged my existence otherwise, getting totally excited about my apron.  I mean, out-of-control excited.  She would come and poke at me in the boobage (that word is for you, Cassie) and other body parts, pointing out the alien puppy, and the alien kitty, and alien babies, screaming and shrieking  It was, um, a wee bit distracting.  I stopped wearing it when her class came to art. 

Below, Violetta, my duct tape dress dummy, is modeling side #2.  Don't you just love the 'yoga frog' appliques I have put on both sides of the apron?  I was excited by the fabric when I saw it, but it was rather insubatantial and I was afraid paint would go right through it if I used it for the apron, so it worked out great for appliques.   I had planned to use WonderUnder, like I did for this tunic, but the store now had a different brand.  I didn't like it.  It didn't hold as well, but at least it held enough for me to zigzag their edges onto the apron.  I found some crazy metallic thread for the appliques, but the thread was so problematic that I only used it on three appliques before I gave up and went back to regular black thread.
By the way, I did not use an official pattern.  I took a Sax apron that I got as a freebie at a vendor booth last year, traced it (I liked the shape of the top), made it longer, and extended the sides to go further around my not-insubstantial hips.  I cut out the apron shape in each of the two fabrics I had chosen.  I cut out pockets, based on the size of the Sax apron, and sewed them on.  The pockets are lined.  Below is my favorite yoga frog.  Now all I need is a mantra...
 I took a third fabric, and used it to make seam binding by cutting it on the bias and running it through this handy-dandy folding thing I've had for, like 20 years.  You iron the fabric as you pull it through, and voila! 
 Instant bias fold seam binding!  How cool is that?! 
I used the seam binding around the apron edges and for the ties.  It was really easy to put together.  Because the apron was being put together with the seam binding, I didn't even need to sew it together and turn it inside out.  I just put the pieces wrong sides together, basted them, and put on the binding.  Easy!  I think if I make an apron this way again (it's bound to happen sooner or later) the only change I'd make would be to make/use a wider binding for the trim and ties.  Though I suppose that means I need to search for another bias tape maker. 
Once I was done sewing the whole thing together, I decided to quickly finish up another project, since my machine was already threaded with black thread. 
 When I was in Santa Fe this summer for the Crizmac International Folk Art Extravaganza, one of our hands-on projects was making a quilt square.  I don't usually hand-sew at all, but I really dove into this thing and am super proud of it.  So I decided to stitch it to a piece of black fabric, which I am going to stretch over a board (showing a black fabric border of about 2" on each side) and then frame.

And that's when my Janey (my sewing machine) acted up.  Janey is a Janome brand machine, and I've had her 3 or 4 years.  I bought her when my 30 year old singer finally bit the dust.  She's small and lightweight, but very efficient.  Except she is electronic, and the electronics seem to have a mind of their own.  Usually, when she acts up, the problems are solved with turning off the machine and then on again (basically, rebooting).  Not his time.  What was she doing?  She, um, just kept on sewing, long after I had taken my foot off the gas.  If my car did that, I'd be running red lights and driving into the backs of other cars.  She just sewed right off the edge of the quilt square onto the black fabric and kept right on going.  I can't even blame it on the cat (who frequently likes to tug at the thread and stick her head dangerously in the machine while I'm sewing).  She was napping nearby.  I rebooted.  I fiddled with the 'start/stop' button that can be used in place of the foot pedal.  Nothing worked.  I swear, one time she even kept right on going after the machine was turned off!!  Every time I sewed, it happened again.   Sometimes, it was just a couple of stitches, but other times, it was a dozen or more.  In the end, I pulled out the extra stitches and called it done, and I guess perhaps it's time for Janey to have a service call.  Luckily the place to take her is only a couple of blocks away.  Anyhow, it's not framed yet, but here it is all sewed messily onto the black fabric.