Showing posts with label perspective. Show all posts

Wednesday, February 21, 2018

Robot in Perspective - Fun with Tooling Foil!

 A couple of weeks ago, I posted a pic of this robot, on a white background (below), as part of a post HERE, along with a tutorial on using tooling foil to achieve relief.  The tutorial consists of a couple of videos.  I'm new to videos, so they are not fancy, but hopefully they are worth your time if you are new to this material, 36 gauge aluminum tooling foil.  (You can also get copper or brass tooling foil, but it is MUCH more expensive, so not so financially practical for classroom use.)
By the way, the small amount of added color was done with acrylic paint mixed with Mod Podge, after the black 'antiquing' was done with India ink and steel wool.

I knew I didn't want to simply glue him on the white board as shown above, but I was struggling to figure out what environment would be a good fit for him.  So I stuffed all his parts (head, antennas, neck, arms, shoulders, legs, and body - all together 11 pieces) in a baggie that evidently wasn't closed too well.  I brought the bag into my studio, where I promptly dropped it, spilling the pieces onto a canvas laying on the floor.  The canvas was painted with black gesso, and I had drawn lines on it with white chalk.  I saw the  robot pieces on the canvas, and an idea was born!!

I found a scrap piece of foam core, and I painted it with black gesso.  Then I used a ruler and a white colored pencil to draw a perspective room room.  I added a couple of accents of color, also with colored pencil.  And then I glued my robot into the room, using low temperature hot glue. 
I posted a pic of him on Facebook, and he's received a lot of love, and a lot of questions, so in case you are thinking about this as a possible project for your students, here's a few thoughts on how to make it work -
  • Your students should each have a baggie or envelope (with their name on it) to store their pieces. It's up to you how many pieces to make.  Arms and legs could be separated to be jointed at the knee or elbows.  Elbows, knees, hips, etc, could all be separate pieces like my shoulders are.  Make sure all pieces are cut with rounded corners to prevent cuts.
  • Because the pieces are small, keep the design of each piece simple.  
  • If you are using white colored pencil, like me, to do a perspective drawing on a black surface, make sure it is erasable in case of errors.  I liked the texture of the gessoed surface, but that might not be practical for young students.  
  • Of course the drawing doesn't need to be perspective.  That might be too challenging for some students.  How about a city?  A garden?  A mountain landscape? 
  • I glued with low temp hot glue.  Keep in mind that it low temp hot glue dries immediately, so if you are using this, the pieces have to be instantly placed once glue is applied.  With the small pieces, I suggest holding them with tweezers, quickly applying the glue, and placing them as desired.
  • I do NOT recommend high temp hot glue.  While it will also hold well, and you have place your pieces, you are gluing METAL, and it will get HOT!  Probably not a great idea for your students.
  • Other ideas for adhering, if you don't want to use hot glue: E6000 glue should work well, and some tacky glues might also hold.  Look for one that specifically says it will hold metal or other non-porous surfaces.  While I love Elmer's Glue-All, it is best for porous surfaces, like paper, wood, glue, or fabric.  It won't hold the metal foil permanently.  You can also use double stick tapes or other double-sided sticky products.

One last thought - the idea of using multiple small  pieces of tooling foil to create this robot sparked many other ideas.  For example, what about making windows and doors, and adhering them to a drawing of a house.  Or perhaps making tooling foil bugs, and adhering them to a drawing of flowers.  Or parts of a machine, or wheels of a vehicle, or leaves of a tree, or little boats to put on a drawing of a lake.  The material offers so many possibilities, so many ideas!  In the photo above, the the face features were made with a much lighter weight foil, not as effective, I think.  The students who made them were 3rd graders.  Please let me know if you have any questions!!

Saturday, November 11, 2017

Surrealism in Space!

I came across a really cool post on the Italian blog Arteascuola, and decided to adapt the project to use with my after school DragonWing Arts students.  Thank you to blogger Miriam Paternoster for her great idea!  You can find her post, HERE.

There were three parts to creating the final project.  But before we even started, we discussed surrealism and and looked at images by various artists.  We noticed that many of the paintings created a sense of space and depth by using perspective.  So of course we had to discuss what linear perspective is!  Then we were able to start.

Step 1 was creating the background, and outer space sky.  We painted with black ink, and let it dry.  Then we painted on some glittery purple paint (it was a free sample I was given at a convention, and the consistency is rather thin and jelly-ish and doesn't cover well at all, but it create a nice effect great over black).  We also splatter painted some white tempera paint.  When it was dry, metallic and glittery markers and colored pencils were used to add some planets and stars and such.

Step 2 was to create a simple room interior on a separate paper, using one-point perspective.  We used the vanishing point and our rulers to create a checkered pattern on the floor, and also to place some doors and windows.  The rooms were painted with liquid watercolors, and salt was added as desired o make a funk textural look to the walls and floor.  When the paint was dry, some details were added with Sharpie, and the windows and doors were cut open.  Some were cut out completely, and others were cut so that they could open and close.  The ceilings were completely cut away. 
Here we are, ready to cut out our ceilings and doors.  
The Sharpie embellishments haven't been added yet.
Step 3 was assembly and magazine collage.  The parts were glued together, and students picked images to put in their rooms and skies.  I was originally planning to cut a window flap in the skies, and take and print photos of the kids so they could be entering through the window.  Thank goodness I didn't tell the kids about this plan, since we ran out of time and never got to it!  The pic below shows the work created in steps 1 and 2, ready to be assembled.

The pics below are the finished pieces, after the magazine collage was added and everything was glued together.  (We used Elmer's Glue-All applied with a paintbrush.)   The pic at the top of the post is another of the complete pieces.

I have just 4 kids in the class this fall, which sometimes makes an odd dynamic.  I had great expectations for the kids putting things like giant hamburgers or ice cream cones or insects or tubes of toothpaste in the room or in the windows, or a fish flying through the sky, and so on. I made an example with a giant foot coming through a door, and a large hand reaching in a window, as well as a huge eyeball and a lizard, and a chocolate chip cookie.  I had loads of magazines - nature, home, and more, and so I was very surprised at the odd choices the kids ultimately made.  I've been teaching a long time, and usually kids would have been intrigued by my example but these kids had other ideas, decidedly different from my expectations.  But I think they are pretty cool, nevertheless!!!

Monday, February 15, 2016

3 NYC Museums in 3 Days - Day 2, the Whitney!

 That's me, of course, above.  The artwork is by Ricci Abenda, and, yeah, I suppose it makes me think.  But more about that later...

So hubs and I had plans to walk across the Brooklyn Bridge, but we scrapped the plan till the next day because the weather wasn't good, and instead decided to see the new Whitney Museum, which moved 9 months ago to a completely new location.  A bonus to those of you who (in better weather) like to walk in NYC - the new museum is easy access from the south end of the High Line, which is a former elevated rail line converted into a wonderful walking park.  We did however, walk the Bridge the next day, and the beautiful structure made me understand why there are so many works of art based on this bridge.  Here are two that we saw in the Whitney.  The first, "Brooklyn Bridge", is by Joseph Stella, and the second, called "Region of Brooklyn Bridge Fantasy", is by John Marin.  Tune in, in a couple of days, for my photos of this iconic bridge! 
But anyhoo - the Whitney Museum's collection is American art, and the galleries are set up by era/theme.  Below is Railroad Sunset by Edward Hopper. I love the quiet, lonely sense of peace of this painting. 
I was struck by a number of images that I thought would be fabulous for teaching perspective, and combining it with surrealism.  It doesn't always have to be a Dali!!
 Above is The Subway by George Tooker; directly below is No Passing by Kay Sage.  
 Below, La Fortune by Man Ray.
 There are some outdoor decks where you can view the city.  In one direction you'll see Lady Liberty, and in the other direction, this.  It was too cold and windy to stay out for more than a moment.
 I liked seeing this David Smith sculpture "Hudson River Landscape".  Smith was from Bolton Landing, on Lake George, just 1/2 hour north of my home.  This piece was based on drawings he did looking out the train window, riding along the Hudson to NYC.  We took the train to/from NYC so I totally 'get' this piece.
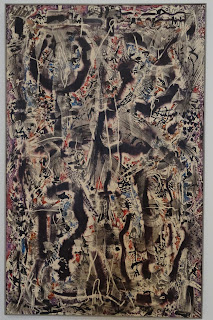
 This large piece, below, really intrigued me. By Alfonso Ossorio, it is called Number 14, and is done with layers of wax and ink, using the wax as a resist, and then scraping off, and repeating, creating an intriguing layered piece. 
 And then, of course, is the marvelous (but hard to photograph) Calder's Circus. Here's a tiny sampling.  The whole thing is such a joy, and I think is a great lesson inspiration.  You don't have to have fancy sophisticated materials to make art that people will love.
 Now here's where things got a little dicey in the museum.  My husband tries to be kind, but his immediate response was "Get me some lockers.  I'd be happy to crush them for you."  Yeah....
 And then there were these sinks, "The Ascending Sink" by Robert Gober.  It's a couple of sinks, screwed to the wall...
 And the painting at the top of the post, and this, below, by Richard Prince.  It seems every visit to a major museum has us scratching our heads in at least one room. 
 Then we came across this., also by Robert Gober (the sink guy).  I ended up in a conversation with another museum patron, trying to puzzle it all out.  The tag calls it  "Newspaper" and for medium, lists it as "photolithographs with twine".  It is a pile of newspaper.  Now, it happens that, coincidentally, the big headline, from 1992, happens to be about lead in the drinking water, making this very timely, at the moment.  But still, the question is, what makes something "art". 
 It is certainly a definition that is changing, though I am still hung up on the concept (whether or not, on this particular piece) the headline happens to timely at the moment) that art is something that is interesting or intriguing or beautiful to look at.  I know that is not the only definition any more, but it still doesn't help me understand how someone can stencil some letters on a canvas, or tack a couple of sinks to a wall, or crush some lockers, or pile up some newspapers, and achieve recognition for this as an artist.  Where did that "artist" make the leap from learning about the Elements and Principles in art class?  How did he or she move from putting together a portfolio of work to get accepted into an art program, to getting recognized for displaying a sink?  Help me out here, folks....
Anyhow, I;'ll close with a few more pieces I liked.  Above, puppets by Phillip Parreno.  Below, a painting that I became very fond of.  My photo of it isn't great, but I love how, while it looks like an aquarium, it also looks open into an abyss.  It makes me happy. 
 And just for fun, these colorful pieces put a smile on my face.  My husband, not so much..  I apologize; for some reason I'm missing the artist's names for these final 4 images, and the color balance on my photos is a little off, but hopefully it's enough to intrigue you, too!!

Saturday, October 26, 2013

Work-in-progress


 My DragonWing Arts students currently have about 4 different projects in progress all at once!  We are having so much fun.  A week ago we painted a bunch of paper with acrylics, and this past week the painted papers were twisted and glued to become a 3-dimensional loom.  The 18x24" painted paper that we previously made, shown below, will be sliced (each child's paper has two different color and pattern schemes) and then woven into the 3D looms.  And then we will embellish!!!
Meanwhile,we have painted these awesome crazy liquid watercolor & salt skies over oil pastel planets (pictures below), for backgrounds we will be using for perspective cities, as I did with my fourth graders before I retired, and posted about, here
 
 Here's one of the cities in progress, by a 3rd grader.  She doesn't have her verticals correct on the buildings, but I don't want to overwhelm her, so I'm letting it go.
  My students are a mix of 3rd and 5th graders, and attend two different schools, and I have discovered a few things.  Not one of them has ever heard the word perspective before in art.  Never.  It doesn't surprise me with the 3rd graders, but it does with the 5th graders.  So I think whatever they are able to do is a pretty good first effort! 

And the students (both 3rd and 5th graders) who attend one school district have told me they have not used paint yet in art this year.  All they use is pencils and markers.  (Don't get me wrong; I like markers and pencils, but kids need to paint!)  And the student who goes to a different school district tells me her teacher tells them exactly what to do and they do it, leaving no room for creativity at all.  And this little girl has a fabulous imagination and loves to draw.  Her mother confirms what she has told me about art class, which was why she was very excited to send her daughter to my program.

I have told the moms who drop them off and pick them up not to worry that they aren't seeing artwork coming home with the kids yet; we are doing multi-step projects and they will have a lot to bring home at the end of our 7 week session.  The moms responded - "Are they having fun?"  The kids' answer - "YES!"  The moms then said that even if they never saw a single work of art come home, they'd be happy, since the kids are enjoying themselves, and since the kids aren't excited about their art classes in school.


I have made a commitment: I see them for an hour and a half, once a week, and at some point during that time each week, there will be painting.  The kids are happy; I am happy. 

So be patient - I promise to show you the end result when these projects are complete.

Saturday, March 10, 2012

Looking down from above


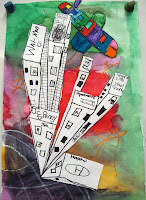
Yes, that is a flying pizza zooming in above the city on the left. Those are superheros flying above the other two cities. Wait till you see what other things are in the skies above my 4th graders' cities!!

I always give my 4th graders a basic introduction to one-point perspective. I've done "flying boxes" for years, and the 4th graders are always so excited to try out this new skill. But we all know it's a struggle; not all kids will 'get' it right away, and some (particularly those who struggle at math, it seems), may NEVER truly grasp the nuances of the process. Anyhow, I saw a lesson version of perspective cities viewed from above at a post on Sarah's Art Room. I used her idea of keeping the cities in black and white, but changed my approach to the rest of the lesson.

We all worked together to begin, with me using an old-fashioned overhead projector to demonstrate! Our Vanishing Point was at the bottom center of the 12"x15" paper, and everyone used rulers to draw a minimum of 6 rectangles, all parallel to the sides of the paper. Starting from the bottoms of the bottom rectangle, we began connecting all corners to the VP, with the following rules: NEVER draw through one of your rectangles, and if you BUMP into another rectangle on the way to the VP, you STOP and don't pick up the line again on the other side of the rectangle. Easy peasy!!

We traced with Sharpies, and made light pencil guidelines aiming toward the VP down the walls of the buildings to use for windows and more. This is where it gets pretty challenging for 1st timers, so I didn't stress out when some were less successful in this part of the lesson. The buildings would look like buildings no matter what! They loved writing words on the roofs so that airplanes could see them: everything from the sign that said "Reptile House - P.S. Don't Buy the Cobra!" to the "Pot Belly Deli"to the "Haunted County Jail" which included "Ghost Place". And of course there's schools, art museums, police stations, amusement places, stores, restaurants, and more. The cities were cut out to place on a background that was created separately.

The backgrounds were a lot of fun, and done in about 10 minutes. On an 12"x18" sheet of white paper, the curvature of a planet was drawn with oil pastel. Still using the oil pastels, some kids added lots of design and texture to the planet at this point, others added stars and other celestial details, and others were pretty minimal with the oil pastel.

Then, we painted with liquid watercolor, but all I had was blue, turquoise, red, and sparkly 'black'. The other colors - greens, violets, oranges and yellows - all were paint that I had previously created by soaking the tips of those dead markers. We've all seen that done, right? I have a box in the art room labeled "DEAD MARKER GRAVEYARD" and the dried out markers all get tossed there for me to periodically soak. (By the way - the paints I made this way are getting a gelatinous skin on them. Do you know how to prevent this from happening?)


The last step was the silliest. After gluing down the city, the students used a separate (smaller; I think it was 6"x9") sheet of paper and some markers to create something that could be flying above the city. In the 3 photos above, there's a UFO, a dragon, and a flying fish. Below is someone seated on a magic carpet, a mutant bumble bee, and someone with jet packs.

And then, below, is a flying submarine, another superhero of some sort, and an airplane.
Some other ones that I didn't post in these photos (it was hard to choose but I just had too many to post them all) included a flying pig, a butterfly, a dragonfly, a helicopter, a flying pickup truck, an alien, another UFO, a flying heart, and a hot air balloon.

I think this may be the most fun my 4th graders EVER had doing perspective, and I think they are very proud of their success.