

 I promised to post the instructions for our wampum belts, so here they are! Note that I use an Elmo (document camera) to demo this process. It makes it so much easier!


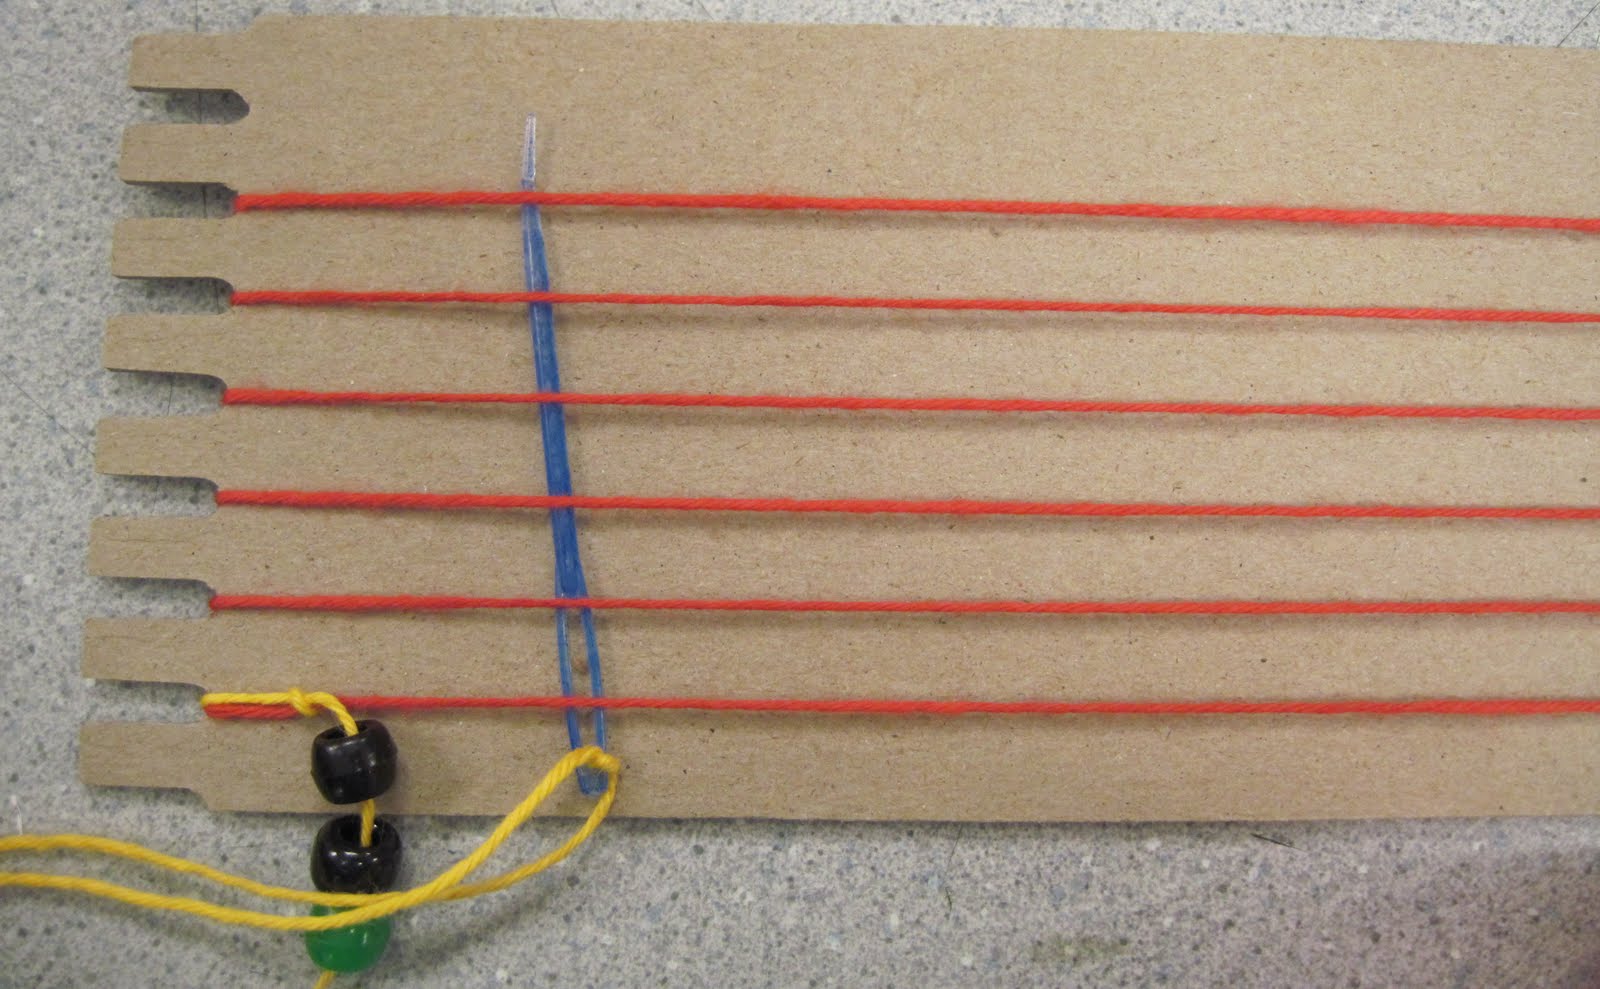
First, to warp the loom, we tape our string on the back of the loom. Then we bring it up through the first notch, around the back, and so on, going around and around the loom. When we finish warping, we tape the other end of the string on the back. We aren't using the last notch, because our pattern has 5 rows and therefore needs just 6 strings. It's up to you how much of the loom you use.


Then we tie a new piece of string on the bottom left corner of the loom (we follow our patterns left to right). Tape the shorter end of the string on the back.

Thread a needle on the longer end. Now we're ready to weave.
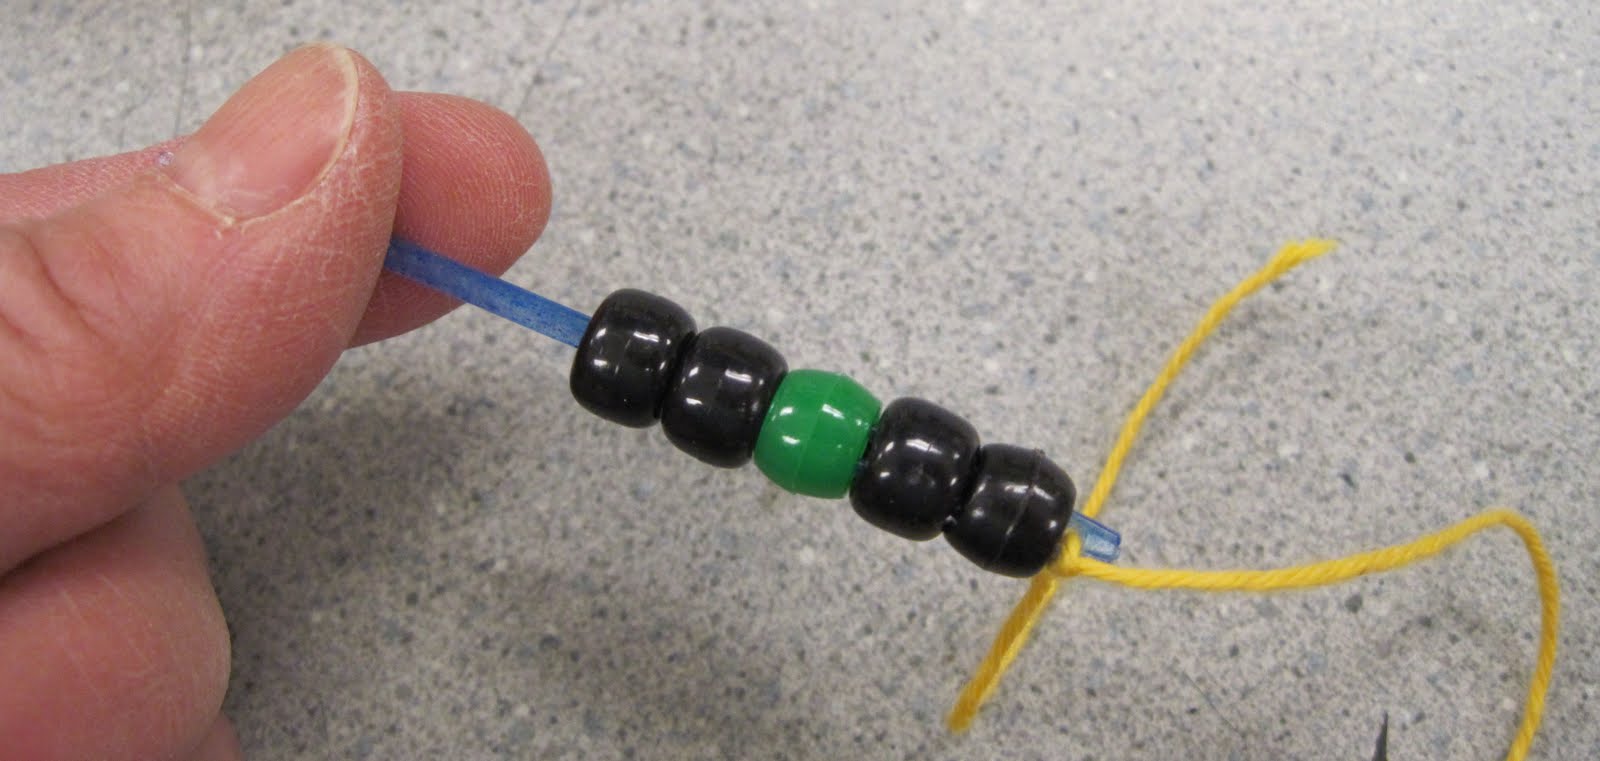
Put beads on the needle in order, from bottom to top of your design. (We work the pattern left to right, bottom to top. )
Put beads on the needle in order, from bottom to top of your design. (We work the pattern left to right, bottom to top. )

Drop the beads off the needle down onto the string. Now push the needle up under all the strings.


Pull the beads under the strings, and place one bead in between each string.


Pull the needle back through all the beads, making sure the needle goes ON TOP of the warp thread on the way back. (This is the biggest mistake the kids can make, so make sure they know the needle goes OVER the warp string as it passes back through the beads.
Pull it tight! Cross off the row on your pattern, and then start the next row. That's it!
Hopefully tomorrow I'll post how to take it off the loom. Happy weaving!
These are so awesome! I've been wanting to do a weaving lesson, but was intimidated because it looked so complicated. Thank you for the demo!!
ReplyDeleteThis seems so simple but I've been wanted to learn how to do this forever. Thanks for posting this!
ReplyDeleteRuth, it's pretty easy when you break it down. The big thing is making sure they have carefully layed out their pattern before they start. I remind the kids to "ask three before you ask me" to get them to help each other. Then I am mostly untangling tangles, and dealing with emergencies. Every single child has been successful; it's amazing how excited they are by this.
ReplyDeleteThese are AWESOME - I love doing weaving projects with my students and am always looking for something new to do. I will be trying this idea for my next 5th grade project! Thanks for sharing all the info!
ReplyDeleteThanks for posting the 'How To's' for us all. I am keeping up with them and look forward to the finale!
ReplyDeletePhyl, Do you have any string and bead recommendations? Is there are certain kind of string that you use and do you buy the beads in bulk? How many classes do you do this with? I am wanting to do this with three 5th grade classes this year, they have been weaving since first grade so I think they are up for the challenge. I just want to make sure that I order enough beads :) Thanks so much for the tutorial. Love your site!!
ReplyDeleteHi Magpie, I actually posted about the string and beads I use here: http://plbrown.blogspot.com/2011/01/so-many-questions-wampum-belts-part-2.html
ReplyDeleteI think if you copy that address into your browser you'll find I've answered your questions there. I posted a couple of other times about the belts as well - if you click the label "wampum belts" (from the right side of the blog) you can get all of them.
The big things are to make SURE the kids can tie knots (it's worth it to have a knot-tying session before you begin, or you'll go crazy tying knots), and to make sure they understand about going UNDER the warp strings on the way out, and OVER them on the way back. Try it out yourself before you teach it - my kids had all done paper weaving etc, but this is a little different.
Good luck - let me know how it goes! By the way - I did it with 3 classes of 4th graders this year. Next year I'll only have 2 4th grade classes. Snag the kid who "gets" it most quickly to keep an eye on his table-mates. I found the kids often were a big help to each other.
My daughter is loving weaving her very own wampum belt, but she is almost done and I don't know how to get it off the loom. Help! Thank you!
ReplyDeleteHow to get it off the loom: cut the strings straight across the back of the loom. Then tie every two strings together close to the last row of beads on each end. Then you may want to to sll the strings together. My students sometimes but some long strings through the last row of beads on each enc, and knotted the ends toph getter. These could then be used to tie it into a belt or headband, or hang from a belt, or whatever. If you still need help, let me know! I'm happy to help and am glad your daughter is enjoying!
DeleteHi! May I ask how long it took for the kids to do these? I am thinking of having 4th graders do this on Cultural Day (celebrating Native Americans) but only have one class period to do it in. If I shortened it to bracelets would that be better?
ReplyDeleteShelly, thanks for your question. Unfortunately, this is decidedly NOT a one-class project. I have seen, either on another blog or on Pinterest, a wampum belt project using pipe cleaners that is much simpler, faster. There is a definite learning curve to the bead weaving we did, and would not be possible to finish in one or even 2 classes. It's a longer process. Sorry! Just graphing out the designs took at least one class period!!
DeleteShelly, check out this link for an idea for simplifying: http://wesbmsart.blogspot.com/2012/02/grade-2-wampum-belts.html
DeleteThis comment has been removed by the author.
ReplyDeleteWhat a great idea! I'm going to try this with my kids. I would love for you to come link this up with us @costours.blogspot.com
ReplyDeleteThank you so much for this lesson idea! The pictures are very helpful. We are homeschoolers using this accompanied with the book The Indian in the Cupboard.
ReplyDeleteYour welcome! By the way, the graph that we used to plot our designs can be found at the "documents weblinks" tab at the top of the post. Good luck!
DeleteHello, and thanks for the great project! I have a question about your looms: were they hand made or bought, and what are the approximate dimensions? I would like to try this out, but would need to create my own looms. Thanks!
ReplyDeleteSarah, the looms were purchased. They are chipboard, 3-1/4"x13". I got them from School Specialty, here: https://store.schoolspecialty.com/OA_HTML/ibeCCtpItmDspRte.jsp?minisite=10206&item=472485
DeleteThanks so much! Also, apologies for materials question. After asking I found your other related entry with materials listed. I was able to make my own out of thin cardboard, and will try it out with my students tomorrow.
DeleteI strongly suggest you try it out yourself first, before you try it with your students. I'm concerned with thin cardboard that your looms will bend, which is potentially a problem.
DeleteThank you for posting this - it is appreciated! My child did a project with UV-activated pony beads and we want to try a weaving project with them. I've always wanted to weave with beads but was too scared to try. I never thought of trying it out with bigger beads, and when my kiddo came home with the UV beads, I thought why not?! Thank you for the clear instructions so we can try.
ReplyDeleteI hope you find the instructions easy to do! But I admit I have no idea what UV-activated beads are.
DeleteDear Phyl,
ReplyDeleteI am working in Mongolia and was very happy to find the design of making the beads. I tried it and it works very well. I however don't know how to take it off the loom. Would you kindly help?
Mongolia, wow!! I think it’s so spectacular that blogs allow our lessons to travel around the world!
DeleteAnyhow - I posted about how to take them off the loom in a subsequent post, that you can find here: http://plbrown.blogspot.com/2011/01/wampum-finale.html
There’s a couple of things I would now add to or change on that post, since I still make these with kids! First of all, where I recommend square knots, I find overhand knots hold better, look better, and are easie4 to teach the kids. Definitely teach them to tie knots ahead of time!
Second of all, securely knot the end of the weft string onto the warp string when you are done, before you cut them off the loom. Afte4 knotting it, I like to then weave it back through a couple of beads, knot it again for extra security (I’ll admit I can go a little crazy with knots), and then tie it into the knots you tie afte4 you cut it off the loom. Finally, I sometimes like to take a needle and heavy string and sew the whole piece of beadwork onto a strip of felt (to imitate the leather a Native American might have used). It’s a nice way to present the finished piece!
Good luck, and let me know if you need any more help!
I just reread what I posted in response to you. Excuse the weird typos in it! I don’t know why a couple of my letter ‘r’s were replaced with number ‘4’s!
DeleteWhat grade is this lesson for? I have grade one, and this seems far to complex for them.
ReplyDeleteI did this lesson with 4th graders. That’s when they learn about the regional Native American tribes in their history curriculum
DeleteWampum are specific codes of shared oral knowledge such as treaty agreements, agreements to share territories, symbolic representations of oral history of a nation, clan, prophecies passed down for generations, and have symbols the carrier is taught then given the permission to teach. They are not 'crafts". They are made with ceremony, passed the next generation with ceremony and always made from shells knotted together with eel skins. They are not based on dragons or any other non native ideas. I find as an art educator of thirty years, as an Indigenous woman and as a university instructor in Indigenous education that this is offensive in that you are simplifying a set of teachings, world views, and histories into a pretty object rather then actually teaching something authentic that imparts true knowledge that is of value to learners. This is a Eurocentric model of teaching art based in teaching techniques, materials and visual concerns devoid of societal and cultural context. I hope you will consider taking this down. Wampum are not woven. They are not make from plastic beads, they are not made with personal symbols (they are collective languages) and you are diminishing the depth of the beauty of why our wampum carriers have passed down wampum for thousands of years.
ReplyDelete