Showing posts with label crafts. Show all posts

Friday, January 22, 2016

Crafty Projects Around the House

lampshade completed!
This fall, after a visit to my brother in Cape Cod, we took a leisurely drive home through the back roads, stopping at antique and junk stores and scenic overlooks.  At one antique/junk stop, my husband found an old lamp, made from a cracked pitcher and wash basin, pictured below.  The lampshade, unfortunately, was stained and decaying. But he figured he could replace the shade, and that it would fit in beautifully with the many vintage pieces in our Adirondack camp.
He went online looking at lampshades, and it didn't take long to discover that to buy a new bell-shaped vintage-looking lampshade, it would easily cost triple what he had paid for the lamp.  Being that the pitcher has a crack, and that he would have to replace the wiring, it began to seem sort of ridiculous to have to invest big bucks in the shade.  So, silly me, I said "I'll make a new shade for you".  And I proceeded to strip the stained and brittle fabric off the lampshade frame.

Someone should have told me how challenging this would be.  I mean, I'd gladly  make another lampshade, but NOT one with a bell shape and scalloped bottom edge.  I went online, solicited advice, and found a tutorial I liked.  I dragged my husband to the fabric store (since it is HIS lamp, I wanted his approval).   He cleaned up the rust and spray-primed the bare lampshade frame.  And many, many, many hours later, after much measuring, pinning, wrapping, sewing by both machine and hand, and gluing  trim, the lampshade is complete, and I couldn't be prouder.
 For the trim, I really wanted to put a fringe on the bottom, but I couldn't find what I wanted locally, and was concerned that the color wouldn't match appropriately if I purchased it online.  So I dragged hubby back to the fabric store a second time, and he picked out this pretty beaded trim.  I'm not sure it was the best choice, putting a scalloped trim on a scalloped edge, but we are satisfied.
And here it is, all newly rewired, and assembled.  Isn't it cute? 
 Not all projects have to be so challenging!  This next project was a solution to a storage problem. We had gotten a new TV, and a Roku player, and found ourselves with a multitude of remotes.  I would leave them on the coffee table, and my neat-freak husband would shove them in a little drawer in the coffee table, where they inevitably got stuck.  So I found a little cardboard box, and raided my box of remnant fabrics and trims.  And with a little cutting and gluing, I made this:
 Isn't it cute?
 By the way, a little shout out for wonderful Sobo Fabric Glue that made both putting the trim on the lampshade and decorating the box so easy. 
 I even covered the bottom, to protect the coffee table!
 And look how perfectly all the remotes fit in the box!
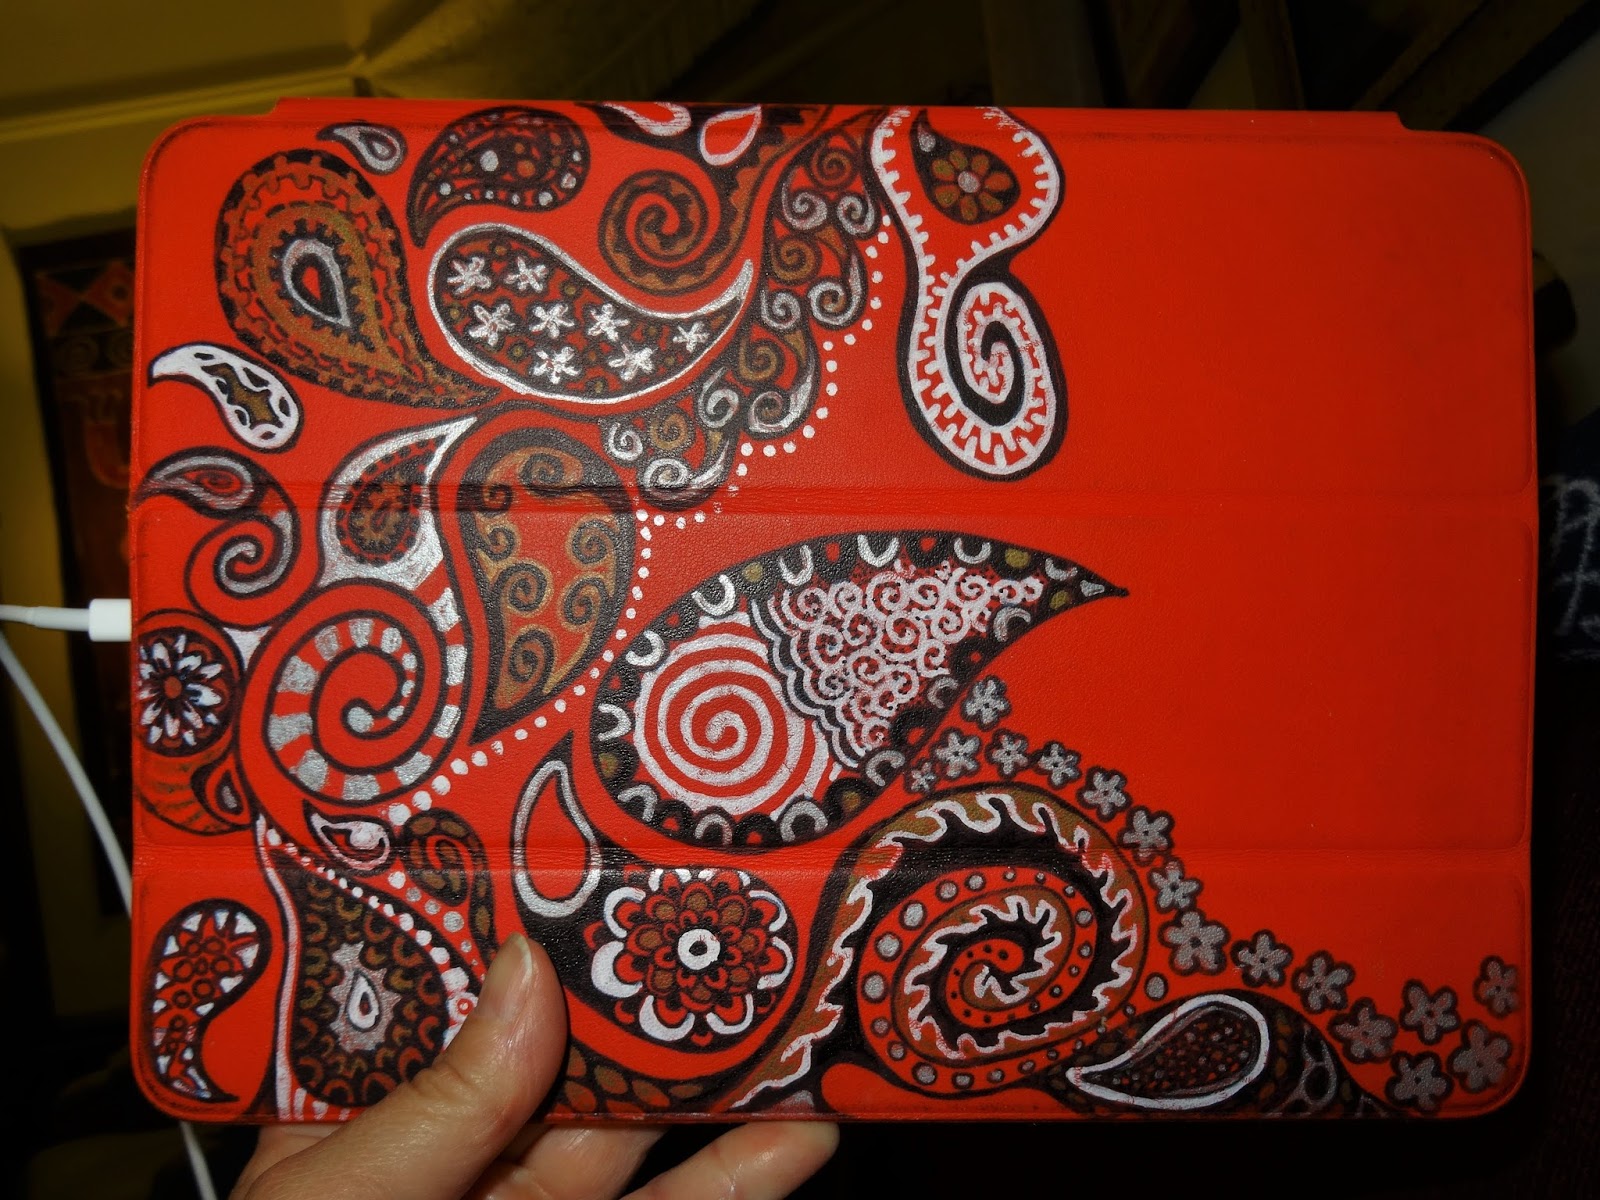
 And one more project...  A while back (last year?), when I got my iPad Air, I got a new cover for it, too, and promptly began to decorate it with metallic and black Sharpies, and a white Sharpie paint marker.  And I stopped about halfway and never finished it.
Until a couple of days ago, when I was on hold on the telephone.  I got out the Sharpies, and finished it up!  Here's how it looks now, below. 
What little crafty projects have you been up to this winter?

Saturday, March 8, 2014

Gourd purse!

I have SO many things to blog about - a trip to NYC including my butterfly experience, museums, and more, but today I want to tell you about my new gourd purse that I made!

I spent the day at the awesome Adirondack Folk School, where I previously took classes in precious metal clay (PMC), (and a second time in PMC),  bead embroidered free-form jewelry, and lampwork beads.

But today was all about gourds.  We started with canteen gourds, like these pictured below, and soaked and scrubbed them to remove mold etc.  I had a specific plan in mind for my purse, but when I saw the beautiful natural patterns on my scrubbed gourd, I changed my mind and my plan completely.
Once our gourds were scrubbed, we drew a saddle-shaped line dividing top and bottom and sawed them apart. The insides looked pretty funky!

We removed the seeds (you can plant them; I saved mine for next summer but unfortunately realize that I left them at the school where they were undoubtedly 'cleaned up' and thrown away).  Then we cleaned the excess stuff out of the insides. 

We were given lots of alternatives for decorating, including using shoe polish, acrylic paints, or alcohol paints.  I chose the alcohol paints because the patterns on the gourd would show through.  We were also given the option of using a wood burning tool.  Since I'd never used one before, I decided to give it a try.  Here's my woodburned lines and my beginnings with the alcohol inks.  The colors did not look exactly as I expected, so I made some mid-course alterations.  In the end I was pretty satisfied with my result. 
On the top of the gourd, I kind of blended all my colors together.  The teacher was skeptical but I assured her I would do OK and in the end she loved it.  The back is actually quite a bit lighter than the front (it's not pictured right here) because of the coloration variations of the natural gourd. When we finished painting our gourds, we sprayed them with a clear finish.  The gloss really brought out the beautiful colors and natural patterns on the gourds.

Here's what the other gals in the class were doing.  The one with the stars was colored with shoe polish, and the star outlines were wood-burned.  She blackened them in with a Sharpie!  (The paints wouldn't work over the shoe polish.)  The studs in the middle of the stars are actually brass fasteners!!  The fastener is a loop of elastic that hooks over the stem of the gourd.  Cool, no?
In the photos below, all the coloring was done with alcohol ink except the red top and black diamonds.  They were painted with acrylic craft paints.  Both the purses below use a button and elastic closure.


Here's the back of my finished purse.  We put on hinges using brass fasteners. 
And the front.  I used a blackened brass clasp on mine. 
The sides look pretty cool too.  I may change out the strap at some point.  I'd love to use something woven perhaps? 

By the way, we sewed a little felt pouch that fits perfectly inside, and also cut a piece to fit in the top.  They were attached inside with hot glue.  I didn't photograph the inside.   I may  at some point, when I have the time, remove the felt inside and use something a little 'nicer'.  When I have time....

Here I am below, showing off the finished product to my husband, who didn't even really take a good look at it.   Oh well.  He's too used to my projects, I guess!
 

Tuesday, October 1, 2013

My Beaded Dragonfly!

my completed dragonfly
Early in August, I took a one-day class at the Adirondack Folk School in Lake Luzerne.  The class was called 'Bead Embroidery: Freestyle Jewelry Design' and I had absolutely no idea what I was getting into (or I might not have taken the class!!)

True to form, my first project was kinda big.  I don't seem to understand the concept of baby steps; I always jump into new artsy-craftsy stuff fully committed, and this time was no different; I went whole hog!  Once the teacher explained what we would be doing, I decided I wanted to make a beaded dragonfly brooch.  Dozens of hours (no exaggeration) and almost two months later, it is done, but not without some detours.

As the dragonfly got close to completion, I realized it was too big for a brooch.  I'm not a big person, and this thing pinned on my sweater would bump into my shoulder rather awkwardly.  So I decided to make a purse for it.  (By the way, I googled free patterns for purses and bags, and came up with so many!  I need to remember to search for sewing patterns on line for free.)  So I took the almost-done dragonfly and off I went to JoAnn's to buy fabric for the purse.  Somewhere in the store, the dragonfly slipped out of my shopping cart, onto the floor.  I picked it up and didn't notice right away that one of the beautiful bead eyes had cracked and half of it was missing.  When I made the discovery, I searched and searched but could not locate the missing bead half.  I paid for my fabric and sat in my car and cried.  By the time I got home, I was calmed down, and emailed the teacher, who called me that evening to tell me she had two more of those beads.  She explained to me how to remove the leftover part of the bead, and how I could use tweezers and gently move the bead netting I had sewn around the eye and tuck the new bead inside just like the old one.   I followed her instructions and finished the project.  The new eye has a slightly larger hole, so the tiny bead that sits in the center sunk deeper inside, but it isn't very noticeable.  I sewed this cute little turquoise and black purse and stitched on the dragonfly.  Here it is, DONE!  Actually, after I took this photo, I sewed a Velcro closure on the bag and stitched a black button over it, on the central downward curve.
my dragonfly bag

Below you see the inside of the bag, and the dragonfly before I cut it out and edged it with stitched beads.  I picked out the funky fun fabric for the inside of the bag, but I didn't think about the fact that I needed to stitch right through it in order to put on the dragonfly in a way that it can be removed if I ever want.  So the inside isn't quite so pretty any more, but hey, nobody will actually see it, right?

Sunday, October 17, 2010

Hyperbolic Crochet Coral Reef?! Wow!


This is not an art teacher post, but instead a cool story about combining craft with science and math, and also about preserving our planet. Today, while driving my car, I heard this story on my public radio station, on the show Studio 360. It was about the origin of a really awesome project, the Hyperbolic Crochet Coral Reef. It began with the inspiration of a Cornell University mathematician who discovered that she could crochet a visual representation of hyperbolic geometry. I'd explain what that means if I understood it. Here's complete info I found online about the reef project:

http://crochetcoralreef.org/about/index.php

Here's a link to amazing images of the crocheted reefs (there are now many of them):
And here's one of many videos available: http://www.youtube.com/watch?v=RsKhi0x4Ni4

You'd probably never know this, but I was a bit of a math geek in high school. Last weekend I was reminded about this, when I attended my (40th!!!) high school reunion, and a guy I barely remembered came up to me and exclaimed "You were my math buddy!!! I'd forgotten that I was assigned to help him with his math. I know this may not be the most normal background for an art teacher, but while I haven't followed a mathematical career path, I sometimes incorporate the fun of mathematics into art projects. You'll see this later this year when I post a mathematical art project that's a favorite of mine and the kids.
I'm also a former SCUBA diver, and I especially loved to dive in tropical waters with lovely coral reefs. Global warming is damaging coral reefs, and I am concerned for their future. So while I don't crochet, I was really smitten by this story that combined the structure of mathematics and the beauty of the coral reef, threw in some environmental awareness and activism, and then finally added this really nutty artsy craftsy connection. I hope you enjoy it as much as I did. There's a ton of info and photos on the Internet.

Thursday, August 5, 2010

A pie and a book - 2 creative endeavors!

In anticipation of my son coming home from Africa, I went blueberry picking last week, and this Sunday my son and his friends put together this delicious blueberry pie. Pretty nice!
:-)

After reading Erica's blog http://artprojectgirl.blogspot.com/ yesterday about an inspiring painting professor, I decided it was time to get creative. So, I finally started painting and collaging my altered book, that I talked about in the blog back when school was ending. This project is in preparation for making these again with 6th graders this fall. Earlier this summer I began by cutting into the book to create my river, and then gesso-ing all surfaces to be painted.

The book is based on the lyrics of the Beatles song Lucy in the Sky with Diamonds. I chose it because the lyrics have such magnificent visual imagery. These are the first two pages:

Picture yourself on a boat in a river,
with tangerine trees and marmalade skies...

Somebody calls you, you answer quite slowly -
the girl with kaleidoscope eyes.

a couple of close-ups:

Darn, the best photos keep entering sideways so these will have to do. It's hard to see that the pages have depth cut into the river. I think I'm going to add some silly collage fish in the river.

In book pages still to complete, images include: towering cellophane flowers of yellow and green, newspaper taxis, plasticene porters with looking-glass ties, a girl with the sun in her eyes, and of course, Lucy in the Sky with Diamonds. Hope I can get it done!

Monday, July 26, 2010

Fun and easy yarn projects at PTSA summer camp!


We had a great week making giant Ojo de Dios (God's eyes) and pompom critters, and learning to make a Japanese Kumihimo braid. The kids ranged from those entering 4th grade to 6th grade, with my 'helper' entering 7th grade, and everyone was successful and happy.

The God's eyes were made on 3' dowels. The kids caught on quickly and chose very unique color combinations.


Everyone got so good at making pompoms, we made these adorable pompom critters.
So easy and cute!


Kumihimo is very easy to do - all you need is a notched circle of heavy cardboard and some yarn. The kids were surprised by how easy it was to learn, and they all took their 'looms' home and came back each day to show me what they had made the previous night without any assistance. We made bracelets and keychains.

All in all, it was a good week. And as for my super helper, I needed a reminder to be specific with instructions! One day, I asked her to PICK UP the rolls of masking tape we had used. I neglected to say PUT THEM AWAY. So I walked the kids to the front door to meet their rides home, and when I returned to my classroom, this (picture below) was what I found. She had certainly 'picked up' the tape! Cute, huh?