Our theme for the fall DragonWing Arts session was Discover! My five students (two 3rd graders, one 4th grader, one 5th grader, and one 6th grader) did three projects - the first was the creation of a treasure map.
And the second was a papier-mache project. (I'll tell you about the third project later.) I asked the kids what they'd like to build with papier-mache - perhaps a newly 'discovered' creature, a box of buried treasure, something from outer space, a discovery under the microscope or deep in the sea, etc. My five students unanimously said "We want to make TREASURE CHESTS!" So we did.
We began by constructing the boxes and their curved covers, out of cardboard (from shipping cartons). We covered them with a coat of papier-mache, and when dried, we gave them a base coat of black acrylic.
The students painted their treasure chests and bedazzled them with some jewels. They used a colorful air-dry clay and made some tentacles and such to be emerging from the their treasure chests, and also added felt and more jewels and strings of beads as desired. We cut 'hinges' out of sparkly felt and such, and I hot glued them together for the kids. I think they came out great!
For the treasure maps, I had experimented with dark brews of tea and coffee to stain the paper, but it just didn't 'take' the way I wanted, so we used liquid watercolors. I mixed brown with green, with orange, with yellow, and with black, and after they had torn the edges of their paper, they painted them with the watercolors, blotting and wetting as desired to get the effect they wanted. They discovered that dripping water on the papers looked really cool.
The kids learned how to make a simple 'compass rose', and also how to make a scroll for a key on their maps. I printed out sheets of typical map symbols and then let them go to work making their maps truly their own inventions. The started with pencil, and then used a combination of fine-tip black markers and India ink with dip pens. They loved working with the pen and ink!! Afterward they used tiny amounts of red, white, and gold acrylic ink to embellish.
Somehow I forgot to take pics of the third project, so here's some more views of the treasure chests!
Showing posts with label air dry clay. Show all posts
Tuesday, January 7, 2020
Monday, August 7, 2017
Attempting to Purge
My "studio" in my home is my son's former bedroom. (You can read about the renovation that turned it into an art studio HERE.) But it is also the only spare room in my crazy little house that has a place to put a bed for a guest. So the twin bed from his childhood bedroom has remained. But now.... he is engaged to be married to a wonderful woman, and I realize that the twin bed isn't enough if I want them to visit. So in a couple of days, the twin bed is going out, and a futon is coming in. While the 'footprint' of the futon isn't much bigger than the twin bed, it needs the space to open, so I've been working on rearranging the tiny art-making space that I have in there.
In the four years since I did the original renovation from bedroom into studio, a lot has changed. Somehow, the room has also become my sewing room, so along with art supplies, there's a sewing machine and various paraphernalia related to sewing. Plus, all the remnants from my 37 years of teaching are stored in the room. In addition, for two summers I've taken an immersive plein air painting class, cranking out 9 or 10 paintings in the one week class. A couple of the paintings from last summer have found new homes, but the rest of them, plus all of the paintings from this summer, are in the studio (and being oil paintings, they take FOREVER to dry), along with a box full of stretched canvases, and some incomplete canvases I've been painting in the interim. Plus I now have a rather large paper cutter that has to be moved every time I want to use the table! I keep accumulating stuff, and the room keeps getting more and more crowded and is less and less viable as a work space.
Today I started doing a little cleaning to make room for the futon. My first line of attack was boxes of examples of projects that I had saved from all my years in the classroom. I had already given away several papier-mache creations when I retired: a flying pig, an iguana, a fat cat, a goofy 4' tall totem pole, a large frog in a tuxedo jacket, a penguin, a dragonfly, a couple of goofy monsters/creatures, and more. I had also left behind, with my replacement, several teddy bear chairs, a couple of 36" god's eyes, and more, including mountains of 2-D samples on paper. Sigh...
Anyhow, here's a few things that I threw away today - a couple of papier-mache vessels:
Some air-dry clay big-mouth fish, painted with acrylics (I had already disposed of a many many other air-dry clay projects, including coil pots, pinch pots, animals, 3-D slab people, "posy pockets" made from slabs, cave paintings on clay slabs, and more. But somehow I had a hard time parting with these fishies):
And these Model Magic bugs, even though I made them in a workshop and never used Model Magic in the classroom and don't even like the stuff:
I also threw away a mountain of paper examples that filled a large trash bag. But the room.... it still is so crowded, so cluttered. What the heck do I do with it all, in a house with zero extra space??? I can't get rid of the oil paints, the acrylic paints, the craft paints, the fabric paints, the roll of canvas, the easels, the drawing pads, the brushes, the drawing tools, the papier-mache supplies, the binders of ideas, the flying pig, the papier-mache ice cream cones and sundaes, the sock monkey named after my grandmother, the papier-mache light bulb maracas, the 2 large Laurel Burch style papier-mache cats, the pile of carved sheet rock, the Barbie Doll dress-making supplies, the half-done sewing projects, Violetta the duct tape dressmaker's dummy, the Ugly Lamp project, the box full of colored glass fragments, the roofing felt relief mask, the carton of mailing tubes, the 10 lb. carton of polyester fiberfill, the dropcloths, the roll of bubble wrap, the random weird sculptural or collage materials.....
In the four years since I did the original renovation from bedroom into studio, a lot has changed. Somehow, the room has also become my sewing room, so along with art supplies, there's a sewing machine and various paraphernalia related to sewing. Plus, all the remnants from my 37 years of teaching are stored in the room. In addition, for two summers I've taken an immersive plein air painting class, cranking out 9 or 10 paintings in the one week class. A couple of the paintings from last summer have found new homes, but the rest of them, plus all of the paintings from this summer, are in the studio (and being oil paintings, they take FOREVER to dry), along with a box full of stretched canvases, and some incomplete canvases I've been painting in the interim. Plus I now have a rather large paper cutter that has to be moved every time I want to use the table! I keep accumulating stuff, and the room keeps getting more and more crowded and is less and less viable as a work space.
Today I started doing a little cleaning to make room for the futon. My first line of attack was boxes of examples of projects that I had saved from all my years in the classroom. I had already given away several papier-mache creations when I retired: a flying pig, an iguana, a fat cat, a goofy 4' tall totem pole, a large frog in a tuxedo jacket, a penguin, a dragonfly, a couple of goofy monsters/creatures, and more. I had also left behind, with my replacement, several teddy bear chairs, a couple of 36" god's eyes, and more, including mountains of 2-D samples on paper. Sigh...
Anyhow, here's a few things that I threw away today - a couple of papier-mache vessels:
Some air-dry clay big-mouth fish, painted with acrylics (I had already disposed of a many many other air-dry clay projects, including coil pots, pinch pots, animals, 3-D slab people, "posy pockets" made from slabs, cave paintings on clay slabs, and more. But somehow I had a hard time parting with these fishies):
And these Model Magic bugs, even though I made them in a workshop and never used Model Magic in the classroom and don't even like the stuff:
I also threw away a mountain of paper examples that filled a large trash bag. But the room.... it still is so crowded, so cluttered. What the heck do I do with it all, in a house with zero extra space??? I can't get rid of the oil paints, the acrylic paints, the craft paints, the fabric paints, the roll of canvas, the easels, the drawing pads, the brushes, the drawing tools, the papier-mache supplies, the binders of ideas, the flying pig, the papier-mache ice cream cones and sundaes, the sock monkey named after my grandmother, the papier-mache light bulb maracas, the 2 large Laurel Burch style papier-mache cats, the pile of carved sheet rock, the Barbie Doll dress-making supplies, the half-done sewing projects, Violetta the duct tape dressmaker's dummy, the Ugly Lamp project, the box full of colored glass fragments, the roofing felt relief mask, the carton of mailing tubes, the 10 lb. carton of polyester fiberfill, the dropcloths, the roll of bubble wrap, the random weird sculptural or collage materials.....
Labels:
air dry clay,
art studio,
cleanup,
papier-mâché
Friday, May 19, 2017
Birdhouse Assemblages
Do you have a local picture framer that you go to, when you want a piece of artwork framed? Your framer will almost always have scraps of mat board ready to be given away to art teachers. When they cut mats, they rarely are able to use the odd-sized leftovers. I recently learned that the framers also often discard their framing samples when an old sample is discontinued. I asked my framer, and she had a full carton ready to take to the dumpster! I asked for a few, and she told me if I wanted any of them, I had to take the entire box. So I did, and my DragonWing Arts students recently used both mat board samples and frame samples to create these adorable birdhouse assemblages!
We started by painting a background (we used dollar-store foam core), using small sponges to dab and spread tempera paint as desired.
Then we used a colorful air dry clay and some feathers to make these sweet birds. This is NOT Model Magic; I am not a fan. I purchased this clay online and it was much moister than Model Magic, really stuck together well, and didn't crack when dry. The brand: Sago Brothers Magic Clay. The kids absolutely were smitten with it.
My students then selected their mat board and frame samples, and began assembling their birdhouses. The mat board could be decorated with Colorsticks and/or Sharpie markers and metallic markers. Some kids chose to make two birdhouses, and others only wanted to make one.
Corks were used for perches for the birds, and black circles cut from construction paper became the entrances to the bird house. I hot glued the birds (when the clay was dry) onto the perches.
I felt that they still needed a little jazzing up, so I had planned for us to cut out leaves and flowers from felt and/or sheet foam, but with the class ending this week, I knew we wouldn't have time. So I stopped at the dollar store and bought a big pile of fake flowers, and cut them off their stems. Those were hot glued on the artwork as desired. Some kids also chose to add fluffy clouds. The girl who made the assemblage below is a bit of a minimalist. She did not want any more flowers beyond her three foam tulips! I love her bird house. It says "All Birds Welcome (at the) Birdy Nesters Hotel. Even toucans".
Oh my gosh, I have to admit I was smitten by the felt bee hive made for the assemblage below. (And the bluebird is adorable too!) The bees are just little knots of striped pipe cleaner pieces. So fabulous!
I love the rainbow birdhouse below. It's hard to tell, but the bird is a "French bird" wearing a beret. My young artists have great senses of humor!
Another minimalist. No flowers on the piece below! But I love that perfect robin, and the windows in the red birdhouse. The right-hand birdhouse is evidently a castle.
I've had a former student, now a 19 year-old attending the local community college, joining me as my "helper" this winter and spring. She loves working along with the kids, and made this delightful birdhouse with a little owl. She took some extra frame samples home with her, to invent some sort of crafty project over the summer.
And here's one last student assemblage. This was such a fun and easy project, and I would love to repeat it again some day! Meanwhile, I still have a carton full of frame samples, and welcome your ideas for other ways to use them. Maybe a big city, perhaps? Let me know if you have a suggestion!
We started by painting a background (we used dollar-store foam core), using small sponges to dab and spread tempera paint as desired.
Then we used a colorful air dry clay and some feathers to make these sweet birds. This is NOT Model Magic; I am not a fan. I purchased this clay online and it was much moister than Model Magic, really stuck together well, and didn't crack when dry. The brand: Sago Brothers Magic Clay. The kids absolutely were smitten with it.
My students then selected their mat board and frame samples, and began assembling their birdhouses. The mat board could be decorated with Colorsticks and/or Sharpie markers and metallic markers. Some kids chose to make two birdhouses, and others only wanted to make one.
Corks were used for perches for the birds, and black circles cut from construction paper became the entrances to the bird house. I hot glued the birds (when the clay was dry) onto the perches.
I felt that they still needed a little jazzing up, so I had planned for us to cut out leaves and flowers from felt and/or sheet foam, but with the class ending this week, I knew we wouldn't have time. So I stopped at the dollar store and bought a big pile of fake flowers, and cut them off their stems. Those were hot glued on the artwork as desired. Some kids also chose to add fluffy clouds. The girl who made the assemblage below is a bit of a minimalist. She did not want any more flowers beyond her three foam tulips! I love her bird house. It says "All Birds Welcome (at the) Birdy Nesters Hotel. Even toucans".
I love the rainbow birdhouse below. It's hard to tell, but the bird is a "French bird" wearing a beret. My young artists have great senses of humor!
Another minimalist. No flowers on the piece below! But I love that perfect robin, and the windows in the red birdhouse. The right-hand birdhouse is evidently a castle.
I've had a former student, now a 19 year-old attending the local community college, joining me as my "helper" this winter and spring. She loves working along with the kids, and made this delightful birdhouse with a little owl. She took some extra frame samples home with her, to invent some sort of crafty project over the summer.
And here's one last student assemblage. This was such a fun and easy project, and I would love to repeat it again some day! Meanwhile, I still have a carton full of frame samples, and welcome your ideas for other ways to use them. Maybe a big city, perhaps? Let me know if you have a suggestion!
Saturday, June 11, 2016
No kiln? No problem! It's air dry clay day!
Home to me was Saratoga Springs, where Skidmore college is located. They had a very respected ceramic artist teaching the class, and I was out of my element. I was used to a state university budget and life and suddenly I was at an exclusive private school. I went to work as a waitress in the evenings, and in class was surrounded by spoiled rich kids who ignored this little hippy-dippy 'townie'. I never fell in love with clay. However, I did enjoy the potter's wheel, (though I couldn't raise a decent pot any higher than my hooked-together thumbs). I have a memory of my waist-length pony tail spinning around the wheel in the clay, and of my mother's horrified look and her demands for me to remove my shoes immediately and get in the shower when I walked in the door after class. (Below, pinch pot turtle pot in air dry Mexican Pottery clay.)
Nevertheless, when I began teaching elementary art, I felt it was important for kids to have at least one clay experience every year. My classroom did not have a kiln, so I learned to use air-dry clay successfully by trial and error, and in this post I want to share what worked, in case you are also in a kiln-less art room. I located all the pieces pictured here a couple of weeks ago, when I was subbing in my former classroom. They are all samples made by me, using air dry clay.
First, the clay. I am NOT a fan of creepy Model Magic, though I know some of you love it, and use it in interesting ways. For me, it does not mimic the texture and feel of clay, and lacks the solidity of a genuine clay piece. I have experimented with several types of air dry clay, and pretty much settled in with Amaco's Marblex (a very paintable pale gray color) and Mexican Pottery Clay (a nice red-brown color). The photos in this post are of clay pieces made with these two air dry clays. I tried less expensive "store brands" and found they did not hold together well at all. I tried more expensive brands and liked them, but they weren't affordable for what I wanted to do. I'm struggling to recall the name of one excellent quality clay that dried rock hard and bright white. Very durable, in comparison, but also very pricey.... Also, several years ago I received a sample of some dark reddish brown air dry clay with a lot of grog in it, that dried rock hard, and after sampling it, I really loved the texture and consistency and quality. But I was never able to find it in a catalog, so I've long forgotten the brand name. (Below, pinch and pull gator, Marblex; and unpainted dragon, unknown brand hard white air dry clay)
Air dry clay is always going to be more breakable than kiln-fired clay. The best way to use air dry clay with minimal breakage is by having no thin appendages, and by making pieces in just one session. You can use slab construction, coil construction, and of course pinch pots, as well as pieces made by pinching and pushing, such as the gator, above. And you can mix the clay with water to make slip. So basically, it still can very much mimic the sensation of working with 'real' clay.
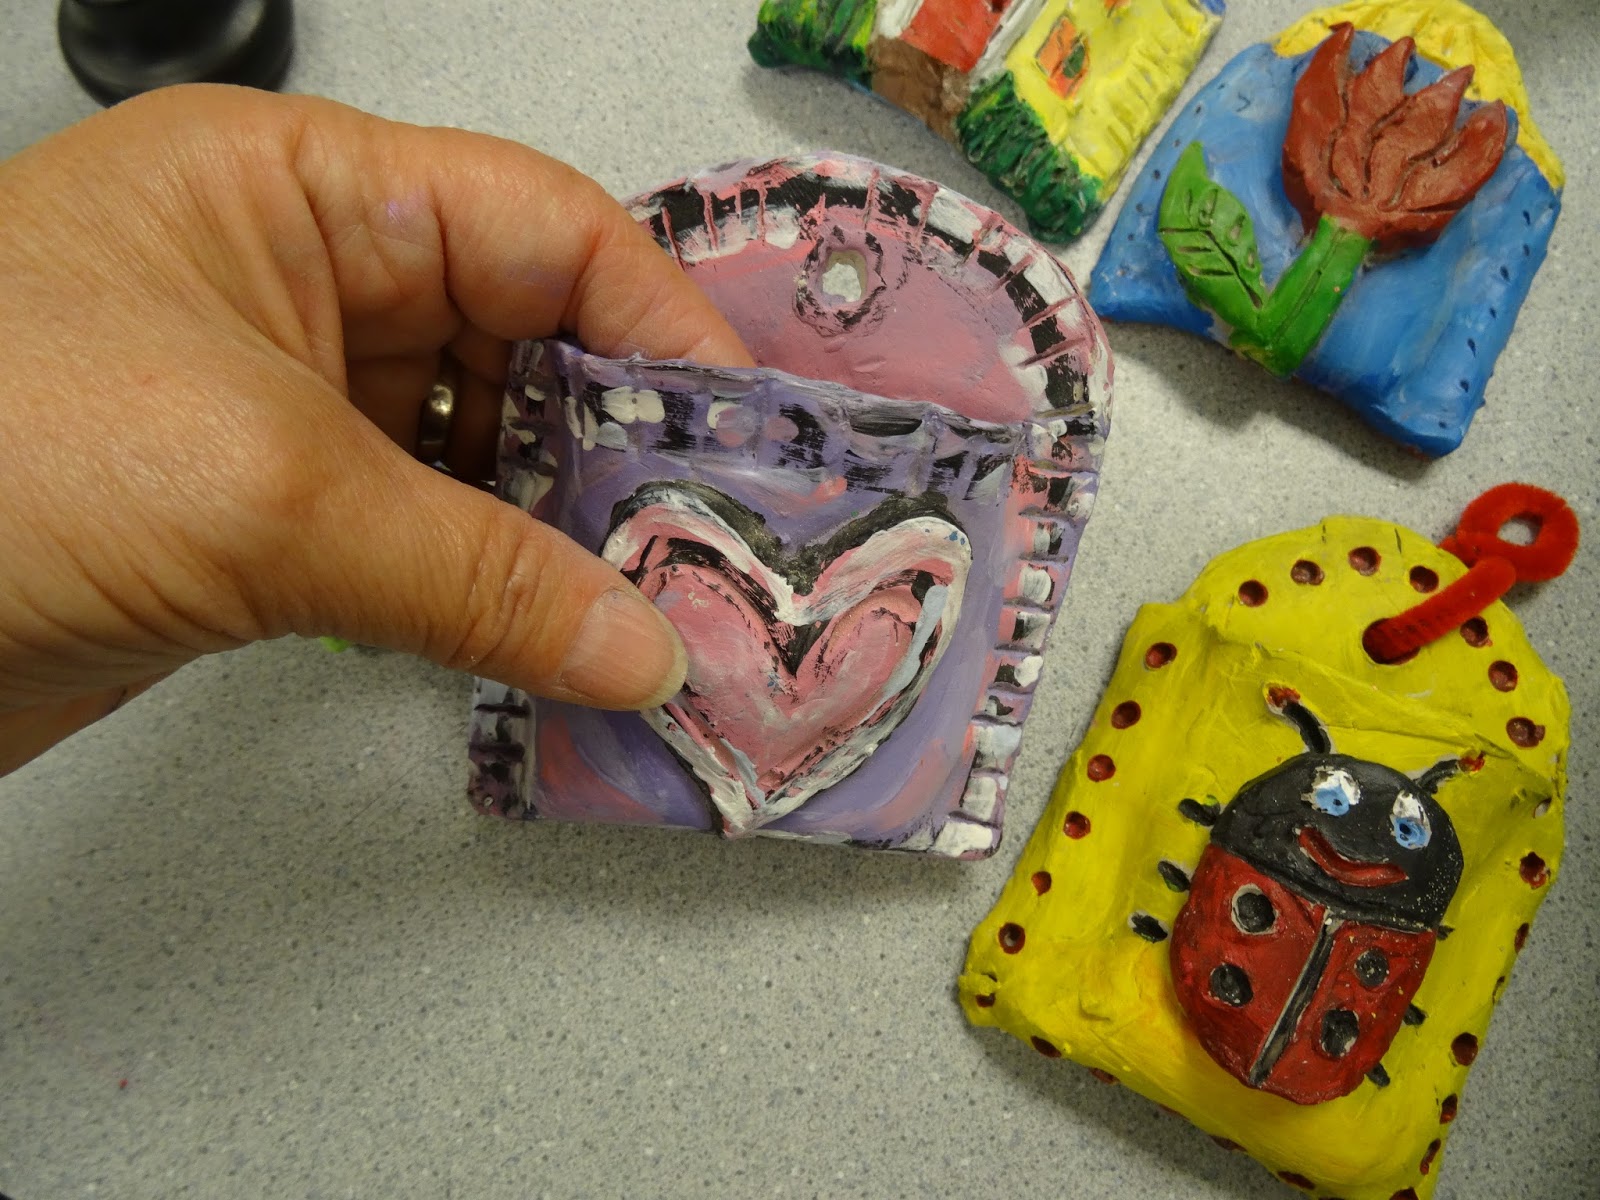
In order to get a clay project complete in one art class, a good idea is to use the prior art class for "clay play", to familiarize the students with the materials and the techniques, and also to demonstrate what they will be doing in their next art class. That way, in the next class, all you need is a quick review and away you go! I always had blocks of clay measured out and ready for the kids, so they could get right to work. The "posy pockets" pictured below are an example of an air dry project that was successful. I often did this with my 2nd graders.
To make these, students rolled out a rectangular slab, trimming off any excess. They scored close to the long edges, put slip on the scored edges, and then folded the pocket, leaving about a third or quarter of the rectangle above the fold, and keeping a couple of fingers inside when they folded. Then, the top was trimmed to an arc or peaked shape, and any remaining clay after trimming was used to make embellishments, which were attached by scoring and putting on slip. I had the kids put two fingers in the pocket and gently wiggle the decoration into place, as though they were playing with a peanut butter and jelly sandwich and wanted to get the jelly to squirt out the sides. This way, the embellishment would stick better. We also used tools to add texture, and cut a hole in the top for hanging over a nail.
The posy pockets (and pretty much all air dry clay projects) were painted with acrylic paints; I used Nasco's Bulk-krylic. The kids were cautioned NOT to use air dry clay for food or liquids; it is not permant. So we made tiny tissue paper bouquets of posies, with pipe cleaner stems, to put in the pockets.
The fish above are a slab project similar to the posy pockets but requiring a bit more sophistication. Instead of putting our fingers inside, we stuffed the mouths with paper towels. Again, excess clay was used for embellishment.
The fish below were a ridiculously easy slab project. Again, a slab was rolled out. I demonstrated how to cut the slab to make tail and fins and mouth, and again extra clay could be used for embellishment. The fish body was curved to stand up.
We made clay people using a similar process, starting with a rectangle, cutting away squares from the both sides of the top to leave a head, and vertical rectangles from both sides of the bottom. Then slits were made straight up from the corner of where the rectangle was cut, to create arms, and a slit was cut in the bottom to create legs. The bodies could then be molded and posed by bending and pinching the clay. We used this process because air-dry clay is much more breakable, and if slip and score techniques are not used well, add-ons will fall off. So working with a one piece pull and pinch construction with younger kids was very successful.
We made a lot of crawly critters this way - lizards and dragons and alligators and turtles and such, as well as animals lying down, like cats and dogs. This way, we avoided the narrow appendages snapping off. Still, sometimes they will break. Glue generally does NOT hold air dry clay. The best solution I have every found is using the acrylic paint to repair breakage. So, when the tail of the critter below broke off, I fixed it by filling the gap with green acrylic paint. In worst case scenarios, we'd joke about the art room being a hospital for injured animals, and "Dr. Brown" (me) would fix them, and add a little band-aid for extra security!
My fourth graders usually made coil pots, using the Mexican Pottery Clay. Their work was much larger than my quickie samples below. We used scoring and slip and the peanut butter and jelly wiggle again! Snails could be made and worked into the pot as desired, by placing a coil up and over them to secure them. I had the kids frequently hold them up to the light to check for gaps, and then wiggle the gaps closed. I gave each child a hunk of clay to start, they rolled the base, and then started adding coils. If they ran out of clay, they could come for another hunk until we ran out of time. Some students made small pieces with fine coils, others made big wide or tall pots. My samples are small because all I did was a quick demo of coil technique.
Again, we painted with acrylic, and used it to fill any gaps. Acrylic paint makes the piece stronger. By the way, the kids could choose to leave the clay color exposed, but then would use an acrylic gloss such as Mod Podge to paint over it. For tall narrow pots, we poured in the gloss or paint, tilted it around to cover the inside, and then drained out the excess paint.
And of course, we made pinch pots. (But no, I never made a single pinch pot owl. Sorry...) These "pinch pot clusters" pictured below were a favorite of my first graders, to take home and store their tiny treasures. They made three little pinch pots, scored and used slip to hook them together, and smoothed over the joints.
And we sometimes made cave paintings on random shaped clay slabs.
Finally, a quickie easy project, that was always a lot of fun. Sneaker imprint jewelry! The kids loved pushing clay gently into the bottom of a neighbor's shoe, and then cutting them in interesting shapes. After these were dry and painted, we strung them with yarn and beads and more. Late edits to this post - four points to make:
First - There is NO REASON to wedge air dry clay, since you won't be firing it and don't have to worry about it bursting. Actually, it is counterproductive, as it dries it out.
And second, try to finish everything in ONE SESSION. Keeping air dry clay properly moist and to a workable consistency once it's been out in the air is very difficult. Just get it done, and move on... You'll have trouble trying to continue working successfully on an air-dry piece after one sitting.
And the tools - you can use inexpensive plastic modeling tools, for scoring and texturing, as well as little pointed wooden sticks, and also, of course, slip made from the clay.
And finally, getting them home safely - I would ask students to bring in cube-style tissue boxes, which were great for bringing home coil pots, for example. We padded them in newspaper or other stuffing material before gently putting in the box for safe travels. I always warned kids against putting clay projects in the bottom of their backpacks, where they'd throw lunchboxes and sneakers on top. For the little pinch pots and other small delicate pieces, if I had nothing to pack them in safely, I told the kids to carry them in their hands like they were baby birds, who hadn't yet leaned to fly. If they fell out of the 'nest', they probably would be injured. I loved seeing them walk to the school buses, cradling their 'baby birds' in their hands!
Subscribe to:
Posts (Atom)