Showing posts with label sculpture. Show all posts

Friday, June 8, 2018

Three projects, all complete!

This spring, my DragonWing Arts students completed three projects in a 7-week after-school session.  There were toothpaste batik pillows and puzzle paintings (one of each, pictured above), and stocking sculptures, which you'll see later in this post! 

 I've done toothpaste batik with my students many times before, but this time I think we lost a little more color than usual on the final products.  But still, the kids were happy with them. I gave them lots of ideas, encouraging them to add borders, to use full-strength vibrant colors, and suggesting abstract designs.  But they had their own minds and because this isn't 'school', I feel like I have to let them do what will ultimately be what they want.  If you want to know more about the toothpaste batik process, and see some other student toothpaste batik projects, you can find posts HERE, HERE, HERE, and HERE. (And HERE, for my toothpaste batik shirt!)  Above are pictured the painted fabric, mostly complete, before washing out the resist.  Below, finished pillows.  Due to time considerations, I sewed the pillows on my machine, and the kids stuffed them and sewed up the openings. 
 
Here's my painted sample, ready to wash.  Sorry no pic of the finished product.

For the puzzle paintings, I was given a bunch of wooden frames, each inset with 9 wooden squares.  I made an example that was a design where the pieces were interchangeable and matched up no matter what.  I thought they'd want to do that, too.  Both of the boys in the class did.  But three of the four girls had different ideas, and again, I let them roll with it! 
 We started by priming all the parts with gesso.  Here's a picture to help you understand what it looked like prior to painting.
 Here's 4 of the finished products.  There's one more in the pic at the top of the post, and I'm missing a pic of the 6th project.  I still have LOTS more of these boards and I'm going to experiment with other ideas for how to use them.

 Many of you have made the stocking sculptures, so I'll give just a very brief explanation.  You can read more about this project in a prior blog post, HERE.
The sculpture structure is a nylon sock, which has been pulled over bent and twisted pieces of wire that are inserted at both ends into a wood block.  We primed them all with gesso before painting. White house paint works well, too.  Basically, the paint stiffens up the nylon sock, making them easy to paint (we use acrylics).
 Here's some of the finished products.  I'm again missing a pic of one of them. I had several finished samples to show the kids, but I let them choose how they wanted to paint theirs. I painted a demo piece with organic faces that fit onto each side.  Sorry, no pic of it!

 One more toothpaste batik pillow before I end this post. 
OOPS the pic is upside down...

DragonWing Arts is now on summer break, but the blog is not.  Still more art stuff to share, including my own artwork!  But when I'm not blogging, I can be found paddling in my kayak with my camera in my lap, or sitting on the dock with a good book, or with my easel set up outdoors for some painting!

Sunday, November 26, 2017

Sculpture from scrap cardboard!

Just before Thanksgiving, I returned from my NY state art teachers annual convention, a whirlwind weekend of learning, creating, presenting, engaging, and more.  While there, I presented two workshops; I'm going to tell you about one of them in this post, and I'll tell you more about the convention and the other workshop in another post.  The workshop I'm telling you about today was called From Scraps to 3-D Success, and I co-presented with a friend (pictured below). 
We each presented one project made mostly with recycled materials; my project was an abstract sculpture made entirely from cardboard and Elmer's Glue-All.  The photo at the top of this post, and the one directly below, are examples of these cardboard sculptures, made by participants during the workshop.
We began with 4"x 6" rectangles of cardboard, cut from shipping cartons. 
 I also provided a big bagful of random shapes of cardboard cut from shipping cartons.  All cutting was done on an old paper cutter to get straight edges. It works great, and is fast and easy to cut a lot.
 Participants were each given a Popsicle stick, to be used as a 'glue paintbrush', and little cups of Elmer's Glue-All to share with a neighbor.  However, when I do this project with students, I do NOT put the glue into cups; the students actually pour a little puddle of glue directly from the bottle onto their cardboard base, near to the corner.  This prevents them from using too much glue.  Using too much glue does not make the structures hold together better!  In fact, too much glue means it takes longer to set and therefore the sculptures are more difficult to construct.
The small cardboard pieces have at least one cut edge that has zigzaggy corrugation, and another edge where the cardboard is more like two parallel lines.  The zigzag edges will hold much better and I recommend using those edges for gluing/attaching when possible.  We scoop up a little glue with our pop sticks, paint it on the edge we plan to glue, and hold it in place where desired, counting AT LEAST to 10.  For more challenging structures, count higher.  While the glue does not dry totally in 10 seconds, this allows it to set enough for you to let go.  Usually I would have students glue a base structure in one class, and then add to the construction in their subsequent class. In this workshop, I had participants set their sculptures aside to work to the project offered by my co-presenter, and then come back to the cardboard sculpture to add more pieces. 
 Hold and count to 10!!
 It's possible to hold some crazily balanced pieces if you are patient!
 Note: the glue MUST be Elmer's Glue-All, which is very strong.  If you use Elmer's School Glue, the sculptures will collapse.  Don't bother to try; it will be a waste of time and your students will get frustrated when their work begins collapsing.
Some workshop participants had time to paint their little sculptures. One workshop participant said she was going to have her students paint large pieces of the cardboard in a 'painted paper' type of activity, BEFORE she cuts the cardboard for this project.  It could work great, if the cardboard doesn't warp too much.  I look forward to seeing her results.  Below, a participant painted hers a solid color.  Behind it is a piece of painted wood for the project that was presented by my co-presenter. 
And one gentleman got really inventive, cutting the shapes into curves, while leaving straight sides for gluing.  Ironically, this same guy attended a papier-mache workshop I taught years ago, and totally went in his own direction then, too!  I even mentioned him in a blog post about the workshop, HERE.
I've done this project many times over the years with my first graders.  We discuss what a sculpture is, and what it means to be abstract or non-objective.  Sometimes their sculptures turn out to look like castles or robots or airplanes etc and that is fine too!  We discuss that a person who makes a sculpture is a sculptor, and that they are all sculptors while doing this project! We look at photos of work by various artists, in particular Calder, but there are many others that can directly relate to this project, depending especially on how you intend to paint the finished products.

In the blog posts from 2011 and 2012 that you'll find HERE and HERE, you can see some examples of my first graders' cardboard sculptural creations using this process.  Here's a first grader working on his sculpture, paying attention to balance, and another first grade piece.
If you're looking for an easy, low-cost project that will work at almost any grade level, give this one a try!  Sculpture with kids is really fun! 

Saturday, February 20, 2016

3 NYC Museums in 3 Days - Day 3, MAD

No, I'm not MAD.  MAD stands for the Museum of Art and Design, in Manhattan.  It's a lovely small museum, and I've been there before, several years ago, for a premiere of the film Hand Made Nation, about the indie-alternative resurgence of DIY crafters in the country.  My talented and beautiful niece, Faythe Levine, co-directed the film and authored the companion book, as well as the book and movie Sign Painters, which I previously recommend HERE on the blog.  But... I digress.
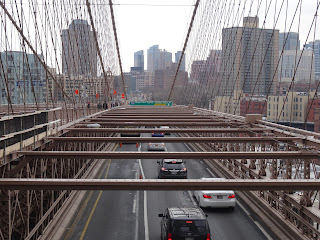
We had walked across the Brooklyn Bridge, one of my long-time goals,but by the time we got to the other side it had gotten very blustery cold outside and our plans to do further exploring in the neighborhood of the bridge were shelved.  But we had a few hours of the afternoon left, and decided that hopping on a subway to get us out of lower Manhattan, and exploring a small museum to get us out of the cold, would be our best option.  We chose MAD, and it was an excellent choice within our parameters.  (I should add, I took a LOT of pictures of the bridge, which I'll mostly save for some other time when I'm not sharing about a museum visit! In the meantime, here's a sampling.   You can see by our clothing and the sky that it was NOT the best of weather.)
 Left, look what we saw with the zoom lens, happening below!  Right, the iconic lines of the Brooklyn Bridge, that you can see in many well-known paintings. 
 Anyhow...
When we got to MAD, we learned that due to changing exhibits, one floor was closed, so admission price was reduced.  As it was, we barely got to see everything there because my husband suddenly felt ill and needed to get out in the air.  (Don't worry, he was fine by dinnertime!) The up-side of leaving when we did was that I didn't get to visit the gift shop, so I think I may have saved a lot of money.  Anyhow, it had warmed up again outside, and he wanted fresh air, so we walked the 25 or so blocks back to our hotel room.  Walking in NYC is one of my favorite things!  Here's what we saw at MAD:
 This is just a small sampling of the amazing sculptural furniture pieces by Wendell Castle.  Above, is a chair!  He used a process of stack lamination, and then began integrating digital technology into the stack lamination process, using 3-D scanning and more.  I'm not sure I understand it all, but the work is gorgeous and I've used a pic of me standing by one of the lamps, at the top of the post, to show you the massive scale of these pieces.
 Below, a chair and cabinet together.  I think I was particularly intrigued by Castle's life story and work because of the life story and how it reminded me of the work of a sculptor and furniture carver of another generation: my own grandfather, Harry Levine, who I've mentioned previously on the blog (you can use my labels or search bar to find these posts).  Grandpa Harry was a Russian-born Jewish furniture carver/sculptor, trained originally in Vilna (now Lithuania), who came to the country in his late teens.  I never met him, but I'm proud to have had a grandfather/artist with two sculptures on permanent display in the Brooklyn  Museum!  But I digress... Here's the chair/cabinet combo I mentioned before:
 And a chair/table combo, below, and a beautiful serpentine lamp.
And there was an interesting video to go along with the exhibit.  Here's a screen image of the artist.  Cool dude!
 The top floor of MAD is artist's studios that you can visit.  This AMAZING work is an installation of 2000 hand-hewn sugar cups by Margaret Braun.  She unfortunately was not in her studio the day we were there.  The yellow cast is due to bad color balance in the photos, that I'm having trouble completing eliminating.  The cups were pure white.
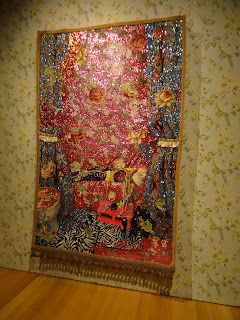
 One the one other open floor, was a fascinating exhibit by Jamaican artist Ebony G Patterson, called Dead Treez.  I had to race through this gallery, because that's when hubby started to feel ill, so my pictures are limited and poor.  There were mixed media installations, and jacquard woven photo tapestries.  The literature and a video that was playing talked about her exploration of class, gender, and race. 
 In the nooks and crannies of this gorgeous installation, there were little bugs and lizards and things, and all sorts of trinkets and jewelry.  I would love to have more time to explore in this display.
 And... I'll close with a few pics from the walk back to the hotel.